2 of 4
ASSEMBLY
Carefully remove the contents from the carton and keep the carton for future storage. Be sure to untangle any wires
that may be tangled with other items. (Please DO NOT forcibly remove any contents.)
Step 1:
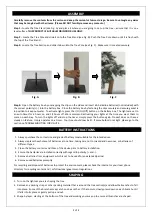
Locate the Tree Stand (see Fig. A) and place it where you are going to set up the tree
–
ensure that it is on a
level surface.
THIS PRODUCT IS SUITABLE FOR INDOOR USE ONLY.
Step 2:
Locate the Tree Pole and slide it onto the Tree Stand (see Fig. B). Push the Tree Pole down until it is flush with
the top of the Tree Stand.
Step 3:
Locate the Tree Section and slide it down into the Tree Pole (see Fig. C). Make sure it is seated securely.
Step 4:
Open the battery box by unsnapping the clips on the sides and insert 6 AA alkaline batteries (not included) with
the correct polarity (+/-) into the battery box. Close the battery box by fastening the clips securely and ensure gasket is
in position to keep out water. To activate lights, press the I/O (On/Off) button on the battery box. The lights are set to
an auto timer for 6 hours on and 18 hours off. We recommend activating your lights at the time you want them to
come on each day. To turn the lights off and stop the timer, simply press the button again. Product does not have a
steady on feature. It only operates on a timer. Your tree should now be lit. If some bulbs do not light, please go to the
section on TROUBLESHOOTING FOR LIGHTS.
BATTERY INSTRUCTIONS
1.
Always purchase the correct size and grade of battery most suitable for the intended use.
2.
Always replace the whole set of batteries at one time, taking care not to mix old and new ones, or batteries of
different types.
3.
Clean the battery contacts and those of the device prior to battery installation.
4.
Ensure the batteries are installed correctly with regard to polarity (+ and -).
5.
Remove batteries from equipment which is not to be used for an extended period.
6.
Remove used batteries promptly.
For recycling and disposal of batteries to protect the environment, please check the internet or your local phone
directory for recycling centers and / or follow local government regulations.
SHAPING
1.
Turn on the lights as you are shaping the tree.
2.
Remove any packing strap or other packing material that is around the tree section(s) and allow the branches to fall
into place. Some of the branches may catch on one another. If that occurs, slowly press down on each branch until
it falls into its place or gently pull up and out.
3.
Shape by layer, starting at the bottom of the tree and working your way up to ensure all branches are shaped.
Fig. A
Fig. B
Fig. C


