A
OPERATING INSTRUCTIONS
15
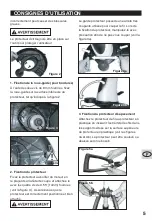
retaining bolt through both the handle and the
support on the trimmer shaft. Then, thread
the bolt into the retaining nut located in the
auxiliary handle (see Fig 5a-5b).
PREPARING TRIMMER FOR USE
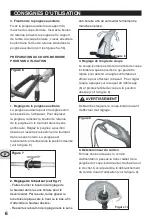
Fig 6
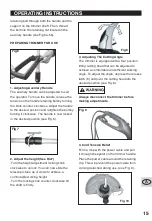
1. Adjusting Auxiliary Handle
The auxiliary handle can be adjusted to suit
the operator. To move the handle, release the
tension on the handle retaining bolt by turning
the knob counter-clockwise. Adjust the handle
to the desired position and retighten the bolt by
turning it clockwise. The handle is now locked
in the desired position (see Fig. 6).
Fig 7
2. Adjust the height (See Dia7)
-Turn the height adjustment locking knob
clockwise to unlock. You can now slide the
telescopic tube up or down to achieve a
comfortable working height.
-Turn the locking knob counter-clockwise till
the shaft is firmly .
Fig 8
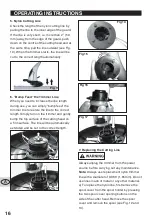
3. Adjusting The Cutting Angle
The trimmer is equipped with a four position
tilting cutting head that can be adjusted to
achieve a comfortable and efficient working
angle. To adjust the angle, depress the release
latch (6) and pivot the cutting head into the
desired position (see Fig. 8).
Always disconnect the trimmer before
making adjustments.
Fig 9
4. Cord Tension Relief
Form a loop with the power cable and pull
it through the eyelet on the trimmer handle.
Place the power cable around the retaining
clip. This will prevent the power cable from
coming detached during use. (see Fig. 9).
Fig 10
Содержание GGT520U.1
Страница 20: ...F CONSIGNES D UTILISATION 20 10 ...


