Hatco FLAV-R-SAVOR FSCD Series Скачать руководство пользователя страница 12

Form No. FSCDm-1016

12

English

MAINTENANCE

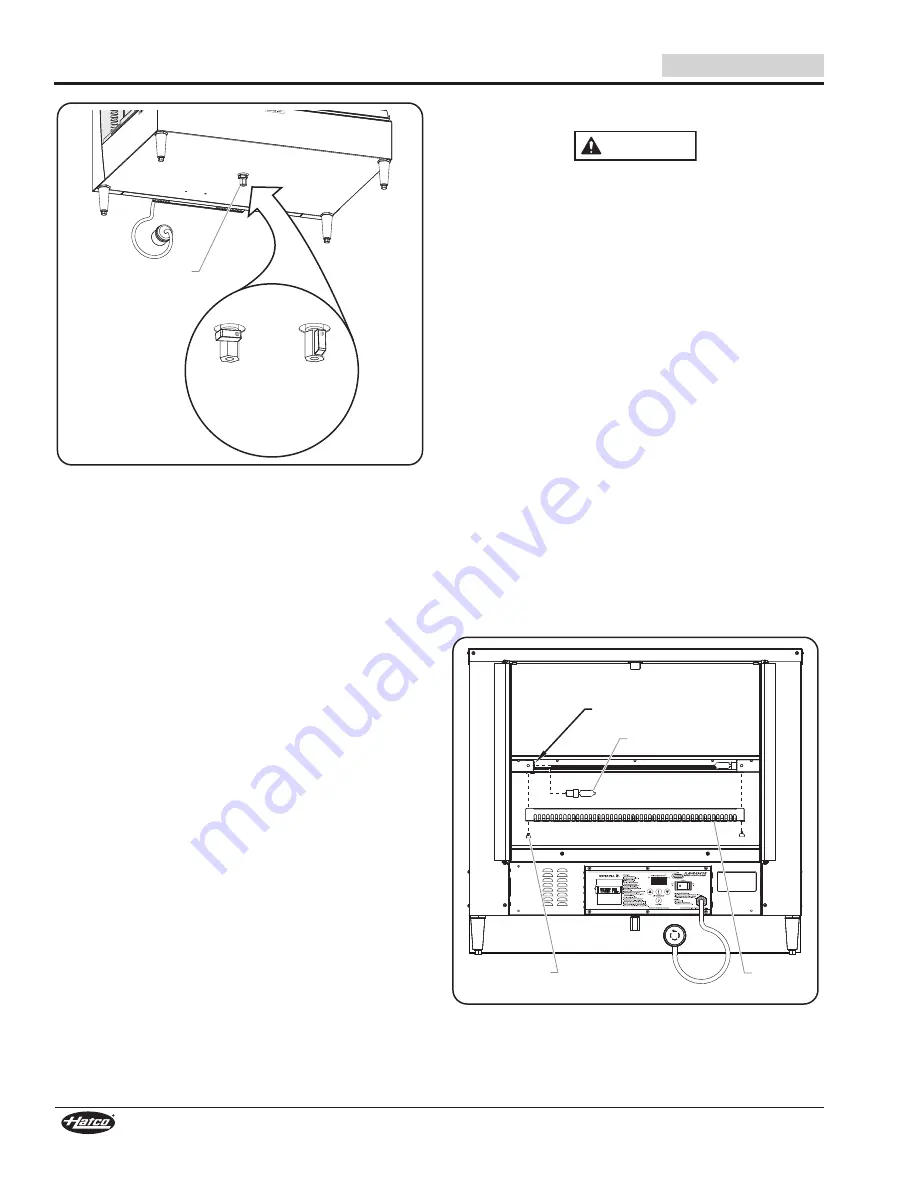
Draining the Water Reservoir (shown without leg skirt)

Removing Lime and Mineral Deposits

Use the following procedure for periodic cleaning and deliming

of the water reservoir on humidified models.

NOTE: The lime and mineral content of the water used for daily

operation  will  determine  how  often  the  deliming

procedure must be performed.

NOTE: Perform this procedure when the unit will not be used

for a period of time, such as the end of the day.

1. move the PoWER oN/oFF (I/o) switch to the oFF (o)

position and unplug the power cord. allow the unit to cool.

2. after the unit has cooled down, perform the “Draining the

Water Reservoir” procedure in this section.

3. Fill the water reservoir with a mixture of 75% water and 25%

white vinegar. Do not use flavored vinegar.

4. Plug in and turn on the unit.
5. Set  both  the  air  temperature  and  humidity  level  to  their

highest settings and allow the unit to run for 30 minutes.

6. move the PoWER oN/oFF (I/o) switch to the oFF (o)

position and unplug the power cord. allow the unit to cool.

7. Perform the “Draining the Water Reservoir” procedure to

empty the deliming solution from the water reservoir.

8. Continue to fill and drain the water reservoir with clean water

until the deliming solution is rinsed through and the reservoir

is clean.

9. Plug the unit into its power source and fill the reservoir as

usual  for  daily  operation  using  the  procedure  in  the

oPERaTIoN section of this manual. 

Drain Valve

Valve handle

in closed

position. 

Valve handle

in open

position. 

Replacing Xenon Display Lights

The light fixtures in this unit have safety shields covering

the  light  bulbs  to  meet  National  Sanitation  Foundation

(NSF)  standards.  To  avoid  personal  injury  and/or  food

contamination,  always  operate  the  unit  with  the  safety

shields properly installed.

Units  are  equipped  with  four  Xenon  display  light  bulbs  that

illuminate the cabinet (two above each shelf). These bulbs have

a  bulb  guard/safety  shield  to  guard  against  injury  and  food

contamination  in  the  event  of  breakage.  When  replacing  a

Xenon bulb, use Hatco P/N R02.30.168.00 and the following

procedure.

  1. move the PoWER oN/oFF (I/o) switch to the oFF (o)

position and unplug the power cord. allow the unit to cool.

  2. Remove the two thumbscrews that secure the bulb guard

to the bulb housing assembly.

  3. Remove the old Xenon bulb from the light socket.
       a. Rotate the bulb in the socket until the tab on bulb is clear

of the locking channel on the socket.

       b. Pull the bulb out of the socket.
  4. Install a new Xenon bulb into the light socket. 
       a. Push the bulb into the socket until the tab on the bulb

aligns with the locking channel on the socket.

       b. Turn the bulb so that the tab on the bulb locks into the

locking channel on the socket.

  5. Position the bulb guard on the bulb housing assembly, and

secure using the two thumbscrews.

Replacing Xenon Display Lights (rear view of unit)

WARNING

Thumbscrew

Xenon Bulb

Light Socket

Bulb

Guard

Содержание FLAV-R-SAVOR FSCD Series

Страница 1: ...s que haya le do y comprendido el contenido de este manual Cualquier falla en el seguimiento de las instrucciones contenidas en este manual puede resultar en un serio lesi n o muerte Este manual conti...

Страница 2: ...e at www hatcocorp com 24 Hour 7 Day Parts and Service Assistance available in the United States and Canada by calling 800 558 0607 INTRODUCTION Hatco Flav R Savor Convected Display Cabinets are desig...

Страница 3: ...ectrical receptacle of the correct voltage size and plug configuration If plug and receptacle do not match contact a qualified electrician to determine and install proper voltage and size electrical r...

Страница 4: ...ning clips They come standard with a black powdercoated finish and are available in several other Designer colors all models feature a digital temperature controller a lighted PoWER oN oFF I o switch...

Страница 5: ...are supplied from the factory with an electrical cord and plug installed plugs are supplied according to the application ELECTRIC SHOCK HAzARD plug unit into a properly grounded electrical receptacle...

Страница 6: ...ge complete online warranty registration See the ImPoRTaNT oWNER INFoRmaTIoN section for details 4 Place the unit in the desired location Locate the unit in an area where the ambient air temperature i...

Страница 7: ...Installation 7 Reinstall the stone base shelf a Remove all tape and protective packaging from the shelf b align the two holes on the back edge of the shelf with the locating pegs on the base c Careful...

Страница 8: ...nel toward the unit until it rests against the upper frame and the glass side panels c Tighten the thumbscrews holding the curved glass retaining clips on each side of the panel Front Sign Holder Hing...

Страница 9: ...ts NOTE Unit failure caused by deionized water is not covered by warranty 4 For humidified units fill the water reservoir with clean water To fill the reservoir a Lift up the WaTER FILL cup cover and...

Страница 10: ...aBINET TEmPERaTURE display shows the lowest temperature point inside the cabinet not the product temperature Setting the Humidity Level Use the following procedure to set the humidity level on humidif...

Страница 11: ...o the Cleaning the Stone Surface information in this section NOTE To correct inconsistent staining and discoloration refer to the Cleaning the Stone Surface information in this section e Wipe dry with...

Страница 12: ...usual for daily operation using the procedure in the oPERaTIoN section of this manual Drain Valve Valve handle in closed position Valve handle in open position Replacing Xenon Display Lights The ligh...

Страница 13: ...eating elements or heating elements defective Contact authorized Service agent or Hatco for assistance Unit is heating but is not producing humidity inside cabinet Lo H20 flashes on display and unit i...

Страница 14: ...ated top shelf pan Risers Pan risers are available to prolong the holding time of moist products Pan Riser Drain Valve Relocation Drain valve relocation is available for humidified units as a factory...

Страница 15: ...PURPoSE oR PaTENT oR oTHER INTELLECTUaL PRoPERTY RIGHT INFRINGEmENT Without limiting the generality of the foregoing SUCH WaRRaNTIES Do NoT CoVER Coated incandescent light bulbs fluorescent lights he...

Страница 16: ...rechange disponible 7j 7 24h 24 aux tats Unis et au Canada en composant le 800 558 0607 INTRODUCTION Les vitrines convection Flav R Savor de Hatco sont con ues pour conserver des plats pr par s penda...

Страница 17: ...ANGER DE D CHARGE LECTRIQUE Brancher l appareil sur une prise de courant avec terre de tension de format et de configuration des broches corrects Si la fiche et la prise ne se correspondent pas s adre...

Страница 18: ...taille et un de petite taille 1 3 NOTE Les surfaces en pierre sont en pierre artificielle Les appareils qui peuvent tre configur s avec ou sans syst me d humidification sont pourvus d un cordon d alim...

Страница 19: ...sont fournies en fonction de l application DANGER DE D CHARGE LECTRIQUE Brancher l appareil sur une prise de courant avec terre de tension de format et de configuration des broches corrects Si la fic...

Страница 20: ...pareil l endroit d sir Placez l appareil un endroit o la temp rature ambiante est constante et de 21 C 70 F minimum vitez les endroits susceptibles d activer les mouvements ou les courants d air comme...

Страница 21: ...Support d enseigne non montr pour plus de lisibilit Installation des pieds 7 Replacez l tag re inf rieure en pierre a Retirez le ruban et l emballage de protection de l tag re b alignez les deux orif...

Страница 22: ...il repose contre la partie sup rieure du cadre et les panneaux lat raux en verre c Serrez les vis de fixation des fermoirs de chaque c t du panneau en verre Support d enseigne frontal Vis de charni r...

Страница 23: ...vertes par la garantie 4 Dans les appareils avec syst me d humidification remplir le r servoir avec de l eau propre Pour remplir le r servoir a Soulever le couvercle du godet de remplissage d eau et l...

Страница 24: ...mp rature affiche la temp rature la plus basse l int rieur de l armoire et non la temp rature du produit R glage du taux d humidit Suivre la proc dure suivante pour r gler le niveau d humidit sur les...

Страница 25: ...re humide non abrasif d Nettoyer et d sinfecter les surfaces en pierre en utilisant un tissu propre et humide et un d sinfectant agr pour les surfaces en contact avec des aliments Si un nettoyage plus...

Страница 26: ...mentation et remplir le r servoir comme d habitude pour une utilisation quotidienne en suivant la proc dure de la section moDE D EmPLoI dans ce manuel Robinet de vidange Poign e du robinet en position...

Страница 27: ...votre agent de maintenance agr ou Hatco pour assistance L appareil chauffe mais ne produit pas d humidit dans la vitrine Lo H20 clignote et l appareil est rempli d eau Si vous utilisez de l eau disti...

Страница 28: ...eurs sont disponibles pour prolonger la dur e de conservation des produits humides Rehausseur Rallonge du robinet de vidange Une rallonge du robinet de vidange peut tre install e en usine en option po...

Страница 29: ...TRES aTTEINTES aUX DRoITS DE La PRoPRI T INTELLECTUELLE Sans restreindre la port e g n rale des nonc s pr c dents CES GaRaNTIES NE CoUVRENT PaS ampoules d clairage incandescence enduites lumi res fluo...

Страница 30: ...Form No FSCDm 1016 30 NOTES English...

Страница 31: ...Form No FSCDm 1016 31 NOTES English...

Страница 32: ...rvice Co maspeth 718 386 2515 appliance Installation Buffalo 716 884 7425 Duffy s Equipment Services Inc Buffalo 800 836 1014 3Wire Northern Plattsburgh 800 634 5005 Duffy s Equipment Services Inc Sau...

Отзывы: