background image

ENG

19

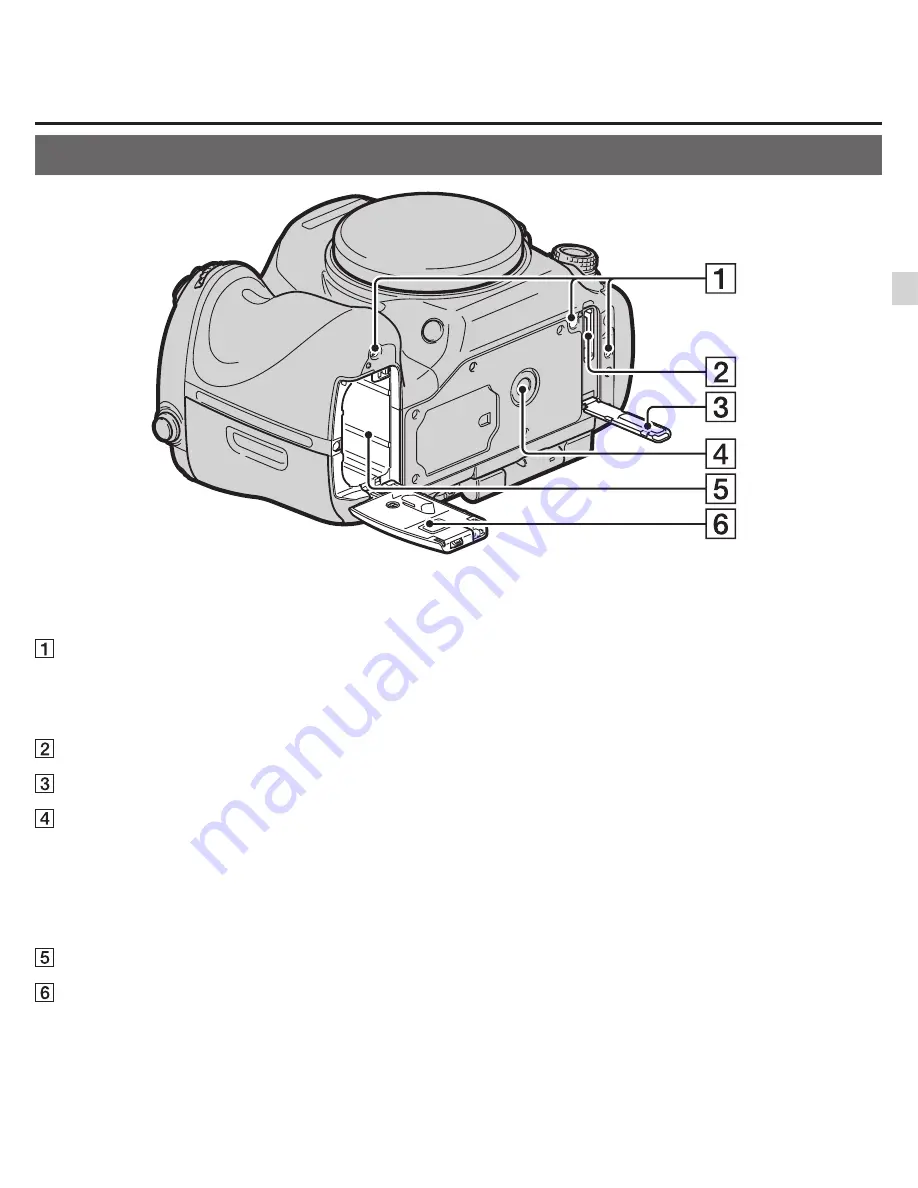
Bottom

  Guide holes for the Vertical Grip

•  These holes are used when you connect the Vertical Grip 

(sold separately) to the camera. Be sure to keep dust or 

debris from getting inside the holes.

  Connector for the Vertical Grip
  Connector cover for the Vertical Grip
  Tripod receptacle

•  Use a tripod with a screw length of less than 5.5 mm 

(7/32 inch). You will be unable to firmly secure the 

camera to tripods with a screw length of 5.5 mm (7/32 

inch) or longer, and attempting to do so may damage the 

camera.

  Battery insertion slot (46)
  Battery cover (46)

Identifying parts

Bef
or

e use

Содержание HV

Страница 1: ...Operations Instruction Manual ...

Страница 2: ... the battery pack using a genuine Sony battery charger or a device that can charge the battery pack Keep the battery pack out of the reach of small children Keep the battery pack dry Replace only with the same or equivalent type recommended by Hasselblad Dispose of used battery packs promptly as described in the instructions Battery charger Use the nearby wall outlet wall socket when using the Cha...

Страница 3: ...terface cable must be used with the equipment in order to comply with the limits for a digital device pursuant to Subpart B of Part 15 of FCC Rules For Customers in Europe Hereby Victor Hasselblad AB declares that this HV Interchangeable Lens Digital Camera is in compliance with the essential requirements and other relevant provisions of the Directive 1999 5 EC Notice for the customers in the coun...

Страница 4: ...re than 0 0005 mercury or 0 004 lead By ensuring these batteries are disposed of correctly you will help prevent potentially negative consequences for the environment and human health which could otherwise be caused by inappropriate waste handling of the battery The recycling of the materials will help to conserve natural resources In case of products that for safety performance or data integrity ...

Страница 5: ...ENG 5 ...

Страница 6: ...ilent multi controller 28 Selecting a function with the Fn Function button 30 Functions that can be selected with the Fn Function button 31 The functions selected with the MENU button 33 Using the In Camera Guide 43 Preparing the camera Charging the battery pack 44 Inserting the battery pack memory card sold separately 46 Compatible memory cards 49 Attaching a lens 50 Setting the date and time 52 ...

Страница 7: ...g the various functions of the camera thoughtfully 64 Depth Map Assist Continuous AF 64 AF Range Control 65 Movie recording with a positive approach to audio 66 ISO sensitivity Multi frame noise reduction 67 Creative Style 68 Hand held Twilight 69 DRO Auto HDR 69 Playback functions 69 Viewing images on a computer Using the software 71 Others Learning more about the camera Handbook 76 Checking the ...

Страница 8: ...O sensitivity White balance 32 You can adjust the color tones You can select an option to suit a light source or perform a fine adjustment by combining the color temperature with the color filter Drive mode 31 You can use an appropriate drive mode to suit your purposes such as single shot advanced continuous advanced bracket or shooting with a Wireless Remote Commander Original characteristic func...

Страница 9: ...hen you take your face away from the viewfinder the viewing mode returns to the LCD screen mode You can change the screen mode by pressing the DISP button Quick Navi 27 In viewfinder mode you can quickly switch the LCD screen to the Quick Navi screen by pressing the Fn button You can set the items with an intuitive operation Silent multi controller 28 Using the silent multi controller that is desi...

Страница 10: ...hen the camera warms up the screen will function normally The recorded image may be different from the image you monitored before recording Notes on long time recording When you continue to shoot for a long time Screen language You can select the language displayed on the screen using the menu page 42 Shooting procedure This camera has 2 modes for monitoring subjects the LCD screen mode using the ...

Страница 11: ...son movies recorded in MP4 format with this camera cannot be played on devices other than those that support MPEG 4 AVC H 264 Discs recorded with HD image quality high definition can be played back only on AVCHD format compatible devices DVD based players or recorders cannot play back HD image quality discs as they are incompatible with the AVCHD format Also DVD based players or recorders may fail...

Страница 12: ...ious elements The image may be slightly distorted near the corners of the viewfinder This is not a malfunction When you want to check every detail of the entire composition you can also use the LCD screen If you pan the camera while looking into the viewfinder or move your eyes around the image in the viewfinder may be distorted or the color of the image may change This is a characteristic of the ...

Страница 13: ...e U S A and Canada Multiple power cords may be supplied with your camera Use the appropriate one that matches your country region Rechargeable battery pack NP FM500H 1 Shoe adaptor 1 Connector protect cap 1 Attached on the Shoe adaptor USB cable 1 Shoulder strap 1 Body cap 1 Attached on the camera Shoe Cap 1 Attached on the camera Eyepiece cup 1 Attached on the camera CD ROM 1 Download links for s...

Страница 14: ...Front side AF illuminator 34 Self timer lamp Shutter button 58 Power switch 52 Front control dial Remote sensor Lens contacts Mounting index 50 Mirror Preview button 26 38 Mount Custom button 26 38 Lens release button 51 Silent multi controller 28 Do not directly touch these parts ...

Страница 15: ...mode Eyepiece sensors 57 Diopter adjustment dial Adjust the diopter adjustment dial to your eyesight until the display appears clearly in the viewfinder Light sensor LCD screen 21 54 MOVIE button 38 59 For shooting AF MF Auto focus manual focus button 26 37 For viewing Enlarge button 26 For shooting AEL AE lock button 26 37 SLOW SYNC button 26 For viewing Image index button 26 Multi selector Ident...

Страница 16: ...6 DISP Display button 26 Smart teleconverter button 26 38 Zoom button 26 Focus Magnifier button 26 For shooting AF RANGE button 26 For viewing Delete button 61 When the Fn screen or menu screen is displayed In Camera Guide button 26 Access lamp 53 Playback button 60 Do not directly touch these parts ...

Страница 17: ...n 26 WB White balance button 26 Exposure button 26 ISO button 37 67 Display panel illumination button 25 Image sensor position mark Rear control dial Do not cover this part during movie recording Doing so may cause noise or lower the volume For details on compatible accessories of the Multi interface shoe consult your Hasselblad dealer or local authorised Hasselblad service facility Accessories fo...

Страница 18: ...rnal microphone is a plug in power type the power of the microphone is supplied by the camera Headphones jack HDMI terminal USB terminal Memory card cover 46 SLOT1 Memory card slot 1 46 Available to either SD cards or Memory Stick PRO Duo media SLOT2 Memory card slot 2 46 Available to SD cards only Flash sync terminal REMOTE terminal When connecting the RM L1AM Remote Commander sold separately to ...

Страница 19: ...the holes Connector for the Vertical Grip Connector cover for the Vertical Grip Tripod receptacle Use a tripod with a screw length of less than 5 5 mm 7 32 inch You will be unable to firmly secure the camera to tripods with a screw length of 5 5 mm 7 32 inch or longer and attempting to do so may damage the camera Battery insertion slot 46 Battery cover 46 Identifying parts Before use ...

Страница 20: ...ck knob How to attach the Lock knob Remove the Connector protect cap from the shoe Tighten the Lock knob Loosen the Lock knob and insert the Shoe adaptor into the shoe Do not force the knob to turn after it locks When you attach the Shoe adaptor to the camera insert the Shoe adaptor all the way in After you remove the Shoe adaptor from the camera attach the Connector protect cap to the Shoe adapto...

Страница 21: ...itoring in the default settings Pressing the DISP button changes the screen status to for the LCD screen mode You can also display the digital level gauge or histogram In Auto Mode or Scene Selection mode In Tele zoom Cont Priority AE P A S M Sweep Panorama mode For the LCD screen mode For playback Basic information display For the viewfinder mode Before use ...

Страница 22: ...tion Image quality of still images 33 Frame rate of movies 35 Image size of movies 35 Remaining battery 48 Flash charge in progress 31 APS C Size Capture 42 Setting Effect OFF 37 No audio recording of movies 39 Wind Noise Reduction 39 SteadyShot Camera shake warning 34 35 GPS triangulating status 41 SteadyShot error Overheating warning 11 Database file full Database file error AE lock 26 FEL lock ...

Страница 23: ...ure compensation 26 Metered Manual Flash compensation 31 Recording time of the movie m s Focus 58 Shutter speed 62 Aperture 62 ISO sensitivity 31 67 Display Indication View Mode 39 Folder file number Protect 39 DPOF set 39 Remaining battery warning 53 DISPLAY Indication Drive mode 31 Flash mode 31 Red eye reduction 36 Focus mode 31 AF area 31 Object tracking 31 Face Detection 31 Smile Shutter 31 M...

Страница 24: ...am Date of recording File number Number of images in the view mode Display Indication Spot metering area 31 AF area 31 Assist area 64 Digital level gauge Histogram Smart teleconverter 26 Smart Zoom Clear Image Zoom Digital Zoom Shutter speed indicator Aperture indicator AF Range Control 30 Tracking focus Audio level 72 List of icons on the screen ...

Страница 25: ... 26 Flash compensation 31 ISO sensitivity 31 White balance 32 Drive mode 31 Image quality 33 Remaining battery 48 Remaining number of recordable imag es 77 Even when the remaining number of recordable images is more than 9 999 9999 is displayed on the display panel To turn on the backlight of the display panel Press the display panel illumination button on the top Pressing again turns off the back...

Страница 26: ... speed Displays multiple images on the screen simultaneously AF MF button button Switches the autofocus and manual focus temporarily Scales an image up when viewing images Fn button button Displays the setup screen of the function that is set using the Fn button In viewfinder mode switches to the Quick Navi screen Rotates images DISP button Switches the recording information display of the viewfin...

Страница 27: ...ne Selection mode In Tele zoom Cont Priority AE P A S M Sweep Panorama mode 3 Select the desired item with on the multi selector 4 Set the item with the front or rear control dial Select an option with the front control dial and adjust it with the rear control dial Pressing the center of the multi selector turns on the designated screen used to set up the selected item Pressing the Fn button again...

Страница 28: ...asks can be accomplished only on a designated screen How to use the silent multi controller You can set an item without changing the screen using the silent multi controller Since the dial is designed to reduce the sound of the dialing operation you can reduce the sound of the dialing operation during movie recording You can assign separate functions to the dial for still image shooting and movie ...

Страница 29: ...lent Multi Controller Rotate the dial to select a function You can also select a function from MENU button 3 Silent Controller or MENU button 1 Silent Controller Current function Functions available Still image Focus Mode AF area Select AF area Exposure Comp Metering Mode ISO Movie Audio Rec Level Focus Mode AF area Select AF area Exposure Comp Metering Mode ISO Shutter speed Aperture The function...

Страница 30: ...n button 3 Select the desired item with on the multi selector then press the center to execute The setup screen appears 4 Following the operation guide select and execute the desired function Operation guide To set up the camera directly from the recording information screen Turn the front control dial without pressing the center in step 3 You can set up the camera directly from the recording info...

Страница 31: ... a flash sold separately Flash Off Autoflash Fill flash Rear Sync Wireless Focus Mode Selects the focus mode Single shot AF Automatic AF Continuous AF Depth Map Assist Continuous AF DMF Manual Focus AF area Selects the area of focus Wide Zone Spot Local Object Tracking Keeps the focus on a subject while tracking it Off On On Tracking focus w shutter Smile Face Detect Automatically captures people ...

Страница 32: ...Opt Auto HDR Creative Style Selects your desired image processing Standard Vivid Neutral Clear Deep Light Portrait Landscape Sunset Night Scene Autumn leaves Black White Sepia Style Box1 6 Picture Effect Shoots with the desired effect filter to achieve more impressive expression Off Toy Camera Pop Color Posterization Retro Photo Soft High key Partial Color High Contrast Mono Soft Focus HDR Paintin...

Страница 33: ...he image quality for still images RAW RAW JPEG Extra fine Fine Standard Panorama Size Selects the size of panoramic images Standard Wide Panorama Direction Sets the shooting direction for panoramic images Right Left Up Down Clear Image Zoom Zooms an image with higher quality than Digital Zoom On Off Digital Zoom Zooms an image with higher magnification than Clear Image Zoom On Off Long Exposure NR...

Страница 34: ...the size of the increment step for shutter speed aperture and exposure 0 5 EV 0 3 EV Priority setup Sets whether or not to release the shutter even when the focus is not confirmed in autofocus mode AF Release AF w shutter Sets whether or not to activate the autofocus by pressing the shutter button halfway down This is convenient when you want to adjust the focus and exposure separately On Off AEL ...

Страница 35: ...he subject is in a dark situation On Off Silent Controller Assigns the desired function to the silent multi controller for movie recording Audio Rec Level Focus Mode AF area Select AF area Exposure Comp ISO Metering Mode Shutter Speed Aperture Audio Recording Sets whether or not to record audio when shooting a movie On Off Wind Noise Reduct Reduces wind noise during movie recording On Off Audio Re...

Страница 36: ...duration of time the image is to be displayed 10 Sec 5 Sec 2 Sec Off DISP Button Mon itor Allows you to select the available screen display modes of the LCD screen that can be selected by pressing the DISP button Graphic Display Display All Info No Disp Info Level Histogram For viewfinder DISP Button Finder Allows you to select the available screen display modes of the viewfinder that can be selec...

Страница 37: ... Focus Magnifier Memory ISO Button Assigns the desired function to the ISO button Exposure Comp Drive Mode Flash Mode Focus Mode AF area Smile Face Detect Auto Port Framing ISO Metering Mode Flash Comp White Balance DRO Auto HDR Creative Style Picture Effect Image Size Quality AEL hold AEL toggle AEL hold AEL toggle FEL Lock hold FEL Lock toggle Object Tracking AF MF Control Hold AF MF Control Tog...

Страница 38: ...F MF Control Hold AF MF Control Toggle AF lock AF On Aperture Preview Shot Result Preview Focus Magnifier Memory Smart Telecon Button Selects the function to be used with the button Smart Telecon Focus Magnifier Zoom Focus Hold Button Sets the function of the focus hold button of the lens When you select Preview Button the function selected with Preview Button is assigned Focus Hold Preview Button...

Страница 39: ...gistration Registers or changes the person to be given priority in the focus New Registration Order Exchanging Delete Delete All Playback menu Still Movie Select Allows you to determine how to group the playback images View mode Folder View Still Folder View MP4 AVCHD View Delete Deletes images Multiple Img All in Folder All AVCHD view files Slide Show Shows a slide show Repeat Interval Image Type...

Страница 40: ... Movie Format Formats the memory card File Number Sets the method used to assign file numbers to still images and MP4 movies Series Reset Folder Name Sets the folder format for still images Standard Form Date Form Select REC Folder Changes the selected folder for storing still images and MP4 movies New Folder Creates a new folder for storing still images and MP4 movies Recover Image DB Recovers th...

Страница 41: ...r Temp Sets the color temperature of the screen in the viewfinder Setting it toward makes the color cooler and toward makes the color warmer 2 to 0 to 2 GPS Settings Sets the GPS functions Power Save Sets the response level to be used to activate the power save mode Max Standard Power Saving Start Time Sets the interval after which power save mode engages 30 Min 5 Min 1 Min 20 Sec 10 Sec HDMI Reso...

Страница 42: ...Plays back movies recorded with the camera on an NTSC system TV PAL NTSC APS C Size Capture Sets whether or not to record with an APS C size equivalent area On Auto AF Micro Adj Allows you to make fine adjustments to the position of the focus AF Adjustment Setting amount Clear Appears when an Eye Fi card is inserted in the memory card SLOT1 in the camera Version Displays the camera software versio...

Страница 43: ... In Camera Guide feature and a delete feature When you press the AF RANGE button on the Fn screen or menu screen a help guide explaining the currently selected function or setting appears automatically MENU button 3 AF RANGE Button In Camera Guide AF range button Functions list ...

Страница 44: ...oLITHIUM battery pack can be charged even when it has not been fully depleted It can also be used when it has not been fully charged The battery pack is discharged little by little without using it To avoid missing the opportunity to shoot charge it before use 1 Insert the battery pack onto the battery charger Push the battery pack until it clicks ...

Страница 45: ...amp For countries regions other than the U S A and Canada Charge lamp To a wall outlet wall socket Notes The charging time differs depending on the remaining capacity of the battery pack or charging conditions We recommend charging the battery pack in an ambient temperature of between 10 C to 30 C 50 F to 86 F You may not be able to efficiently charge the battery pack outside of this temperature r...

Страница 46: ...mory Stick PRO Duo media or SD cards but SLOT2 can be used only with SD cards 1 While sliding the battery cover open lever open the cover 2 Firmly insert the battery pack all the way while pressing the lock lever with the tip of the battery Lock lever 3 Close the cover 4 While sliding the memory card cover open the cover ...

Страница 47: ...le memory card MENU button 1 Select Recording Media Select the desired slot You can also set Select Recording Media from the Quick Navi screen page 27 To record an image on both memory cards at the same time You can record the same images on both memory cards at the same time or sort images onto the different memory cards by the type of image page 40 MENU button 1 Recording Mode Select the desired...

Страница 48: ...ra this provides a total of 3 battery packs that are switched automatically You can check the status of these battery packs on the screen The remaining battery level of the battery pack inserted in the camera The remaining battery level of the battery packs inserted in the Vertical Grip For details on the Vertical Grip refer to the operating instructions supplied with the Vertical Grip To remove t...

Страница 49: ... Class 4 or faster 3 SD cards that match the Class 10 or faster or the UHS I UHS Speed Class1 interface Notes Memory Stick PRO Duo media cannot be used with slot 2 Images recorded on an SDXC memory card cannot be imported to or played on computers or AV devices that are not compatible with exFAT Make sure that the device is compatible with exFAT before connecting it to the camera If you connect yo...

Страница 50: ...g indexes on the lens and camera Orange index marks 3 Turn the lens clockwise until it clicks into the locked position Be sure to put the lens on straight Notes When attaching a lens do not press the lens release button Do not use force when attaching a lens E mount lenses are not compatible with this camera When a DT lens is attached or APS C Size Capture is set to On in the Setup menu a live vie...

Страница 51: ...he way in and turn the lens counterclockwise until it stops Lens release button 2 Attach the caps to the front and rear of the lens and the body cap to the camera Before you attach them remove dust from them Note on changing the lens When changing the lens if dust or debris gets inside the camera and adheres to the surface of the image sensor the part that converts the light to an electric signal ...

Страница 52: ...o OFF 2 Verify that Enter is selected on the LCD screen then press the center of the multi selector 3 Select your area with on the multi selector then press the center of the multi selector 4 Select each item with and set the numeric value with Daylight Svg Turns on or off the daylight saving time setting Date Format Selects the format to display date Midnight is indicated as 12 00 AM and noon as ...

Страница 53: ...ime the date time setup screen appears automatically The next time set up the date and time from the menu MENU button 1 Date Time Setup or Area Setting page 40 Maintaining the date and time setting This camera has an internal rechargeable battery for maintaining the date and time and other settings regardless of whether the power is on or off or the battery is installed or not Setting date and tim...

Страница 54: ...creen rotates 180 degrees clockwise and 90 degrees counterclockwise When the LCD screen is not used it is recommended that you close it with the screen side facing to the camera Note When the LCD screen is open the eyepiece sensors may not be able to function in situations involving low position shooting If you look into the viewfinder and the viewing mode does not switch from the monitor to the v...

Страница 55: ...g indicator does not appear in the following situations The exposure mode is set to M S or during movie recording When the viewing mode is set to No Disp Info Level or Histogram Using the SteadyShot function The SteadyShot function is available with this camera to reduce camera shake The SteadyShot function can be set separately for still image shooting and for movie recording The SteadyShot funct...

Страница 56: ... the SteadyShot function Holding the camera properly Stabilize your upper body and take a position that keeps the camera from moving In viewfinder mode In viewfinder mode vertical position In LCD screen mode Point One hand holds the grip of the camera and the other hand supports the lens Point Take a secure stance with your feet shoulder width apart Point Lightly tuck your elbows against your body...

Страница 57: ...ingers under the Eyepiece cup and slide it upward Note When an FDA A1AM Angle Finder sold separately is attached to the camera switch the display between the viewfinder and the LCD screen by setting FINDER LCD Setting in the Custom menu to Manual and pressing the FINDER LCD button Setting Eye Start AF to Off is recommended because the eyepiece sensors located below the viewfinder may be activated ...

Страница 58: ...ial to Auto Mode Rotate the mode dial while pressing the mode dial lock button on the center of the mode dial 2 Hold the camera monitoring your shot with the viewfinder AF area 3 When using a zoom lens turn the zoom ring then decide on your shot Zoom ring 4 Press the shutter button halfway down to focus When the focus is confirmed or Focus indicator lights up 5 Press the shutter button fully down ...

Страница 59: ...ording Notes The sound of the camera and the lens in operation may be recorded while recording a movie Using the silent multi controller you can reduce the sound of the dialing operation for adjustments you need to make page 28 You can disable sound recording by setting Audio Recording to Off page 35 The continuous recording time of a movie may be shorter depending on the ambient temperature or th...

Страница 60: ...ng pause To slow reverse Rotate the rear control dial to the left during pause The movie is played back frame by frame To adjust sound volume To display the information DISP Display button Note Movies recorded with other devices may not be played back on this camera Switching between still images and movies To play back still images set Still Movie Select to Folder View Still and to play back movi...

Страница 61: ...he image or not Make a copy of any images you may want to keep before deleting them from the camera 1 Display the image you want to delete and press the button button 2 Select Delete with on the multi selector then press the center of the multi selector Note Protected images cannot be deleted Shooting and viewing images ...

Страница 62: ... speed manually using the front or rear control dial Manual Exposure Allows you to shoot after adjusting the exposure manually both the shutter speed and the aperture value using the front or rear control dial 1 2 3 Calls up setting pre registered in Memory in the Still shooting menu Scene Selection Allows you to easily shoot any subject under any conditions as the camera makes appropriate setting...

Страница 63: ...splayed in gray on the screen Shoot Mode Exposure Comp 26 Self tim er 31 Cont Shooting 31 Face De tection 31 Smile Shutter 31 Auto Port Framing 31 68 ü ü ü ü ü 68 ü ü ü ü ü ü ü ü ü ü ü ü ü ü ü ü ü ü ü ü ü ü ü ü ü ü ü ü ü 68 ü 68 ü 68 ü ü ü ü ü ü 68 ü ü ü ü ü ü 68 ü ü ü ü ü ü 68 ü ü ü ü ü 65 68 ü ü ü ü When the exposure mode is set to M the exposure can be compensated only when the ISO sensitivity ...

Страница 64: ...Continuous AF In addition to the Continuous AF function assist areas are displayed to help you to continue to focus on subjects Set Focus mode to Depth Map assist Continuous AF with the Fn button Assist area After the camera focuses on the subject using the 19 AF areas the camera continues to focus on the subject An assist area is displayed only when a compatible lens is attached to the camera For...

Страница 65: ...al and set the minimum shooting distance with the rear control dial Press the AF RANGE button so that the AF RANGE screen apears Press the AF RANGE button again to lock the distance The AF area and assist area that overlap with the subject located within the AF range you set turn to yellow An assist area is displayed only when a compatible lens is attached to the camera Using the various functions...

Страница 66: ... dial to Movie Press the MOVIE button to start or stop recording Headphones jack When headphones are used you can set the echo compensation using Audio Output Timing MENU button 2 Audio Rec Level You can adjust the audio recording level by monitoring the level meter Audio Level Display You can display the audio level on the screen and shoot the image Using the various functions of the camera thoug...

Страница 67: ... AUTO Minimum Using the various functions of the camera thoughtfully Press the ISO button Select the desired setting with on the multi selector When you select Multi Frame Noise Reduct you can select larger ISO numbers than the maximum ISO sensitivity The camera shoots continuous multiple images automatically combines the images reduces the noise and records 1 image The image recorded is comprised...

Страница 68: ...saturation and sharpness for each Creative Style Select Creative Style with the Fn button Creative Style item 13 types Style box You can fine tune the setting from the original setting and save the adjusted setting Select the desired Creative Style or the style box with on the multiselector Using the various functions of the camera thoughtfully ...

Страница 69: ... Auto HDR function you can capture various gradations of the contrast of images DRO By dividing the image into small areas the camera analyses the contrast of light and shadow between the subject and the background producing the image with the optimal brightness and gradation Auto HDR Shoots 3 images with different exposures and then overlays the correctly exposed image the bright areas of an unde...

Страница 70: ...essing the DISP button changes the screen from the 9 image screen to the 4 image screen Deletes unnecessary images Changes to the playback screen Rotates the image counterclockwise Pressing the center of the multiselector rotates the image counterclockwise Using the various functions of the camera thoughtfully ...

Страница 71: ...ages on a scale of 5 Set color labels To use Image Data Converter refer to Help Click Start All Programs Image Data Converter Help Image Data Converter Ver 4 Using PlayMemories Home With PlayMemories Home you can do things such as the following Set images shot with the camera and display them on the computer Organize images on the computer on a calendar by shooting date to view them Retouch red ey...

Страница 72: ...Camera Control Connect the camera to your computer With Remote Camera Control you can Set up the camera or record an image from the computer Record an image directly to the computer Perform an Interval Timer Shooting Set up the following before use MENU button 3 USB Connection PC Remote To use Remote Camera Control refer to Help Click Start All Programs Remote Camera Control Help Remote Camera Con...

Страница 73: ... when using the supplied software and importing images via a USB connection OS pre installed USB Connection Mac OS X v10 3 v10 8 Image Data Converter Ver 4 Remote Camera Control Ver 3 Mac OS X v10 5 v10 8 Image Data Converter Ver 4 Remote Camera Control Ver 3 CPU Intel Core Solo Core Duo Core 2 Duo or faster Memory 1 GB or more is recommended Display 1024 768 dots or more Notes Operation is not as...

Страница 74: ...ear on the screen to proceed with the installation 2 Choose your language 3 Choose Downloads 4 Click on PlayMemories Home The software will now be downloaded to your preferred download folder 5 Run PMHOME_2003DL exe and follow the instructions on screen Installing Image Data Converter Windows Image Data Converter allows you to develop RAW images 1 Insert the CD ROM supplied into the CD ROM drive a...

Страница 75: ... 4 Double click on the IDC dmg file and follow the instructions on screen Installing Image Data Converter Mac All Non English versions 1 Insert the CD ROM supplied into the CD ROM drive 2 Choose your language 3 Double click the Image Data Converter shortcut 4 Run the IDC Install package and follow the instructions on screen Using the software Viewing images on a computer ...

Страница 76: ...omputer for Windows XP My Computer Start exe If the autoplay screen appears select Start exe 2 Choose your language 3 Choose Handbook 4 Choose Open Handbook NB You need to have a PDF reader installed on your computer 5 For convenience save the Handbook to your computer With Adobe Acrobat Reader choose Archive Save and choose your file location For Mac users 1 TTurn on your computer and insert the ...

Страница 77: ...serted Insert a memory card The number of images that can be recorded on a memory card The table shows the approximate number of images that can be recorded on a memory card formatted with this camera The values are defined using standard memory cards for testing The values may vary depending on the shooting conditions and the type of memory card used Image Size L 24M Aspect Ratio 3 2 A memory car...

Страница 78: ...C 77 F Using the battery pack that is charged for an hour after the CHARGE lamp goes out Using Sony Memory Stick PRO Duo media sold separately Memory Stick PRO Duo media is inserted in memory card SLOT1 and there is no memory card in memory card SLOT2 Quality is set to Fine Focus Mode is set to Automatic AF Shooting once every 30 seconds The power turns on and off once every 10 times GPS On Off is...

Страница 79: ...en you record fast moving subject the image is clearer but the recordable time is shorter because it spends much memory to record The recordable time also vary depending on the shooting condition or subject or setting of image quality size The values shown are not the continuous recording time Recording time may depend on shooting conditions and the memory card used When is indicated stop recordin...

Страница 80: ...ording If you frequently recompose or shoot images after the power is turned on the temperature inside the camera rises and the recording time available is shorter than the values indicated in the table above If the camera stops recording due to the temperature leave it for several minutes with the power turned off Start recording after the temperature inside the camera drops fully If you observe ...

Страница 81: ...1 points cross type and 102 assist points The AF assist function can be used only with compatible lenses Sensitivity Range 1 EV to 18 EV at ISO 100 equivalent AF illuminator Approx 1 m to 7 m 3 3 feet to 23 feet Electronic viewfinder Type Electronic viewfinder Screen size 1 3 cm 0 5 type Total number of dots 2 359 296 dots Frame coverage 100 Magnification 0 71 with 50 mm lens at infinity 1 m 1 dio...

Страница 82: ...RO HG Duo media In Tele zoom Cont Priority AE mode approx maximum 10 images per second Extra fine 18 images Fine 22 images Standard 24 images In Continuous shooting Extra fine 14 images Fine 18 images Standard 20 images RAW JPEG 11 images RAW 13 images The numbers vary depending on the type of subject or the memory card The numbers are calculated when the ISO sensitivity is set to ISO 320 or lower...

Страница 83: ...Approx 863 g 1 lb 14 4 oz with battery and Memory Stick PRO Duo media Approx 784 g 1 lb 11 7 oz body only Operating temperature 0 C to 40 C 32 F to 104 F ADP MAA Shoe adaptor Mass Approx 12 g 0 5 oz Dimensions Approx 26 mm 20 1 mm 26 mm 1 1 16 inches 13 16 inches 1 1 16 inches W H D excluding protrusions BC VM10A Battery charger Input rating 100 V 240 V AC 50 60 Hz 9 W Output rating 8 4 V DC 0 75 ...

Страница 84: ...hange without notice On image data compatibility This camera conforms with DCF Design rule for Camera File system universal standard established by JEITA Japan Electronics and Information Technology Industries Association Playback of images recorded with your camera on other equipment and playback of images recorded or edited with other equipment on your camera are not guaranteed Specifications ...

Страница 85: ... the United States and other countries Mac and Mac OS are trademarks or registered trademarks of Apple Inc Intel Intel Core MMX and Pentium are trademarks or registered trademarks of Intel Corporation SDXC Logo is a trademark of SD 3C LLC Eye Fi is a trademark of Eye Fi Inc MultiMediaCard is a trademark of MultiMediaCard Association and PlayStation are registered trademarks of Sony Computer Entert...

Страница 86: ...6 Area Setting 53 Aspect Ratio 33 Audio Level Display 35 Audio Output Timing 35 Audio Rec Level 35 Audio Recording 35 Audio signals 42 AUTO 58 Auto HDR 69 Auto Mode 62 Auto Port Framing 31 Auto Review 36 Auto Slow Shutter 35 Auto WB 32 Autoflash 31 Auto lock Accessory shoe 20 Automatic AF 31 AVCHD 35 AVCHD View 39 B Battery pack 44 46 Bracket order 38 Bracket Cont 31 C Center weighted 31 Charging ...

Страница 87: ...5 Display panel illumination button 25 DMF 31 DPOF Setup 39 D Range Optimizer 69 Drive mode 31 DRO Bracket 31 DRO Auto HDR 69 E Enlarged image 26 Exp comp set 38 Exposure compensation 38 Exposure mode 62 Exposure step 34 Extra fine 33 Eye Fi 42 Eyepiece cup 57 Eyepiece sensor 15 57 Eye Start AF 35 F Face Detection 31 Face Priority Tracking 39 Face Registration 39 FEL lock 26 File Format Movie 35 F...

Страница 88: ...High ISO NR 33 Histogram 36 I Image Data Converter 71 Image Index 26 Image Size 33 In Camera Guide 43 Incandescent White balance 32 Initialize 42 Install 74 75 Intelligent Auto 31 ISO Button 37 67 ISO sensitivity 67 L Landscape 31 Language 10 42 LCD Brightness 41 LCD screen 21 59 Lens 50 Lens Comp Chromatic Aberration 39 Lens Comp Distortion 39 Lens Comp Peripheral Shading 39 Live View Display 37 ...

Страница 89: ... 37 Peaking Level 37 Picture Effect 32 Playback Display 40 PlayMemories Home 71 Pop Color 32 Portrait 31 Posterization 32 Power Save 41 Power Saving Start Time 41 Pre flash TTL 33 Pressing halfway down 58 Preview 26 Preview Button 26 38 Priority setup 34 Program Auto 62 Protect 39 Q Quality 33 Quick Navi 27 R RAW 33 RAW JPEG 33 Rear sync 31 Record Setting Movie 35 Recording Mode 40 47 Recording mo...

Страница 90: ...racket 31 Single Shooting 31 Single shot AF 31 Slide Show 39 SLOW SYNC 26 Smart teleconverter 26 Smile Shutter 31 Soft Focus 32 Soft High key 32 Software 71 Specifications 81 Specify Printing 39 Sports Action 31 Spot AF area 31 Spot Metering Mode 31 sRGB 34 Standard 33 SteadyShot function 55 Still Movie Select 39 Strap 18 Style box 68 Sunset 31 32 Superior Auto 31 Sweep Panorama 62 T T10 31 T8 31 ...

Страница 91: ...hite Balance 32 Wide AF area 31 Wind Noise Reduct 35 Wireless Flash Mode 31 Z Zone AF area 31 Zoom 26 58 Index Index Additional information on this product and answers to frequently asked questions can be found at www hasselblad com ...

Страница 92: ...Victor Hasselblad AB www hasselblad com hv ...

Отзывы: