www.hasselblad.com
USER MANUALS
Film magazine HM 16-32 – 3033016 – 2011 – v1
Item no.: 3033016
2/2
FILM MAGAZINE HM 16-32
Manual film
speed setting.
220 film length
setting.
Data imprinting
setting.
‘Frames remaining’
counter setting.
Frame counter setting
The frame counter can be set to show either how many unex-
posed frames remain on a film or how many frames have already
been exposed. The LCD shows your choice of setting by adding
the word
Remain
as a reminder of the number of frames
remain-
ing
or ‘countdown’. Absence of this word implies the opposite,
namely, ‘count-up’, so it denotes the number of the next frame
to be used (for example, the figure 4 means three frames have
already been exposed). This information is also automatically dis-
played on the grip LCD and viewfinder LCD though only as a fig-
ure above a symbol.
To access frame counter setting:
1) Ensure the magazine settings lock is in the unlocked position.
2) Press the button until
Remain
appears.
3) Press either the button or the button to reach the
desired setting (toggle function).
•‘on’ will show the number of frames remaining on the roll.
•‘oFF’ will show the number of the next frame in the series.
4) The new setting will be saved automatically after a time out
of five seconds.
5) Return the magazine settings lock to the locked position.
Low-battery symbol
The low-battery symbol only appears on the magazine LCD when
the battery needs changing.
Example
In the example shown here:
• 120 film length set manually
• the film speed (ISO160) has been set manually
• 5 frames have already been exposed (therefore with regular
120 film, 11 frames remain)
• the battery is functional
N o t e
Operation and changes made to the data imprinting func-
tion are accessed through the camera menu. Please see sep-
arate section in camera User Manual for full details.
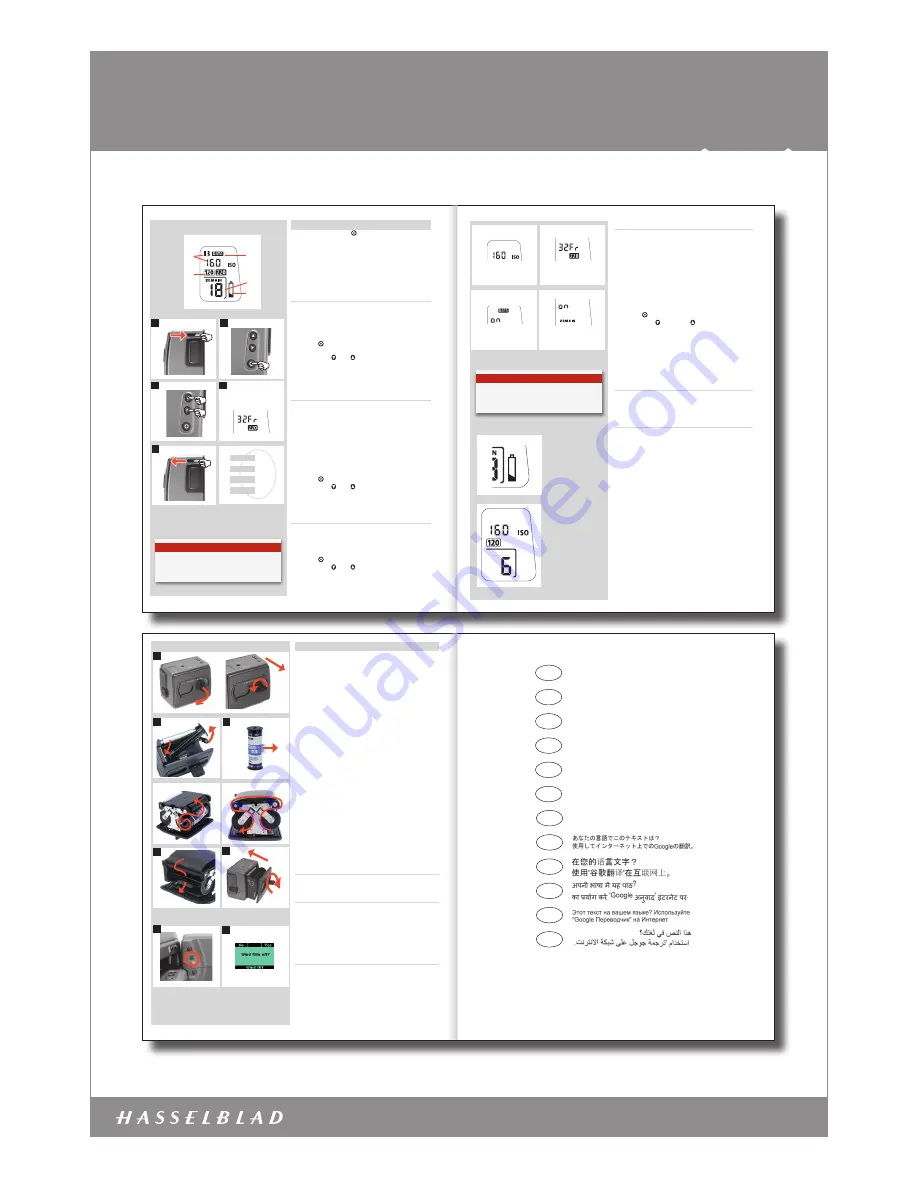
Magazine settings
Press the function selector ( button ) repeatedly to successively
access:
A. Film speed (ISO / Bar Code)
B. Film length (120/220/ Number of frames)
C. Data (on/off)
D. Frame counter (count down / count up)
E. Low-battery warning symbol
Film speed setting / Barcode
The film speed (ISO / ASA) can be set automatically or manually.
Automatic setting uses a Barcode (only some films have this fea
-
ture, notably Fujifilm). This is the default setting.
To access Manual setting:
1) Ensure the magazine settings lock is in the unlocked position.
2) Press the button until a figure (or barcode symbol) appears
together with ISO.
3) Press either the or the button to reach the required set-
ting.
4) The new setting will be saved automatically after a time out of
five seconds.
5) Return the LCD settings lock to the locked position.
Film length/number of frames
Both 120 and 220 films can be used. 120 film will produce 8 (for
use with ‘half-length’ 120 films only) or 16 frames and 220 film will
produce 32 frames.
If the film has a barcode, then film length setting (and film speed
setting) is automatic. The LCD will automatically show the barcode
symbol and the appropriate film length. (Note that film speed can
be overridden with barcoded films, but not film length).
If, however, the film has no barcode then proceed as follows:
To access film type setting:
1) Ensure the magazine settings lock is in the unlocked position.
2) Press the button until the 120 or 220 symbol appears.
3) Press either the or the button to change the desired
setting.
4) The new setting will be saved automatically after timeout.
5) Return the magazine settings lock to the locked position.
Data imprint setting
Data imprinting can be activated or deactivated through the mag-
azine menu.
To access data setting:
1) Ensure the magazine settings lock is in the unlocked position.
2) Press the button until the Data symbol appears.
3) Press either the or the button to reach On or Off.
4) The new setting will be saved automatically after a time out of
five seconds.
5) Return the magazine settings lock to the locked position.
A
B
C
D
E
Film speed
Film length
Data
Frame counter
1
2
3
44
5
EXAMPLE
N o t e
If you use both standard and barcoded films (or overridden
barcoded films), check that you have changed the settings
accordingly.
3
1
2
5
2
4
Film loading
The film magazine can be loaded either on or off the camera. Regu
-
larly check the interior of the magazine and remove dust, particles
or any scraps of paper from previous rolls of film. Load and unload
film magazines away from direct light sources.
1) Fold out the film holder key and turn it counter-clockwise 90°.
Withdraw the film holder com pletely.
2) Place an empty take-up spool in the upper spool holder by
placing one end over the fixed stud in the holder and the other
end underneath the sprung spool retaining arm. Rotate the
spool a little if necessary until it clicks into position.
3) Completely remove the retaining paper band from a new roll
of film and place it in the lower spool holder. See diagram for
correct orientation. Ensure you do not place the film spool the
wrong way around!
4) Pull 8–10 cm (3–4 in.) of paper backing from the film roll and
insert the tongue of the backing paper into the slot in the
take-up spool. Turn the spool one complete turn to ensure the
tongue is firmly held in place by the overlying paper backing.
5) Re-insert the film holder into the main body of the film maga-
zine ensuring the correct orientation. Press firmly inwards
towards the magazine and pay particular attention to see that
both sides are level with the magazine body before turning the
film holder key clockwise 90˚ to lock the film holder in place
and fold the key back into its stored position. You might find
that increased pressure on the left hand side of the film holder
will more easily ensure a positive and correct positioning in the
magazine.
If the camera is active or in standby mode the film will be
wound automatically by the camera to position the first frame
(this function can be changed in
Custom Options
so that
the film is advanced only when the shutter release button is
pressed the first time).
Beeper
The beeper sounds immediately after the last-but-one frame has
been exposed. This function can be turned off in
Custom Options
.
Film wind on and off 6, 7
Wind on: See ‘Film wind-on’ under
Custom Options
for a setting
choice.
Wind off: When the last frame has been exposed, the film will au
-
tomatically be wound off. However, to wind off a film sooner, press
the film wind off button (fig. 6). Use a ballpoint pen or similar to
activate it. You must also confirm the message on the grip LCD (fig.
7) before the film winds off.
Unloading a magazine
To remove a film, remove the film holder in the same manner as
when loading a film. Grip the exposed roll of film firmly and re-
move. Ensure the paper backing is wound tightly and that it is
sealed with the band properly (the band may need to be moist-
ened to activate the adhesive depending on type). Store exposed
films away from strong light sources and contact with sharp ob-
jects. Move the remaining empty spool to the take-up spool
compartment.
1
1
2
6
7
41
The information in this manual is furnished for informational use only, is subject to change
without notice, and should not be construed as a commitment by Victor Hasselblad AB &
Hasselblad A/S.
The text in this manual cannot be reprinted or reused without the express permission of
Victor Hasselblad AB & Hasselblad A/S.
The images in this manual cannot be reprinted or reused without the express permission of
the photographers who took them.
Victor Hasselblad AB & Hasselblad A/S assumes no responsibility or liability for any errors or
inaccuracies that may appear in this manual.
Victor Hasselblad AB & Hasselblad A/S assumes no responsibility or liability for loss or dam-
age incurred during or as a result of using Hasselblad products.
Hasselblad, Imacon, Ixpress, FlexColor and Phocus are trademarks of Victor Hasselblad AB
& Hasselblad A/S. Adobe, Adobe Photoshop is a trademark of Adobe Systems.
Copyright © 2011
Victor Hasselblad AB & Hasselblad A/S
All rights reserved.
FRA
DEU
ESP
ITA
PRT
SWE
NLD
JPN
CHN
IND
RUS
SAU
Ce texte dans votre langue?
Utilisez “Google Translate” sur Internet.
Diesen Text in Ihrer Sprache?
Verwenden Sie “Google Translate” im Internet.
Este texto en su idioma?
El uso de “Google Translate” en Internet.
Questo testo nella tua lingua?
Utilizzare ‘Google Translate’ su Internet.
Este texto na sua língua?
Usar “Google Translate” na Internet.
Denna text på ditt språk?
Använd “Google Translate”på Internet.
Deze tekst in uw taal?
Gebruik ‘Google Translate’ op het internet.
Visit
www.hasselblad.com
to download user manuals, data-
sheets, product brochures, technical information, technical
articles, software and firmware updates etc., as well as news
about the latest developments at
Hasselblad
.
Visit
www.hasselblad.com
to download user manuals, datasheets, product brochures, technical
information, technical articles, software and firmware updates etc. as well as to read about the latest
developments at Hasselblad.
The information in this manual is furnished for informational use only, is subject to change without notice, and should not be construed as a commitment by Victor Hasselblad AB & Hasselblad A/S. The text and images in this manual cannot be reprinted or reused without the express permission of Victor Hasselblad AB & Hasselblad A/S. Victor Hasselblad
AB & Hasselblad A/S assume no responsibility or liability for any errors or inaccuracies that may appear in this manual. Victor Hasselblad AB & Hasselblad A/S assume no responsibility or liability for loss or damage incurred during or as a result of using Hasselblad products. Copyright © 2011 - Victor Hasselblad AB & Hasselblad A/S. All rights reserved.


