Hasler IM6000 Series Скачать руководство пользователя страница 94

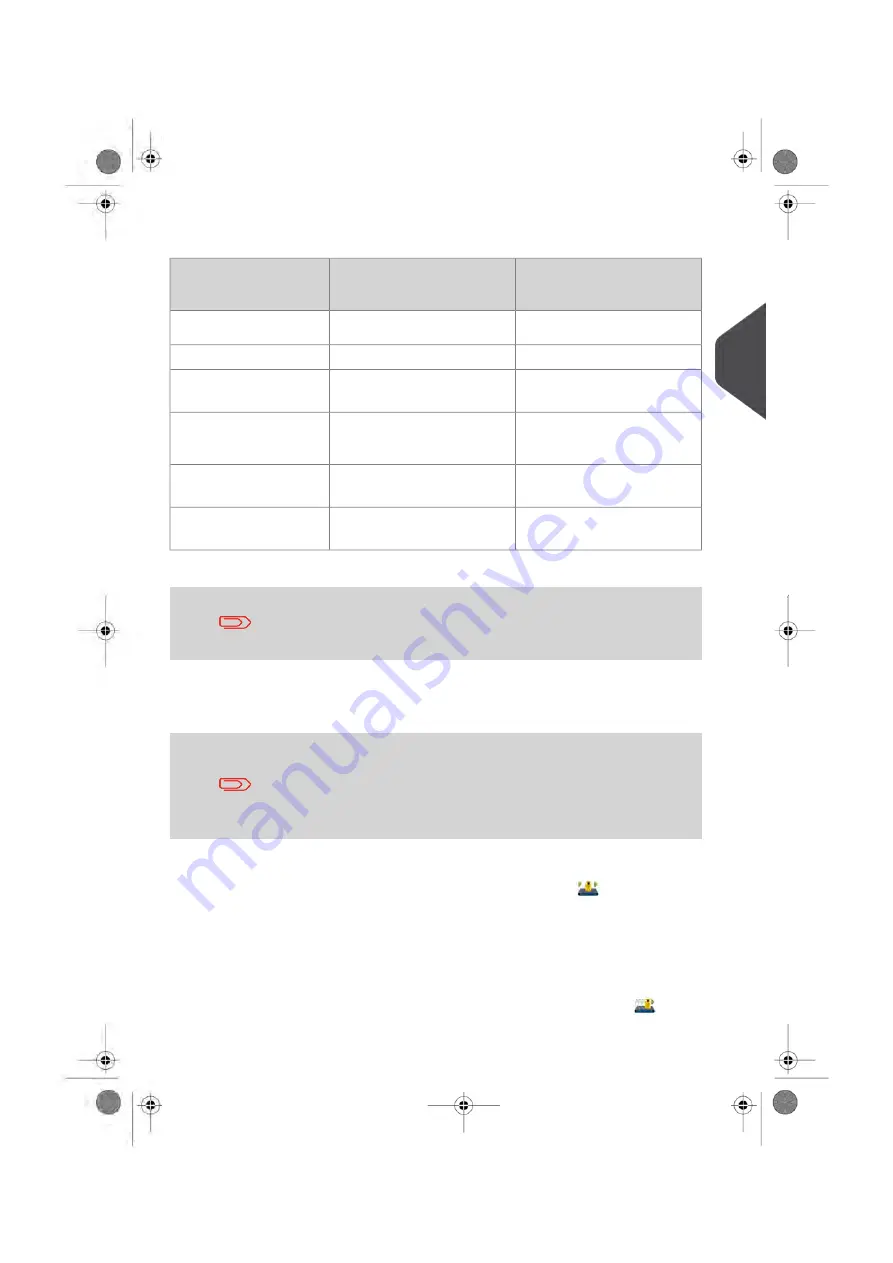
Depending on the mailing application, select the weighing mode according to the
recommendations in the table below.

Dynamic Weighing Module

Using Weighing

Platform

Select mode

Select mode

To weight:

Weigh all

Standard weighing

Items one by one

Differential weighing

Mixed mail stacked on the
Weighing Platform

Standard weighing or

Differential weighing auto-tape

Items exceeding the mail-
path size specifications

Weigh all

Mixed mail stacked on the
feed hopper

Weigh First Piece

Identical items stacked on
the feed hopper

Please note that the recommendations in the table assume that
each batch of mail processed by the Dynamic Weighing Module is
the same mail class.

Descriptions of Weighing Modes

This section describes the various weighing modes, which are
available depending on the accessories and options added to your
Mailing System. The Weighing Platform and Dynamic Weighing
Module are hardware accessories, whereas differential weighing
is an option that can be downloaded through a software upgrade.
Contact your sales representative for more information.

Each weighing mode has a corresponding icon for quick identification.

Dynamic Weighing Weigh all (Dynamic Weighing Module)

Using the Dynamic Weighing Module is the fastest and most efficient method of
weighing and rating mixed mail processed through the Mailing System. It uses a
patented, four-point detection system to weigh and rate mail. It measures the length,
width, thickness and weight to properly determine the mailing format within the mail
class (that is to say letter vs. flat) and rate the mail pieces.

Dynamic Weighing, Weigh First Piece (Dynamic Weighing Module)

3

Processing

Mail

89

| Page 89 | Oct-05-2016 11:35 |

Содержание IM6000 Series

Страница 1: ...USER S GUIDE IM6000 Series MAILING SYSTEM with iMeterTM Postage Meter...

Страница 2: ...iled Steps to Run Mail 84 Postage and Funds Management 121 4 4 1 Overview 123 4 2 Managing Funds 124 4 3 Unlocking the PSD 127 Account Management and Access Control 129 5 5 1 Introducing the Account M...

Страница 3: ...ttings 251 8 6 Imprint Memories 254 8 7 Postage Warning Settings 257 8 8 Sealer Default Settings 259 8 9 Weighing Devices Settings 261 8 10 Adjusting Display and Sounds 269 8 11 Other System Settings...

Страница 4: ...shooting 337 11 11 1 Envelope Stoppages and Jams 339 11 2 Label Stoppages and Jams 344 11 3 Weighing Problems 346 11 4 Diagnostics and System Data 348 System Specifications 353 12 12 1 General Specifi...

Страница 5: ...Page 4 TOC Oct 05 2016 11 35...

Страница 6: ...rtant information about safety precautions and environmental recommendations to operate your equipment in the best possible conditions 1 1 What you will Find in this Manual 3 1 2 Safety Requirements 6...

Страница 7: ......

Страница 8: ...batches of mail etc Postage and Funds Management on page 121 Loading Postage Funds into your Mailing System Account Management and Access Control on page 129 Changing Accounts as a User setting up Acc...

Страница 9: ...erform NOTE remark that explains different cases or specificities TIP advice to help save you time when processing your mail SUPERVISOR indicates that you have to log in as supervisor using the superv...

Страница 10: ...cal Area Network LAN Personal Computer PC Personal Identification Number PIN Pre Paid Imprint PPI Postal Security Device Meter PSD Weighing Platform Scale WP 1 Read this First 5 Page 5 Oct 05 2016 11...

Страница 11: ...T BE GROUNDED Only connect the power plug to an outlet provided with a protective ground contact To reduce the risk of fire use only the power cord supplied with the mailing system Do not use ground a...

Страница 12: ...tion and treatment processes of these machines CE compliance Products presented in this guide conform to requirements of applicable directives For more details refer to Declaration Of Conformity avail...

Страница 13: ......

Страница 14: ...andheld Scanner 22 2 2 Operator Controls 23 How to toggle from your Mailing System display mode to your PC display mode 30 2 3 System Power Management 32 How to Turn the System ON OFF 33 How to Switch...

Страница 15: ......

Страница 16: ...omponents 2 1 The illustrations and tables below show the basic Mailing System configuration including optional accessories you may have added Equipment overview 11 Page 11 Oct 05 2016 11 35 2 Mailing...

Страница 17: ...three optional stackers available Stacker optional Allows the user to operate the mailing machine and configure the system settings Control Panel Weighs mail to calculate postage Weighing Platform Cle...

Страница 18: ...es Feeder release handle Provides access to filter for cleaning Removable filter for user self maintenance Sealer water filter ac cess Provides access to print base to clear stoppages Print Base relea...

Страница 19: ...ter that stores funds and tracks postage us age DO NOT REMOVE Meter Postal security device PSD Provides access to meter PSD Lift from right side to open Meter PSD Access Door 14 Page 14 Oct 05 2016 11...

Страница 20: ...ase Release Lever Reservoir that supplies ink to print head See also How to Change the Ink Tank on page 321 Ink tank Provides access to change ink tank Flip down to open Ink tank Access Door 2 Mailing...

Страница 21: ...en monitor and a keyboard with touchpad mouse Color touch screen display Monitor Allows the input of data to your mailing system To use the numerical keys ensure that Num lock is activated Keyboard 16...

Страница 22: ...the Feeder and measures four points length width thickness and weight to determine the postage value Provides access to stalled mail pieces Lift to open Cover Detects flat pieces dimensions Over size...

Страница 23: ...ption The catch tray is the most basic collector of processed mail It physically attaches to the right side of the mailing system It offers the smallest footprint but holds the least amount of finishe...

Страница 24: ...sing the switch button Automatic Optical sensor automatically starts the conveyor belt as envelopes exit the mailing machine Manual advance Pressing the button advances envelopes on the conveyor for f...

Страница 25: ...evice connected to the mailing system that prints indicia stamps on thermal self adhesive paper It provides an ergonomic work environment as the user can place it in the most convenient working positi...

Страница 26: ...more information about compatible printers that can connect to your mailing system please contact technical support Handheld Scanner option The handheld scanner is used to identify accounts through ba...

Страница 27: ...Handheld Scanner 1 Place the handheld scanner above the barcode you want to scan 2 Press the button on the handheld scanner to scan the barcode A beep indicates that the scan is completed 22 Page 22 O...

Страница 28: ...ode print no print or received and the current operator logged on Task Bar Contains the imprint options rate selection value and weight of mail piece and date of mailing Postage Imprint and Rate Secti...

Страница 29: ...selection of a slogan or image to be printed with the indicia stamp Slogan Selection Displays the current rate selection including zip zone and extra services if applicable Rate Display Allows rate se...

Страница 30: ...buttons Account Section This area displays the current account name and number and allows the user to select a new account Displays the account name and number currently selec ted Account Information...

Страница 31: ...l for sealing envelopes Moistening Level Offers a reduced noise level with a reduction in speed Quiet Mode Allows selection of weighing options Weighing type Allows you to shift the imprint from the r...

Страница 32: ...view postage usage and perform a postal inspection Funds Displays the number of mail pieces processed since the last counter reset Metered Items Resets the Metered items counter to zero This is the st...

Страница 33: ...he supervisor see Direct Access Shortcuts Button Bar on page 248 The system has been set with the following default buttons Provides access to a list of predefined jobs rate and stamp configurations I...

Страница 34: ...p arrow in above illustration to unlock the mechanism and adjust height and angle To adjust display contrast and brightness use the buttons located at the bottom of the screen Side Panel Operation key...

Страница 35: ...the following default display parameters resolution 1024x768 frequency 70Hz Changing these display parameters will alter the display quality If you have a bad display quality check your PC display par...

Страница 36: ...r before the character at the left Left arrow Move before Moves the cursor after the character at the right Right arrow Move after Touchpad Mouse The touchpad on the keyboard or a USB mouse plugged in...

Страница 37: ...t 2 3 System ON OFF The ON OFF switch is located at the rear of the right hand side of the Mailing System base ON OFF switch Turns the Mailing System ON or OFF ON OFF 32 Page 32 Oct 05 2016 11 35 2 Ma...

Страница 38: ...inactivity A very low power Sleep mode called Soft off is also available The Mailing System will automatically switch to Sleep mode after 5 minutes of non activity The Supervisor can change this 5 mi...

Страница 39: ...off mode Sleep wake How to Switch Between Sleep And Wake Modes 1 Press the Sleep Wake key to switch between Sleep and Wake modes Mail processing Start Stop To process mail use the following keys START...

Страница 40: ...How to Start Stop the mail processing 1 Press the corresponding button on the control panel to start stop the Mailing System 2 Mailing System Overview 35 Page 35 Oct 05 2016 11 35...

Страница 41: ......

Страница 42: ...n Dynamic Weighing Modes 62 Running Mail in Standard Weighing Mode 63 Steps to Run Mail in Differential Weighing Modes 66 Running Mail in Manual Weighing Mode 67 3 4 Running Special Mail Types 69 Re D...

Страница 43: ...to Use an Imprint Memory 105 How to Use the Feeder 106 How to Adjust the Mail Thickness Settings 108 Postcard Mail or Thin Mail Processing 110 Puffy Mail or Thick Mail Processing 114 How to Select the...

Страница 44: ...parts Sequences of general steps involved in mail standard processing Standard Setup on page 40 Additional sequences for special mail processing re dating presort works permit mail Running Mail on pa...

Страница 45: ...l available Postage Funds etc Frequently Asked Questions on page 45 Setting Postage and Date of Mailing A first step is mandatory It is required that you select the correct Print Mode that corresponds...

Страница 46: ...l the Mailing System requires you to select a Task Each Task corresponds to different types of processes you can carry out Examples of types of processes Applying postage on outgoing mail using differ...

Страница 47: ...int offset Permit Mail Print a Permit Manually key in postage value Select new date Date Settings Print offset print position Standard Re date mail Manual key in new postage value Validate date Date S...

Страница 48: ...stacks according to the application The different processes are Outgoing mail Letters and flats Parcels or packages Presort mail or permit printing Incoming mail for Received stamping Seal only envel...

Страница 49: ...efore you can set up a work session and or process your mail When completed or to change a user return to Sleep mode see How to Switch Between Sleep And Wake Modes on page 34 Turning on the System and...

Страница 50: ...select by number name or scroll Touch the screen or press enter on the keyboard to validate You can also use a Handheld Scanner to choose your Account Frequently Asked Questions System check list How...

Страница 51: ...nk in the printing headset see How to Display Ink Tank Data on page 320 Do you have enough ink for the work session Choosing a Task and Enhancing the Stamp Follow the procedure below to select a Task...

Страница 52: ...nce your mail stack is ready 1 Make sure you are on the home screen of the Print Mode Print postage The name of the Print Mode is indicated on the title bar of the home screen as illustrated below If...

Страница 53: ...ther away from the right edge of the envelope Changing an Ad slogan requires an update To change the Text press the Text area on the screen and select a custom Text message to be printed For detailed...

Страница 54: ...press the Date Selection area on the screen and select the date of mailing or no day no date For detailed instructions see How to Change the Date on the Stamp on page 103 To offset the print position...

Страница 55: ...rint memories for fast selection See Using Imprint Memories on page 104 3 You can check or change the printing options by using the Imprint settings screen Press and select the path Imprint settings P...

Страница 56: ...Choosing Rates and Weighing Modes Make sure you have completed the preparation steps outlined in Frequently Asked Questions on page 45 3 Processing Mail 51 Page 51 Oct 05 2016 11 35...

Страница 57: ...on the home screen use the keyboard to type the amount Please note that when the value is manually entered the class is not tracked and the mail class will not automatically print in the indicia stamp...

Страница 58: ...page 244 Select Rate Favorites to choose a rate from a list of 20 preset rates Select Other Rates to access all other rates through the screen below On this screen Press a rate button or type its numb...

Страница 59: ...lue To change the weighing method touch the Weighing mode area and select a mode in the Weighing mode screen Options on screen may vary depending on installed weighing devices and options purchased Fo...

Страница 60: ...ort Report See Operational Presort Report on page 181 Changing Accounts To process mail using a different account follow the procedure below This only applies if you track account department usage and...

Страница 61: ...se and press OK 3 Press OK to return to the home screen The current account number and name will be displayed Resetting the Item Counter The Item counter allows you to generate a batch report on those...

Страница 62: ...seal envelopes of mixed sizes while processing mail If activated the sealer can work in two modes Sealing nested open flaps only It will not seal flaps that are closed flat In this mode you can mix s...

Страница 63: ...he user selections area of the home screen indicates the current sealer mode sealer is OFF sealer is ON Nested envelopes and sealed envelopes sealer is ON Nested envelopes and closed envelopes 58 Page...

Страница 64: ...g Button to select the mode The Mixed Sealing screen is displayed 2 Select a sealing mode See also As supervisor you can set the default mixed sealing and moisture level see Sealer Default Settings on...

Страница 65: ...l by Weighing Mode Dynamic weighing uses the inline Dynamic Weighing Module Running Mail Using the Dynamic Weighing Module on page 61 Standard weighing uses the external Weighing Platform Running Mail...

Страница 66: ...le uses a four point detection system to weigh and rate mail It measures the length width thickness and weight to properly determine the mailing format within the mail class and rate the mail pieces T...

Страница 67: ...g press The machine will process mail piece s already in system and then stop In Weigh First Piece Mode 1 Place your stack of same size weight mail in the hopper For more details see Using the Feeder...

Страница 68: ...Steps for Processing Mail on page 60 you are ready to run mail Follow the procedure below to use the Weighing Platform in the standard mode Running Mail in Standard Weighing Mode 1 Put the mail piece...

Страница 69: ...e and the envelopes are sent to the mail tray or stacker To print on one or several identical labels 1 Press label printing A label selection screen is displayed 2 Using the keypad or the arrows enter...

Страница 70: ...e weight is determined the rate is automatically set and the envelope hoppers motors start to run If a tape is required in this mode simply press the Label button Differential Weighing Auto Tape when...

Страница 71: ...e Mail Specifications on page 363 5 Repeat the previous steps for each piece of mail To quit at any time press Back In Differential Weighing Auto Tape Mode You may change the label dispenser if you ha...

Страница 72: ...for reporting and will note automatically print the mail class inscription that is to say Presort First Class for example on the envelope See Entering Postage Manually on page 88 then follow the proce...

Страница 73: ...n A label selection screen is displayed 2 Using the keyboard or the arrows enter the number of labels being printed 3 If necessary using the buttons change the label dispenser you want to use if a RLD...

Страница 74: ...correct date of mailing on the back side of the envelope If you cannot print on the back you may print on the lower right hand front corner by turning the mail around so the address is now upside dow...

Страница 75: ...pe switches to No weight source icon For details see How to Enter Postage Manually on page 88 2 Change the stamp date Press the Date area on the screen and select the date to print For details see How...

Страница 76: ...ront Correcting the Postage Amount 1 From the home screen Type the additional amount of postage required and press OK to validate For more details see How to Enter Postage Manually on page 88 2 To off...

Страница 77: ...ting a Work Session on page 44 Checking the operating readiness such as ink level sealing fluid level etc see Frequently Asked Questions on page 45 Then the specific steps for permit print set up are...

Страница 78: ...amp on page 46 Set the Print Position offset Activate the sealer Checking the Sealing Mode on page 57 According to the Mailing System configuration a weight different from zero may be necessary 3 Proc...

Страница 79: ...e Print Models indicated on the first line of the home screen as illustrated below If necessary see How to Change the Print Mode on page 84 2 Select the permit to use To change the permit press the Pe...

Страница 80: ...Weigh First Piece if you have a Dynamic Weighing Module or standard weighing to weigh and record the first piece See Selecting a Weighing Mode on page 88 To change the current weighing mode press the...

Страница 81: ...g button to change a parameter From left to right Text Slogan Permit These options have postal implications To set the stamp quickly consider using imprint memories The imprint memories store the stam...

Страница 82: ...nt the current report before starting the new one 2 Select the sealing mode that corresponds to your mail stack see Checking the Sealing Mode on page 57 3 Depending on the weighing mode selected run m...

Страница 83: ...See also For counting mail without printing Running No Printing Mail Sealing or Counting only on page 80 Recommended Steps For printing and receiving mail for incoming dating Selecting the Print Mode...

Страница 84: ...ext Received will be printed to the left of the date 1 To turn on off the Text press the Received Marking area that states Marking On off 2 To print or omit the date press the Date area on the screen...

Страница 85: ...the rear wall and covering the optical clear sensor The recommended print area on the envelope is either on the back or upside down on the front Press start The Mailing System prints the mail and sen...

Страница 86: ...Steps for Processing No Printing Mail Processing mail without printing requires the following steps Select the Print Mode No printing Select the sealing mode if necessary Reset the counter if necessar...

Страница 87: ...If necessary see How to Change the Print Mode on page 84 2 Reset the item counter see Resetting the Item Counter on page 56 3 Then run mail Place the envelope or identical set on the hopper Mail shou...

Страница 88: ...unt Mail Pieces Using Weighing Platform 1 As user Press and select Counting by weighing 2 Place 10 items on the Weighing Platform and press OK You must first weigh 10 items in order to get the total c...

Страница 89: ...Either Press and select the path Print Mode Press The Change Print Mode button may be absent from the button bar To customize the button bar or add this selection see supervisor section Direct Access...

Страница 90: ...ns that display six of your rate favorite buttons on the home screen Rate favorites button that provides a list of up to twenty custom selections Other Rates button that displays a dashboard of the mo...

Страница 91: ...ect from one of the rate shortcuts Up to six rate shortcuts to preset rates can be made available directly on the home screen in the rate area To set rate shortcuts see Creating Shortcuts on page 244...

Страница 92: ...tons 1 through 9 or type the number to select the rate or display rate options Press Rate wizard 5 Use the Rate Wizard to view all rate options and associated extra services Press OK to validate your...

Страница 93: ...he Postage area on the home screen as well as in the Weighing mode area shows the No weight source icon To print a fraction of one cent set the system to fractional mode See How to Activate Deactivate...

Страница 94: ...hing modes which are available depending on the accessories and options added to your Mailing System The Weighing Platform and Dynamic Weighing Module are hardware accessories whereas differential wei...

Страница 95: ...ss In this mode you can place a stack or container of mail on the Weighing Platform The weight is then calculated as each mail piece is removed from the Weighing Platform by calculating the differenti...

Страница 96: ...page 241 To change the weighing type for a different type of batch of mail see Selecting a Weighing Mode on page 88 follow the procedure below If the WP automatic selection is activated see Weighing...

Страница 97: ...mode screen is displayed The options displayed on the screen depend on the weighing accessories and options connected to your Mailing System 2 Select the weighing mode If you select the option Differe...

Страница 98: ...ng modes screen is displayed 2 Select Manual weight entry The Manual weight entry screen is displayed 3 Enter the weigh and press OK to validate Using the Item Counters The home screen displays an ite...

Страница 99: ...n Permit Mail Print Mode a preliminary screen allows you to view or print a report before resetting historic reports for the previous two batches are available See Operational Permit Report and Histor...

Страница 100: ...n to the left of the stamp Add Custom Text to the left of the Ad slogan Change the FIM Status You can directly access these settings from the home screen by pressing the corresponding buttons or you c...

Страница 101: ...imprint selections and allows you modify them directly How to Display the Imprint Settings Screen 1 As a user from the home screen Press and select the path Imprint Settings 2 The Imprint Settings sc...

Страница 102: ...Settings screen is displayed Print Mode PPI mail Adding Custom Text Follow the steps below to add a custom Text to the stamp to enhance response rates for your mail 3 Processing Mail 97 Page 97 Oct 0...

Страница 103: ...the home screen Press and select the path Imprint Settings and then press Text selection The Text selection screen is displayed The currently selected Text is highlighted 2 Select the desired Text fr...

Страница 104: ...e for further information How to Add or Cancel an Ad slogan on the Stamp To add change or cancel slogan selection 1 Either Press and select the path Imprint Settings and then press Slogan selection Th...

Страница 105: ...fault permit see Default Permit on page 238 See also Managing Permits on page 313 How to Select a Permit To select a permit 1 As a user Press the Permit selection button on the home screen or Press an...

Страница 106: ...et values are available How to Apply or Cancel a Print Offset To offset the print position of the stamp 1 As a user Press the Print position button on the screen or Press and select the path Batch set...

Страница 107: ...ail COD or Special Handling service You may print a date with the month and year only no day for Standard Mail and Package Services pieces No print date required for Metered reply mail as a method of...

Страница 108: ...ayed The icon indicates the current selection 2 Select the date print option desired To cancel or omit the date select No date To cancel or omit the day in the date select No day To select another day...

Страница 109: ...e charged Since all of your settings are stored in a single memory the Imprint Memory function is particularly useful for setting specific postal rate combinations Simply select the Imprint Memory ins...

Страница 110: ...See Creating Shortcuts on page 244 The Imprint Memories list is displayed To get a summary of the imprint press the icon 2 Press an Imprint Memory name or number in the list to validate and apply mem...

Страница 111: ...bottom 2 Fan the envelopes to ensure separation sometimes envelopes may be stuck together 3 Bevel the edge of the stack 4 Place the envelopes on the hopper against the rear wall and covering the opti...

Страница 112: ...he guide push gently against the envelopes but do not push it tightly against the stack 6 Adjust the mail thickness settings of the Feeder see How to Adjust the Mail Thickness settings on page 108 3 P...

Страница 113: ...ht especially if the thicker envelopes won t feed into the mail path You will find the pictogram below on your Feeder as a reminder 1 Open the Feeder cover 2 Change the lever position left for standar...

Страница 114: ...piece at a time or when you use an inserter No pressure This is the setting recommanded for most media Standard pressure default position This setting applies more pressure through the fingers in cas...

Страница 115: ...have been made you are ready to load the postcard mail and then process it Before loading and running the mail the below settings may need to be changed Stamp Date Mail Class USPS Extra Services Rese...

Страница 116: ...pull outward Swivel from the horizontal to the vertical position 3 Set Tension setting on the top of the cover set to the square default setting 4 Load the feeder with mail to be run 3 Processing Mai...

Страница 117: ...5 Adjust the high stack guide 112 Page 112 Oct 05 2016 11 35 3 Processing Mail...

Страница 118: ...mail Feeder setting to Puffy Mail by turning the Knob to Post Card Icon Make sure that the button is good in the notch and not between both 7 Press the Start button 3 Processing Mail 113 Page 113 Oct...

Страница 119: ...de you are ready to load the puffy mail and then process it Before loading and running the mail the below settings may need to be changed Stamp Date Mail Class USPS Extra Services Reset Item Counter S...

Страница 120: ...icker than space allowed under the feeder you should process the item by placing it on a scale and or enter the weight manually Then printing and placing a tape on the item 3 Adjust the envelope side...

Страница 121: ...the knob to Puffy Mail Icon Make sure that the knob is fully engaged in the notch 5 Press the Start button Using the Sealer For details about the sealing function see Checking the Sealing Mode on page...

Страница 122: ...Button to select the mode The Mixed Sealing screen is displayed 2 Select a sealing mode See also As supervisor you can set the default mixed sealing and moisture level see Sealer Default Settings on...

Страница 123: ...adjust the moistening level for sealing 1 On the control panel Press and select the path Batch Settings Moistening level The Moistening Level screen is displayed 2 Select the level or press Cancel 11...

Страница 124: ...el receptacle How to Fill the Internal Label Dispenser To fill the Internal Label Dispenser 1 Stack the labels and insert them in the dispenser face to print on the right hand side If the labels have...

Страница 125: ...ing the Remote Label Dispenser From the home screen 1 Press Label Printing The following screen is displayed 2 Enter the number of labels you want to print 3 Press Print on RLD or Print on ILD 4 Selec...

Страница 126: ...ad and manage funds money in your Mailing System 4 1 Overview 123 4 2 Managing Funds 124 How to Check the Funds 124 How to Load Funds 125 4 3 Unlocking the PSD 127 How to Unlock the PSD Postal inspect...

Страница 127: ......

Страница 128: ...l Security Device meter How to Unlock the PSD Postal inspection on page 127 To perform funds operations check that your Mailing System is connected see System Connections on page 356 and that the conn...

Страница 129: ...re are sufficient funds available How to Check the Funds Remaining funds are continuously displayed at the bottom of the home screen See Operator Controls on page 23 You can also use the procedure bel...

Страница 130: ...ee How to Set Cancel a Funding Code on page 258 How to Load Funds To load funds into the PSD 1 Either Press and select the path Funds Press or 2 Select Add Funds 3 If the system asks for a PIN code en...

Страница 131: ...splays a message If funding fails the system displays a failure message together with the value you are allowed to add depending on your postal account balance In the case of a communication error the...

Страница 132: ...s Time transitions as connecting to the Postal Service sets the Mailing System time and date How to Unlock the PSD Postal inspection To unlock the PSD and manually connect to the postal server 1 Eithe...

Страница 133: ......

Страница 134: ...agement mode 144 5 3 Managing Accounts 145 How to Display the List of Accounts and Groups 148 How to Create a Group 149 How to View Edit a Group or a Subgroup 150 How to Activate Deactivate a Group 15...

Страница 135: ...ced Reporting Functions 168 How to Activate Deactivate the Budget and Surcharge Function 171 How to Modify Period or Start Day of Budgets 171 130 Page 130 Account Management and Access ControlOct 05 2...

Страница 136: ...ou can use accounts and create usage reports No accounts Off postage usage will not be applied to accounts When the accounting function is on the Mailing System charges the current account when printi...

Страница 137: ...sion except if one account only is active Operators only use the accounts you as supervisor allow them to access Selecting an Account Mode The table below summarizes which Account mode corresponds to...

Страница 138: ...g in and when necessary select an account to charge postage Postage tracking by account depart ment PIN number required Account with ac cess control same as modes with accounts listed above Postage tr...

Страница 139: ...nt menu which provides access to the Account mode selection screen the parameters of the current Account mode The Account mode selection screen on which you can select the current Account mode Display...

Страница 140: ...or From the main menu select the path Account Management The Account Mode Management screen is displayed The available options in the Account mode management menu depend on the current Account mode Th...

Страница 141: ...Management Menu on page 134 1 Select the path Account Mode Selection The Account Mode Selection screen is displayed with the current Account mode selected 2 Select the No account option and press OK A...

Страница 142: ...Displaying Account Mode Management Menu on page 134 1 Select the path Account Mode Selection The Account Mode Selection screen is displayed with the current Account mode selected 2 Select No account w...

Страница 143: ...can change the shared system PIN code as follows How to Change the Shared System PIN Code You have to connect as a Supervisor see How to Log in as Supervisor on page 236 1 As supervisor From the main...

Страница 144: ...count Structure Using Groups on page 145 3 Create accounts as indicated in Managing Accounts on page 145 When you activate the Accounts mode the system creates or re activates an account 00000 by defa...

Страница 145: ...ent menu allows you to manage the accounts See next Creating the account structure Creating an Account Structure Using Groups on page 145 Creating accounts Managing Accounts on page 145 140 Page 140 O...

Страница 146: ...unts with access control by following the procedure How to Set up to Accounts with access control mode on page 142 see below 2 Create a structure of account groups that correspond to your reporting an...

Страница 147: ...system displays a confirmation screen 4 Press OK to continue and display the Account Mode Management menu Management Menu in Accounts with access control mode The Account Mode Management menu allows...

Страница 148: ...cation This type of application should be set up by an authorized technician To implement the Remote account Management mode 1 Connect the PC to the Mailing System see System Connections on page 356 a...

Страница 149: ...current Account mode selected 2 Select Remote account management and press OK The following screen is displayed 3 Enter the Xbus name and then press Next The connection is running See next Refer to t...

Страница 150: ...odes If necessary as long as your accounting structure is not complete you can create Accounts without activating them Creating an Account Structure Using Groups As supervisor you can create an accoun...

Страница 151: ...roposes to create accounts and groups in the Main folder The screens of users never mention group names Groups are a supervisor eyes only feature intended for increasing management and reporting effic...

Страница 152: ...the screen indicates the current position in the group levels Status In the Status area the supervisor can change the account status Active this group account has been created is activated and will be...

Страница 153: ...p to open press the group line in the list 2 Press View group content 3 To return to the upper level press Back To print or export the list of accounts see Account List Report on page 196 Managing Gro...

Страница 154: ...New Group The New group screen is displayed 3 Type the group Name 4 Select the group status Active or Inactive 5 To put the group in another group than Main folder to create a subgroup press the Group...

Страница 155: ...double arrows to scroll the list A group that is not in the list is probably a subgroup select its parent group press View group content then select the subgroup in the list 3 Press Modify The Group m...

Страница 156: ...d press OK 7 On the Group modification summary screen press OK 8 A feedback of the status is displayed on the Account list screen Deleting a Group You can delete a group to delete all its content subg...

Страница 157: ...e 32 alphanumeric characters Name Only active accounts are visible to users Active Inactive Status The group that contains the account The group can be The Main folder or Any level 1 or level 2 group...

Страница 158: ...1 Display the Account list screen see How to Display the List of Accounts and Groups on page 148 2 Press New account The New account screen is displayed 3 Enter the account Number and Name using the k...

Страница 159: ...nt Press Active in the Budget area Enter budget parameters To activate and set up surcharge features for the current account Press Active in the Surcharge area Press Fixed rate or Percentage of imprin...

Страница 160: ...Modify If the account is not contained in the list select the group that contains the account press View group content 3 Select Edit Modify The Edit Modify screen is displayed 4 Select each parameter...

Страница 161: ...y the List of Accounts and Groups on page 148 2 Select the account or type its number and press Modify If the account is not contained in the list select the group that contains the account press View...

Страница 162: ...isplayed Account List Import Export Using a USB memory device you can import or export the account list from your mailing machine as a CSV file Imported accounts are created with no hierarchy and adde...

Страница 163: ...At the end of the process a message informs you that you may safely remove the USB memory device Importing Accounts To import accounts into the Mailing System place the CSV file on a USB memory devic...

Страница 164: ...management Manage account Import Account list 2 Insert your USB memory device into the USB port of the base at rear left and press OK 3 Select the CSV file to import and press OK 4 Follow the instruct...

Страница 165: ...ou can create Accounts or Operators without activating them Operator PIN Code Parameters In the Mailing System each PIN code is associated with a name a list of accounts and a status active or not You...

Страница 166: ...the main menu select the path Account management Manage operator The Manage Operator screen is displayed 2 Select Operator List The Operator list screen is displayed You can sort the Operator list by...

Страница 167: ...has been declared but it is not activated and can not be connected as a user Managing the Operator PIN Codes Follow the steps below to create modify activate deactivate or delete Operator PIN codes T...

Страница 168: ...ch operator PIN code must be unique 4 Press Account list to assign accounts to the operator 5 In the Account List screens about the list see How to Display the List of Accounts and Groups on page 148...

Страница 169: ...isplay the Operator list screen see How to Display the Operator List on page 161 2 Select the operator and press Modify The Edit Modify screen is displayed 3 Change the operator parameters and press O...

Страница 170: ...wards to the group will be automatically assigned to the operator On user screens only accounts are displayed Groups and subgroups are only visible to the supervisor How to Assign Accounts to an Opera...

Страница 171: ...ocedure How to Assign Accounts to an Operator on page 165 steps 1 and 2 2 Select the Account or Group and press Unassign or if you want to assign all the Accounts or Groups to the selected Operator pr...

Страница 172: ...ress OK 4 A feedback of the status is displayed in the operator list Deleting Operators Use the procedure below to delete operators How to Delete an Operator To delete an Operator 1 Display the Operat...

Страница 173: ...eriod will soon be reached Additionally the Mailing System will Block postage for accounts that have used their budget Send a message to the supervisor when the budget of an account is reached Reset a...

Страница 174: ...of time This period of time is common to all accounts in the machine When activating the Budget and Surcharge function you must set this period of time to a month or a year and choose a start day Bud...

Страница 175: ...account charge 1 to 99 Percentage of imprint Setting up the Budget and Surcharge Function You may only use Budget and Surcharge features if the Advanced Reporting option is loaded in your Mailing Syst...

Страница 176: ...Surcharge Mgt to activate deactivate the function When the box is checked the budget parameters located underneath on the screen become accessible 4 Select the basic period for budgets month or year 5...

Страница 177: ...harge function and set global parameters you can set the budget and surcharge parameters of an account The Budget and Surcharge buttons are accessible from the Account mode management menu See Managin...

Страница 178: ...Daily Usage Report 188 How to Generate a Monthly Usage Report 189 How to Generate a Permit Report and Historic Reports 191 How to Display the Operational Presort Report and Historic 192 6 6 Funds Dat...

Страница 179: ...Budget Consumption Report 208 How to Generate a Budget Limit Report 209 How to Generate an Operator Activity Report 210 How to Generate a Machine Activity Report 211 How to Generate a Product Code Rep...

Страница 180: ...can be added as an option Reports generally require a beginning date and an end date Your Mailing System allows you to get reports on the activity over the past two years Typically the reports are ava...

Страница 181: ...ge value per month for a selected period Monthly usage Operational Permit Report and Historic Reports on page 190 SP Number of pieces for each type of permit mail since the latest reset Operational Pe...

Страница 182: ...or List Report on page 201 PF Operator list with PIN codes supervisor only Operator list Operator Activity Re port on page 210 SPF Activity of all operators for a selected period Operator activity SYS...

Страница 183: ...ters and choose one of the following to display or record the report On screen viewing Print with external USB printer if connected Print on a postage label Export to a USB memory device To generate a...

Страница 184: ...creen is displayed The information displayed in this screen depends on the type of report you have selected 3 Select or type required parameters and press OK Note you can use key C to clear data in a...

Страница 185: ...he main menu select the path Reports 2 Resume with the steps in How to Generate a Report as a User on page 179 Special generating procedures apply for the following reports Account List Report see How...

Страница 186: ...the operational presort report function if you intend to use it When the function is activated you may have to start a new report each time the postal services update the rate table in the machine Bef...

Страница 187: ...port displays the batch counter and corresponding postage for outgoing mail since the last reset Requirements To generate this report you have to be logged in as a user You must be in Applying postage...

Страница 188: ...How to Generate a Batch Data Report To generate a Batch Data Report 1 See Generating Reports on page 178 6 Reports 183 Page 183 Oct 05 2016 11 35...

Страница 189: ...g mail batch counter Output The Incoming Mail Batch Data Report outputs are Screen USB printer The Incoming Mail Batch Data Report displays the batch counter for incoming mail Received on since the la...

Страница 190: ...How to Generate a Received Batch Data Report To generate an Received Batch Data Report 1 See Generating Reports on page 178 6 Reports 185 Page 185 Oct 05 2016 11 35...

Страница 191: ...port you have to be logged in as a user Output The Postage Data Report outputs are Screen Label Comments Fields On printed report only Die number For today Total number of items processed zero and non...

Страница 192: ...You have to specify the period for the report Begin date and End date When you specify the Begin date the End date field is filled with a proposed value Begin date 31 days You can specify another End...

Страница 193: ...zero Total postage value for this day How to Generate a Daily Usage Report To generate a Daily Usage Report 1 See Generating Reports on page 178 Monthly Usage Report The Monthly Usage Report displays...

Страница 194: ...month Output The Monthly Usage report outputs are Screen USB printer USB memory device Comments Fields On printed report only Die number For the period for each month presented in data collected Mont...

Страница 195: ...he two previously recorded reports Requirements To generate these reports you can to be logged in as a user or supervisor and Permit mode has to be selected Output The Operational Permit Report and Hi...

Страница 196: ...ps to Run Permit Mail on page 77 Operational Presort Report and Historic Reports Three presort reports are available The Operational Presort Report option displays the currently running presort report...

Страница 197: ...e count and postage value Grand total mail piece count and total postage value How to Display the Operational Presort Report and Historic Operational Presort Report 1 To get the report see Generating...

Страница 198: ...tion on funds usage since installation of the machine The content is limited to the history available in the PSD Requirements This report is available as a user or supervisor Output The Funds Summary...

Страница 199: ...e machine Must be equal to ascending descending Control total Total number of normal items Non zero items Total number of zero items Zero Items Total number of zero non zero items Total items How to G...

Страница 200: ...Current date 6 months End Current date On printed report only Die number Represents the new total amount available in the machine For each refill operation performed Refill date time Funding amount Ne...

Страница 201: ...as supervisor The current Account mode has to be Account or Account with access control Output The List report outputs are USB printer USB memory device Comments Data The report displays the account...

Страница 202: ...ort 1 As supervisor From the main menu select the path Account management Manage account Account report 2 Select an Output and then press Get report Single Account Report The Single Account Report dis...

Страница 203: ...te Default period Beginning 1st day of current month End Current date Output The Single account report outputs are Screen Comments Fields Period On printed report only Die number Account number Accoun...

Страница 204: ...report displays all the accounts in active status and accounts inactive or deleted with a postage value Requirements This report is available as a user or supervisor The current account mode has to b...

Страница 205: ...per sub group For each group sub group Group sub group name Total number of items processed Total postage value For each account Account Number Account name Number of items processed zero non zero ite...

Страница 206: ...vated Active account assigned status if there is at least one active account assigned to the operator the value is Yes otherwise the value is No How to Generate the Operator Report You have to connect...

Страница 207: ...outputs are Screen USB printer USB memory device Fields Imprint default settings Default Text Default Ad slogan Default Rate Date advance parameters Funds settings High value Low Funds Connections set...

Страница 208: ...Events Report The Base Events Report lists diagnostic codes on the mailing machine and is used by a service representative Requirements To generate this report you must be logged in as a service repr...

Страница 209: ...rt lists diagnostic codes for the PSD and is used by a service representative A supervisor may generate this report for technical support Requirements To generate this report you must be logged in as...

Страница 210: ...Report Requirements To generate this report you must be logged in as supervisor Output The IP Configuration Report outputs are Screen USB printer USB memory device How to Generate a IP Configuration R...

Страница 211: ...port you must be logged in as supervisor Output The Proxy Configuration report output is Label How to Generate a Proxy Configuration Report To generate a Proxy Configuration Report 1 See Generating Re...

Страница 212: ...et limit Operator activity activity of all operators for a selected period Machine activity activity of the machine presented in hour bands Product code activity per CPC name for a selected period Whe...

Страница 213: ...Budget period Period begin date end date If an account has no Budget Budget and Remaining budget fields show value 0 For each group subgroup Group or subgroup name for each account that consumed posta...

Страница 214: ...their budgets Requirements To generate this report you can be logged in as a user or supervisor Output Screen USB Printer USB Memory device How to Generate a Budget Limit Report To generate a Budget...

Страница 215: ...lt period Begin 1st day of the current month and End current date Output Screen USB printer USB memory device Comments Fields If an account mode without operators has been used during the period the i...

Страница 216: ...date Default period Begin 1st day of the current month and End current date Output Screen USB printer USB memory device Comments Fields Before 7h00 aggregates items performed between midnight and 7h00...

Страница 217: ...roduct Code Report displays the consumption per Customer Product Code for a selected time period Requirements To generate this report you must be logged in as supervisor not as a user 212 Page 212 Oct...

Страница 218: ...oduct Code Description RDFS short name of items on period PPC number only for the country where the CPC is associated with a weight band Total postage value on period The rate table gives the product...

Страница 219: ......

Страница 220: ...ing to Online Services 218 How to Call Online Services Manually as a User 219 How to Call Online Services Manually as Supervisor 219 How to Test the Connection to Online Services 220 7 3 Uploading Sta...

Страница 221: ......

Страница 222: ...m see Options and Updates on page 297 Ink alerts Never run out of ink again The online server monitors your ink supply and mails an alert notification when it is time to re order Remote diagnostics an...

Страница 223: ...For Ink Management the Mailing System automatically connects when it s time to re order ink supplies It is strongly recommended that you leave the Mailing System turned on in sleep mode and connected...

Страница 224: ...g the Mailbox on page 300 How to Call Online Services Manually as Supervisor You have to connect as a Supervisor see How to Log in as Supervisor on page 236 To trigger a generic call 1 As supervisor F...

Страница 225: ...and This test Validates connection parameters see Connection Settings on page 286 Indicates that the server can be contacted Test server Establishes a connection and tests the communication with the s...

Страница 226: ...t the path Online Service Test server 2 As supervisor From the main menu select the path Maintenance Diagnostics Test server The call process starts and displays its sequence of operations on the scre...

Страница 227: ...at the end of each month Your system uploads basic statistic data for basic postal expense management reporting Enhanced reporting is optional see Activating New Options on page 305 How to Upload Rep...

Страница 228: ...that the latest postal rates are installed on your Mailing System When the Postal Service announces changes in its rate and fee schedule the Online Services server automatically downloads the new rate...

Страница 229: ...te is identified as eConfirmation on your Mailing System and in these instructions To be eligible for Postal Service discounts on Delivery Confirmation and Signature Confirmation services you must use...

Страница 230: ...delivery The actual signature and address of the recipient will be displayed on your My Neopost webpage under the online services tab e Confirmation Service Customer Profile If you have purchased the...

Страница 231: ...Customer Service 2 Select the appropriate rate and e Confirmation service on your machine display 3 Apply the metered postage to your mail 4 Deposit your mail with the USPS e Confirmation does not req...

Страница 232: ...ion Items using the WP The Weighing Platform must be connected to your mailing machine Using your Weighing Platform to send a package and request eConfirmation service is simple 1 Place the eConfirmat...

Страница 233: ...the tape to the package Leave the machine ON and connected at night to automatically upload the record to the USPS You can also upload records manually see How to Upload Report Data to the Online Ser...

Страница 234: ...s case you have to edit the corresponding record and change its status Record status PIC Valid Corresponds to a valid mail with eConfirmation Service to track through USPS PIC Deleted Corresponds to m...

Страница 235: ......

Страница 236: ...re 242 How to Activate Deactivate Fractional Postage 243 8 4 Creating Shortcuts 244 How to Create a Rate Favorite 246 How to Create Modify Rate Favorite Shortcuts 247 How to Delete a Rate Favorite 248...

Страница 237: ...e the GEO Code 266 8 10 Adjusting Display and Sounds 269 How to Change the Display Language 269 How to Change the Display Language by Default 270 How to Adjust the Display Brightness 270 How to Change...

Страница 238: ...nserter Mechanical Connection 289 How to Set the Inserter Mechanical Connection as Default 290 8 16 Changing Motorized Conveyor Stacker Positions 291 How to Install the Motorized Conveyor Stacker in L...

Страница 239: ......

Страница 240: ...as one supervisor PIN code that allows you to configure the mailing functions and perform other functions such as managing accounts and access rights generating certain reports etc The Supervisor PIN...

Страница 241: ...sor To log in as Supervisor when you are already logged in 1 As a user Press Menu and select the path Supervisor The Login screen is displayed 2 Type the supervisor PIN code and press OK The superviso...

Страница 242: ...e to connect as a Supervisor see How to Log in as Supervisor on page 236 To exit the supervisor mode 1 As supervisor Press The machine goes to Sleep mode and supervisor is logged out 8 Configuring the...

Страница 243: ...om the main menu select the path Default user settings Default imprint parameters Default rate 2 Select the default rate using the rate wizard 3 Press OK to validate Default Permit The default permit...

Страница 244: ...as Supervisor on page 236 To change the default rate 1 As supervisor From the main menu select the path Default user settings Default imprint parameters Default Permit 2 Select the default permit in t...

Страница 245: ...Supervisor on page 236 To activate de activate Checking on Zero Weight function 1 As supervisor From the main menu select the path Default user settings Base settings Checking on zero weight 2 The Ch...

Страница 246: ...fault user settings Base settings Default weighing type 2 Select a default weighing mode in the list 3 Press OK to validate Automatic Date Advance The Automatic Date Advance function automatically pro...

Страница 247: ...lt imprint parameters Automatic date advance 2 Press the Automatic Date Advance button to Active status 3 Enter the Automatic Date Advance time 00 00 hours is not allowed 4 Select Day to gain access t...

Страница 248: ...nal Postage You have to connect as a Supervisor see How to Log in as Supervisor on page 236 To activate deactivate fractional postage 1 As supervisor Press menu button and select the path Default user...

Страница 249: ...e some buttons of the home screen You can customize Rate favorites buttons Select Rate area which directly select a rate when pressed Direct access buttons Button Bar area which directly access a menu...

Страница 250: ...d to the default rate of the Mailing System Users of the Mailing System can access the complete list of rate favorites and select a rate favorite through the button All rate favorites The rate favorit...

Страница 251: ...in menu select the path Favorites Rate favorites The following screen is displayed 2 Select one empty favorite 3 Press New 4 Press Next to define Mail Class Destination Format Services The new rate fa...

Страница 252: ...te shortcut 1 As supervisor From the main menu select the path Favorites Configure rate favorites shortcuts The following screen is displayed 2 Select a button to configure in the upper area of the sc...

Страница 253: ...e you want to delete 3 Press Delete A confirmation message is displayed 4 Press OK to validate When you delete a Rate Favorite the system automatically delete its shortcut if created Direct Access Sho...

Страница 254: ...reate a direct access shortcut 1 As supervisor From the main menu select the path Favorites Configure direct access The following screen is displayed 2 Select a direct access button 3 Select the funct...

Страница 255: ...rect access shortcut 1 As supervisor From the main menu select the path Favorites Configure direct access The following screen is displayed 2 Select the direct access button to be deleted 3 Select the...

Страница 256: ...Label Dispenser option that prints on label rolls Changing the Default Text You can create up to ten Texts See also Managing Custom Text Messages on page 306 How to Change the Default Text You have to...

Страница 257: ...slogan or None for no ad slogan 3 Press OK to validate Adding a Default Print Position Offset The printing offset is the distance between the right edge of the envelope and the imprint How to Set the...

Страница 258: ...ou have to connect as a Supervisor see How to Log in as Supervisor on page 236 To select the default label printer 1 As supervisor From the main menu select the path Default User settings Base setting...

Страница 259: ...umber The system displays on the home screen the name of the current Imprint Memory Standard Stamp Imprint Memory The table below gives the content of a Standard stamp Imprint Memory Text Imprint sett...

Страница 260: ...ress Create 3 Select the type of mail by pressing Standard or Permit 4 Enter the name of the new Imprint Memory then press Next 5 To include weight put a mail piece on the Weighing Platform then press...

Страница 261: ...lidate or cancel to quit How to Delete an Imprint Memory You have to connect as a Supervisor see How to Log in as Supervisor on page 236 To delete an Imprint Memory 1 As supervisor From the main menu...

Страница 262: ...value warning amount 1 As supervisor From the main menu select the path Default user settings Base settings High value warning threshold 2 Enter the high value warning amount or enter 0 to disable the...

Страница 263: ...ave to connect as a Supervisor see How to Log in as Supervisor on page 236 To set a funding PIN code 1 As supervisor From the main menu select the path Default user settings Funds set tings Credit PIN...

Страница 264: ...also Checking the Sealing Mode on page 57 How to Set the Default Mixed Sealing You have to connect as a Supervisor see How to Log in as Supervisor on page 236 To modify the default mixed sealing 1 As...

Страница 265: ...the Default Moistening Level You have to connect as a Supervisor see How to Log in as Supervisor on page 236 To modify the default moistening level 1 As supervisor From the main menu select the path D...

Страница 266: ...the default weighing method Default Weighing Mode on page 241 Resetting the Weighing Platform You can reset the Weighing Platform in the following ways Weight refresh weight of the mail pieces on the...

Страница 267: ...eighing Platform as user 1 As a user Press Menu and select the path Batch settings Tare Weigh Platform 2 Place the item you want to use on the Weighing Platform 3 Press OK to set weight to zero As Sup...

Страница 268: ...can use the high accuracy mode when the Mailing System table is not perfectly stable Note that the high accuracy mode slows the weighing process down How to Activate the High Accuracy Mode You have t...

Страница 269: ...t Detection on the WP You have to connect as a Supervisor see How to Log in as Supervisor on page 236 To activate the automatic weight detection on the WP 1 As supervisor From the main menu select the...

Страница 270: ...page 236 Press and select the path Default User Settings System Settings ePostage Mode The ePostage Mode screen is displayed 2 Select Activated or Deactivated to activate or deactivate the ePostage M...

Страница 271: ...s the weight values the mailing machine delivers Make sure you enter the correct parameter How to Change the GEO Code You have to connect as a Supervisor see How to Log in as Supervisor on page 236 To...

Страница 272: ...Geodesic map 8 Configuring the System 267 Page 267 Oct 05 2016 11 35...

Страница 273: ...Geodesic codes 268 Page 268 Oct 05 2016 11 35 8 Configuring the System...

Страница 274: ...session 3 languages maximum How to Change the Display Language To change the current display language 1 As a user Press Menu and select the path Preferences 2 Select the language you want to use 3 Pre...

Страница 275: ...Press OK to validate Adjusting Display Brightness You can adjust the brightness of the display for bright or dark working environments How to Adjust the Display Brightness To adjust the display bright...

Страница 276: ...ange the display brightness by default 1 As supervisor Press and select the path Default user settings Default user prefer ences Brightness 2 Use the 1 or 2 keys or touch the Increase Decrease button...

Страница 277: ...Default System Beeps You can set the default beep state for users How to Change the Beeps by Default You have to connect as a Supervisor see How to Log in as Supervisor on page 236 To change the soun...

Страница 278: ...ur current session As supervisor you can set the quiet mode by default How to Activate the Quiet Mode 1 As user Press Menu and select the path Batch settings Quiet Mode Select on display The Quiet Mod...

Страница 279: ...o set the mode by default 1 As supervisor From the main menu select the path Default user settings Base settings Default Quiet Mode The Quiet Mode screen is displayed 2 Select Quiet Mode ON or Quiet M...

Страница 280: ...me out is reached the machine stops Start The period of time in seconds the system waits for the next envelope or label after printing Once this time out is reached the machine stops Stop Period of in...

Страница 281: ...me out setting screen is displayed 2 Select each field and type the time outs 3 Press OK to exit This is a user setting that only lasts as long as you are logged in How to Set Default Time outs You ha...

Страница 282: ...time outs 3 Press OK to validate Time and Date Management The time and date are required for postage and are provided by the postal authorities As a result you cannot manually adjust the machine time...

Страница 283: ...adjusts its time if necessary and displays time and date values If you are processing postage at the time when the clock adjusts for daylight savings time the Mailing System will wait until you are f...

Страница 284: ...as follows Meaning Led RLD Power OFF Off RLD is on and in an idle state Solid Green Error power off on and retry Solid Amber RLD is receiving data Flashing Green Media is out or printhead is open Flas...

Страница 285: ...S Dynamic Scale Use a USB cable to connect the RLD to the base rear left hand side See System Connections on page 356 Declaring Undeclaring the RLD To use the RLD you have to declare the RLD on the Ma...

Страница 286: ...re the RLD press RLD Connected 3 Press Ok to validate 4 Press to power OFF the Mailing System 5 Press to power ON the Mailing System If RLD status is set to RLD Connected the Mailing System detects au...

Страница 287: ...The Set default type of labels screen is displayed 2 Press Roll labels to use the RLD as default label printer 3 Press Ok to validate Maintaining the RLD How to Test the RLD You have to connect as a S...

Страница 288: ...supervisor From the main menu select the path Maintenance Remote Label Dispenser Management The following screen is displayed 2 Press Begin RLD test 8 Configuring the System 283 Page 283 Oct 05 2016 1...

Страница 289: ...Roll 1 Pull frontward the green buttons located on the RLD sides 2 Open the RLD 3 Move the two maintainers apart to disengage the label roll 4 Fit the new label roll 284 Page 284 Oct 05 2016 11 35 8...

Страница 290: ...5 Insert label inside the cutting system 6 Push the label under both of media guides 7 Close the RLD Press down until the cover snaps closed 8 Configuring the System 285 Page 285 Oct 05 2016 11 35...

Страница 291: ...page 359 How to Set the Postal Online Services Connection You have to connect as a Supervisor see How to Log in as Supervisor on page 236 To set the Postal Online Services connection 1 As supervisor F...

Страница 292: ...Log in as Supervisor on page 236 To set the parameters of the LAN 1 As supervisor From the main menu select the path Communication settings LAN settings 2 In the screens that are displayed next enter...

Страница 293: ...l Accounting Software Fusion Navigator Recovering System Control When a PC remotely controls the Mailing System you can recover control as follows How to Deactivate the Remote Control Function 1 On th...

Страница 294: ...he Mailing System and the inserter are not electronically connected you need to activate the Inserter Mode ON to use the Mailing System with the inserter As supervisor you can set the Inserter Mode ON...

Страница 295: ...ectronic connection How to Set the Inserter Mechanical Connection as Default 1 As supervisor From the main menu select the path Default user settings Base settings Default inserter mode 2 Choose ON or...

Страница 296: ...will have to set the corresponding conveying speed and direction of conveyor How to Install the Motorized Conveyor Stacker in Line 0 Assembly of the metallic attachment base 1 Put the flange of the tw...

Страница 297: ...e that the metallic attachment base is correctly installed Stacker Assembly 1 Put the two feet of the Stacker in the two holes shown by the white circles 292 Page 292 Oct 05 2016 11 35 8 Configuring t...

Страница 298: ...ake sure that the Stacker is correctly installed How to Install the Motorized Conveyor Stacker at 90 Assembly of the metallic attachment 1 Put the flange of the two fixation holes as shown by the arro...

Страница 299: ...es of the metallic attachment base B 3 Make sure that the metallic attachment base is correctly installed Stacker Assembly 1 Use a flat blade screwdriver to remove the flap assy from the Stacker 294 P...

Страница 300: ...f the Stacker in the two holes shown by the white circles 3 On the rear side of the Stacker set the switch to 90 4 Make sure that the Stacker is correctly installed 8 Configuring the System 295 Page 2...

Страница 301: ......

Страница 302: ...te New Options 305 9 3 Managing Custom Text Messages 306 How to Display the List of Text Messages 306 How to Add a New Text Message 307 How to Modify or Delete a Text Message 307 9 4 Managing Ad sloga...

Страница 303: ......

Страница 304: ...oading custom Ad slogans Updating your Mailing System via the Online Services server The operations above are available through the supervisor menu The Options and Updates Menu How to Access the Optio...

Страница 305: ...Service via the server On the home screen an icon indicates that the mailbox contains unread messages Unread messages icon on home screen The Mailbox list screen indicates unread messages and also al...

Страница 306: ...As a user Select Mailbox button on display shown below or Press Menu and select the path Mailbox The Mailbox screen is displayed 2 Select the message to read and press View Message 9 Options and Updat...

Страница 307: ...age 236 1 As supervisor From the main menu select the path Mailbox The Mailbox screen is displayed 2 Select the message to read and press View Message How to Clean your Mailbox You have to connect as...

Страница 308: ...n menu select the path Mailbox The Mailbox screen is displayed 2 Select the message to delete and press Delete message or select Delete all messages to delete all the messages 9 Options and Updates 30...

Страница 309: ...cates the options that are activated You can display details for each option For more information about the options you can add to your Mailing System contact your Customer Service To display the opti...

Страница 310: ...activated Contact your Customer Service to have a new option added to your Mailing System How to Load Activate New Options To activate an option that is ready for downloading on the Online Services se...

Страница 311: ...ed in How to Change the Default Text on page 251 The List of Custom Text Messages The Text list displays the messages you have created and indicates the activated default Text if any How to Display th...

Страница 312: ...odify or Delete a Text Message To modify or delete a Text message 1 Display the list of Text messages see How to Display the List of Text Messages on page 306 2 Select a Text message and press OK The...

Страница 313: ...slogan to print How to Add or Cancel an Ad slogan on the Stamp on page 99 Displaying the List of Ad slogans The list of Ad slogans includes those that are installed in the Mailing System It will high...

Страница 314: ...e List of Ad slogans on page 308 2 Select the Ad slogan and press OK The Ad slogan setting menu is displayed To change the name of the Ad slogan 1 Select Modify 2 Change the Ad slogan name using the k...

Страница 315: ...w Ad slogans 1 Display the list of Ad slogans see How to Display the List of Ad slogans on page 308 2 Select Check for updates The Mailing System connects to the Online Services server and downloads a...

Страница 316: ...ee How to Load Activate New Options on page 305 See also Options and Updates on page 297 Displaying the List of Rates This list displays the rates that are installed in the Mailing System and highligh...

Страница 317: ...ad new rates 1 Display the list of rates see How to Display the List of Postal Rates on page 311 2 Select Check for updates The Mailing System connects to the Online Services server and downloads avai...

Страница 318: ...weight see How to activate de activate Checking On Zero Weight on page 240 Displaying the List of Permits How to Display the List of Permits You have to connect as a Supervisor see How to Log in as Su...

Страница 319: ...n your left hand side at the rear of the base See Base connectors on page 359 3 Press OK The USB memory device content is displayed 4 Select a permit to load into the machine and press OK The permit l...

Страница 320: ...w software package contact your Supervisor who must connect to the Online Server Updating Procedure To check for available updates Perform a call to the Online Services server See How to Call Online S...

Страница 321: ...he download at a proposed date and time When the date and time are reached the machine automatically calls the Online Services server for downloading After downloading The Mailing System indicates it...

Страница 322: ...How to Clean the Printing Heads Automatically 325 10 2 Maintaining the Feeder 326 How to Replace the Feeder Fingers 326 10 3 Maintaining the Sealer Water Network 328 How to Fill the Sealer Bottle 328...

Страница 323: ......

Страница 324: ...ced The ink jet technology requires clean print head nozzles to provide excellent printing quality The system performs that cleaning automatically In this Section This section explains how to Check th...

Страница 325: ...ormation screen is displayed How to Display Ink Tank Data Supervisor You have to connect as a Supervisor see How to Log in as Supervisor on page 236 To display the ink level and the tank data 1 As sup...

Страница 326: ...nsumables must be regularly changed in order to ensure good print quality How to Change the Ink Tank 1 Open the ink tank drawer by pulling it towards you 2 Press on the blue release lever to disengage...

Страница 327: ...lick 5 Close the drawer The alignment process of the printing heads starts automatically Displaying Print head information How to Display Print Head Information You have to connect as a Supervisor see...

Страница 328: ...ance Ink management Print head information The Print Head Information screen is displayed Cleaning the Printing Heads If imprints look unclear or dirty in some way test the printing quality and clean...

Страница 329: ...rvisor on page 236 To test the printing quality 1 As supervisor From the main menu select the path Maintenance Ink management Printing quality management The following screen is displayed 2 Press Prin...

Страница 330: ...visor on page 236 To clean the printing heads automatically 1 As supervisor From the main menu select the path Maintenance Ink management Printing quality management The following screen is displayed...

Страница 331: ...eder These Feeder fingers have rubber pads in contact with the mail After a large number of cycles they are subject to wear so that the Feeder cannot catch the mail well In this case you need to repla...

Страница 332: ...replace a Feeder Finger rubber pad 1 Insert the locating pins 1 of the pad in the locating hole 2 at both ends of the feeder finger 2 Press the rubber pad against the feeder finger untils it clips on...

Страница 333: ...continues but the envelopes will not be sealed properly Filling the Sealer Bottle How to Fill the Sealer Bottle To add water 1 Remove the bottle from its base and turn it over 2 Unscrew the cap and fi...

Страница 334: ...y How to Clean the Water Filter To clean the water filter 1 Open the water filter drawer by pulling it towards you 2 Pull the water filter vertically to disengage it 3 Clean the water filter with wate...

Страница 335: ...ng Feeder belts and rollers Cleaning the Mailing System sensors on the mail path Cleaning the Moistening Ramp of the Sealer Make sure your system is off before cleaning How to Clean the Moistening Ram...

Страница 336: ...Pull up the right of the blue release lever to release the moistening ramp 3 Push the moistening ramp backwards to disengage it 4 Remove the moistening ramp 10 Maintenance 331 Page 331 Oct 05 2016 11...

Страница 337: ...the moistening ramp with hot water 6 Re install the moistening ramp 7 Pull the moistening ramp towards you to reengage it 8 Push down on the blue release lever 332 Page 332 Oct 05 2016 11 35 10 Maint...

Страница 338: ...lers To clean the accessory belts and rollers 1 Open equipment covers 2 Clean the belts and or rollers with a cloth and hot water 3 Close the covers Cleaning Mail Path Sensors How to Clean the Mail Pa...

Страница 339: ...Calibrate the Touchscreen You have to connect as a Supervisor see How to Log in as Supervisor on page 236 To calibrate the touchscreen 1 As supervisor From the main menu select the path System setting...

Страница 340: ...PSD Allows installation of a new PSD in mail system Old PSD must have already been withdrawn 3 Update registration This procedure is used if you have changed your address Contact Customer Service to c...

Страница 341: ...main menu select the path Maintenance Service Processes A confirmation message is displayed 2 Press OK 3 Select Update registration 4 Press OK to start the connection to postal services 5 Press RETURN...

Страница 342: ...How to Clear Mail Stalled in the Dynamic Weighing Module 343 11 2 Label Stoppages and Jams 344 How to Clear a Label Jammed in the Base 344 11 3 Weighing Problems 346 11 4 Diagnostics and System Data 3...

Страница 343: ......

Страница 344: ...n the left column Mail sizes see Mail Specifica tions on page 363 Envelope stacking see Using the Feeder on page 106 Mail piece is too thick Mail size is incorrect Envelopes are not properly stacked o...

Страница 345: ...old the handle opened and push on the inside lever to unlock the base drawer 4 Pull the Base drawer towards you 5 Gently tilt the Base drawer on the left side and remove it 6 Remove jammed envelopes 7...

Страница 346: ...lopes only with seal ing OFF 2 Check that already closed envelopes are properly sealed at the leading edge Envelopes not completely closed may jam Sealing is ON while feeding sealed envelopes Correct...

Страница 347: ...blem Envelopes are stalled on the Dynamic Weighing Module deck Action Possible cause 1 Clear the Dynamic Weighing Module as indicated below 2 Correct the cause Mail sizes see Mail Specifica tions on p...

Страница 348: ...en the cover 2 Gently remove jammed envelopes 3 Close the cover Do not lean on or leave any object on the Dynamic Weighing Module platform as it may alter its weighing accuracy To restore the Dynamic...

Страница 349: ...How to Clear a Label Jammed in the Base To clear a label jammed in the Base 1 Try to disengage the blocked label from the top of the dispenser If it is not possible do the following 2 Remove all label...

Страница 350: ...er towards you 6 Gently tilt the base drawer on the left side and remove it 7 Remove jammed labels 8 Put the Base drawer back into place 9 Release the jam release handle 11 Troubleshooting 345 Page 34...

Страница 351: ...latform see Weighing Devices Settings on page 261 Something is touching or lying on the Weighing Platform See the Weighing Platform zeroing procedures in Weighing Devices Settings on page 261 The Weig...

Страница 352: ...To avoid weighing errors be sure the Weighing Platform is clear when starting the machine 11 Troubleshooting 347 Page 347 Oct 05 2016 11 35...

Страница 353: ...ow Comments Diagnostic No Sends a message to a server if connected to check the line Ping Server 1 Reports the status 0 or 1 of the sensors below Base Sensors Dynamic Weighing Module Sensors Feeder Se...

Страница 354: ...r you have access to the following data Software data PSD Loader OS PACK XNDF DATA OMEGA language variant Hardware data P N of the base and the PSD Events logs Base events and PSD events or Server con...

Страница 355: ...nect as a Supervisor see How to Log in as Supervisor on page 236 To display the events lists 1 As supervisor From the main menu select the path Maintenance System Infomation Events list 2 Select the B...

Страница 356: ...ow to Log in as Supervisor on page 236 To display the data of the machine counters 1 As supervisor From the main menu select the path Maintenance System Infomation Counters 2 The system displays the d...

Страница 357: ......

Страница 358: ...our Mailing System 12 1 General Specifications 355 12 2 System Connections 356 12 3 System Connectors 359 12 4 Mail Specifications 363 12 5 Operating Specifications 365 12 6 Environmental conditions 3...

Страница 359: ......

Страница 360: ...31 49 x 13 77 Weight 63 93 lb Power supply 120 V 10 3 prong Frequency 60 Hz Maximum Current Rating 5A Ambient Temperature 50 F to 104 F Relative Humidity 20 to 80 relative humidity without condensati...

Страница 361: ...System Connections 12 2 Base Feeder CAN Power 356 Page 356 Oct 05 2016 11 35 12 System Specifications...

Страница 362: ...Base Feeder Dynamic Weighing Module CAN Power 12 System Specifications 357 Page 357 Oct 05 2016 11 35...

Страница 363: ...Base Stacker Power 358 Page 358 Oct 05 2016 11 35 12 System Specifications...

Страница 364: ...System base ON OFF switch To wall socket Power connector To Conveyor Stacker Power connector For future use RJ 45 To any USB device USB ports USB devices Keyboard Remote Label Dispenser Printer LAN ad...

Страница 365: ...r or Dynamic Weighing Module CAN To display DVI Connector To Feeder or Dynamic Weighing Module Power connector USB devices Keyboard Printer LAN adaptor Bar Code Reader All USB devices have to be plugg...

Страница 366: ...Feeder connectors To Base or Dynamic Weighing Module Power connector To Feeder or Dynamic Weighing Module CAN For future use RJ45 12 System Specifications 361 Page 361 Oct 05 2016 11 35...

Страница 367: ...Weighing Module connectors To Base CAN To Feeder CAN To Base Power connector To Base Power connector Conveyor Stacker connectors To Base Power connector 362 Page 362 Oct 05 2016 11 35 12 System Specif...

Страница 368: ...ensions and weights Max length 13 10 on system with dynamic scale Max width 15 13 on system with dynamic scale Min length 3 5 Min width 5 Flap max height 3 Min thickness 0 008 with minimum thickness g...

Страница 369: ...Remote Label Dispenser Label storage recommended room temperature 77 F and relative humidity 50 Mind the Best before date ILD labels These labels are pre cut and self adhesive ILD labels dimensions a...

Страница 370: ...5 Dynamic Weighing Module Range Resolution in dynamic weighing mode lb oz Operating conditions Ambient temperature 50 104 F Relative humidity 80 max without condensation 365 Page 365 Oct 05 2016 11 3...

Страница 371: ...id and steady table and away from air movement Away from doors Away from any fan Dynamic Weighing Module Environment The Dynamic Weighing Module uses optical sensors do not install it in an area expos...

Страница 372: ...sition on page 101 3 1 Print Position Selecting a Weighing Mode on page 88 3 2 Weighing modes Weighing Devices Settings on page 261 3 3 Tare Weighing Platform 3 4 Zero Weighing Platform 3 5 Weight ref...

Страница 373: ...e 55 6 Account selection Reports on page 173 7 Reports Presort current batch Presort historical latest date Presort historical latest date 1 Batch data Funds summary Daily usage Monthly usage Single a...

Страница 374: ...records 10 7 E services record list Counting Piece on the Weighing Plat form on page 83 11 Piece Counting 12 User Preferences Changing the Dis play Language on page 269 12 1 Language Enabling Disabli...

Страница 375: ...Funds summary Adding Postage Daily usage Monthly usage Machine configuration Operator activity Budget limit report Product code report Single Account Multi Account Single account Base events PSD event...

Страница 376: ...tening Default Level on page 260 3 2 3 Default moistening level Adding a Default Print Position Offset on page 252 3 2 4 Print Position Weighing Devices Settings on page 261 3 2 5 Default weighing mod...

Страница 377: ...page 258 3 4 Funds settings System Time outs on page 275 3 5 Time out settings Imprint Memories on page 254 4 Imprint Memories 5 Account management Implementing an Account Mode on page 134 5 1 Accoun...

Страница 378: ...ro the Weighing Platform on page 262 6 1 2 Zero Weighing Platform 6 2 Accessories and modules settings Dynamic Weighing Module High Accur acy Mode on page 263 6 2 1 High accuracy GEO Code on page 266...

Страница 379: ...formation 7 3 Diagnostics Diagnostics on page 348 7 3 1 Ping server 7 3 2 System Status 7 3 2 1 Base Sensors 7 3 2 2 Dynamic Scale Sensors 7 3 2 3 Feeder Sensors 7 3 2 4 Remote Label Dispenser Sensors...

Страница 380: ...s on page 306 8 2 Text settings Managing Ad slo gans on page 308 8 3 Ad slogan management Managing Postal Rates on page 311 8 4 Rate management Managing Permits on page 313 8 5 PPI management 9 Commun...

Страница 381: ...r loading 10 6 Save Customer Data 10 7 Upload Customer Data Uploading Statistics on page 222 10 8 Statistics upload e Confirmation Ser vices on page 224 10 9 Upload E Services Records 10 10 E Services...

Страница 382: ...7 129 131 134 138 143 145 146 151 152 153 157 158 160 165 168 172 173 175 181 187 217 218 220 224 226 227 228 229 231 241 244 245 248 251 252 253 254 257 258 261 263 264 265 269 270 271 272 273 275 27...

Страница 383: ...14 223 319 Ink tank 14 319 Ink Tank 14 45 367 370 installation 175 193 291 335 internal label dispenser 364 Internal label dispenser 13 61 Internal Label Dispenser 4 45 61 119 251 item 45 89 93 Item 5...

Страница 384: ...24 Postage Imprint and Rate Section 23 Postal Security Device 4 123 power 6 33 120 218 279 Power 275 279 355 356 357 358 359 360 361 362 PPI 4 370 Pressure rollers 17 print base 13 Print Base 11 13 14...

Страница 385: ...ghing Platform 89 261 370 task 3 41 182 Task 23 40 41 46 72 Text 24 41 42 72 95 97 104 157 251 254 299 306 307 348 370 thickness 106 363 Thickness 364 time 4 6 127 169 181 190 211 212 235 275 277 278...

Страница 386: ...4149616R G 10 10 2016...

Отзывы: