4
PARTS LIST
PLEASE CHECK TO BE SURE YOU
HAVE ALL THE PARTS SHOWN BEFORE
BEGINNING ASSEMBLY. IF YOU ARE
MISSING ANY PARTS, PLEASE
DO NOT
RETURN THIS PRODUCT TO THE STORE.
PLEASE
CALL OUR CUSTOMER SERVICE DEPARTMENT
AT
+44 (0) 1704 549881
OR CONTACT US AT
.
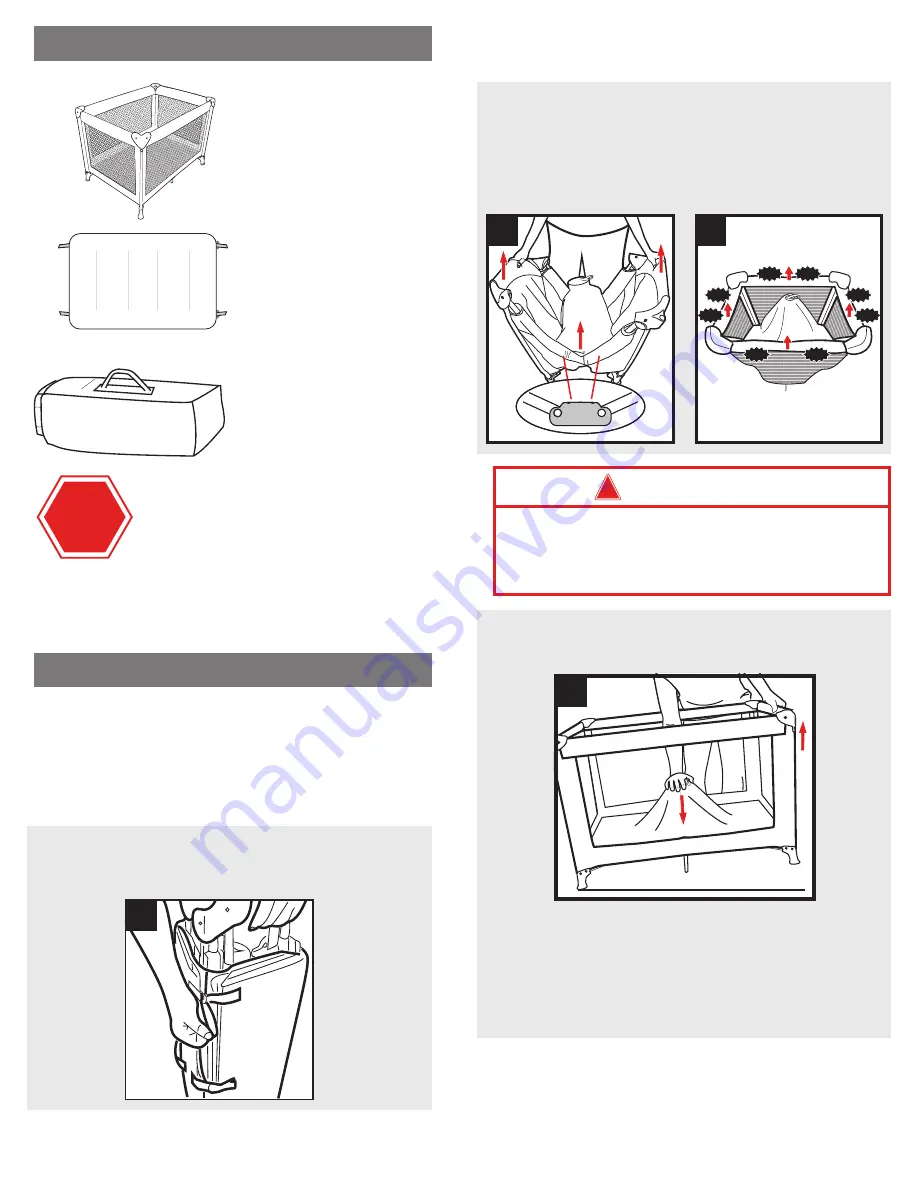
TRAVEL COT SETUP
1.
Remove all contents from packaging, and discard box and
polybags.
2.
The cot comes packed within the carry bag and wrapped
within the mattress:
• Remove travel cot/mattress assembly.
TO OPEN:
3.
Open two (2) hook-and-loop straps securing the mattress.
4.
Stand cot on feet with the
CENTER UP
. Do
NOT
push center
locking mechanism down yet.
!
ALL FOUR RAILS MUST BE SECURELY LOCKED AND RIGID
BEFORE
CENTER LOCKING MECHANISM IS PUSHED DOWN.
5.
Each railing has
TWO (2)
locks as shown. Both locks on each
railing
MUST
‘click’ and lock for the cot to be secure:
• Grasp railing firmly and lift upwards. You will hear
TWO (2)
‘clicks’.
• Repeat on all four (4) rails.
6.
Slightly lift one end of the cot and push center locking
mechanism down.
!
ENSURE
all railings are securely locked by pushing
down on each rail. If rail is not locked, re-lift center
locking mechanism and pull up again until rail
‘clicks’ into its locked position. If rails do not lock, lift
the center locking mechanism
HIGHER
.
7.
Place mattress into cot
ENSURING
padded side up (hard side
downward).
Travel Cot
Mattress
Carry bag
3
STOP
1
2
5a
5
CLICK
CLICK
CLICK
CLICK
CLICK
CLICK
CLICK
CLICK
5b
WARNING!
!
NEVER LEAVE CHILD IN PRODUCT WITH SIDE
LOWERED. Be sure side is in raised and locked
position whenever child is in product.
6


