Harmar Mobility Pinnacle SL300 Скачать руководство пользователя страница 11

SL300 PINNACLE STAIRLIFT:


Install Manual

26MAY2022  |   630-00100 J

11

INSTALLATION

PINNACLE STAIRLIFT: SECTION 4

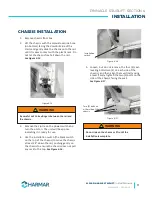
CHASSIS INSTALLATION

1.  Remove chassis from box.

2.  Lift the chassis with the manual override hole 

(on bottom) facing the downhill side of the 

stairs and gently slide the chassis onto the rail 

until it makes contact with the plastic rack. Do 

not let the chassis free fall down the rail.  

See Figure 4-15.

Figure 4-15

3.  Remove the zip tie on the power switch and 

turn the unit on. The unit will beep once 

indicating it is ready for use. 

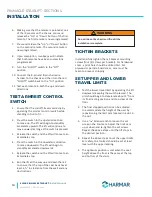
4.  Use the installation switch (the black switch 

on the top of the chassis) to move the chassis 

at least 24" down the rail, pushing gently on 

the chassis to ensure the chassis does not pull 

any rack to the top. 

See Figure 4-16.

Figure 4-16

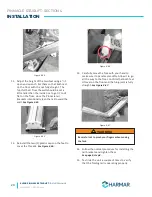
5.  Loosen, but do not remove, the four (4) seat-

leveling bolts (two (2) on each side of the 

chassis), and then align them vertically using 

a level. Firmly tighten the two (2) bolts on the 

side of the chassis facing the wall.  

See Figure 4-17.

Figure 4-17

Do not ride on the chassis or lift until the 
installation is complete.

WARNING

!

Be careful not to trap fingers between the rail and 
the chassis. 

WARNING

!

Installation 

switch

Two (2) bolts on 

either side of the 

chassis

Содержание Pinnacle SL300

Страница 1: ...26MAY2022 630 00100 J PINNACLE STAIRLIFT INSTALLATION SERVICE MANUAL SL300 SL300FR...

Страница 2: ......

Страница 3: ...TALLATION 7 Determine Overall Rail Length 7 Installation Site Electrical Requirements 8 Rail Installation 8 Zero Intrusion Installation 10 Chassis Installation 11 Final Rail Installation 12 Footrest a...

Страница 4: ...ditions and verify that the location is acceptable before performing installation and or servicing tasks If you do not understand any portion of the installation or operation procedures please consult...

Страница 5: ...equipment without written authorization by the manufacturer is prohibited and will void the warranty WARRANTY Please ensure that you advise the owner of the Pinnacle SL300 stairlift to fill out the se...

Страница 6: ...aw SAE socket set SAE wrenches Tape measure Volt meter INCLUDED PARTS Before beginning installation inspect and check the box contents and report any damage or missing items to Harmar Chassis 2 wirele...

Страница 7: ...1 Figure 4 1 3 For a normal stairway with adequate space for a landing add 7 to the nose to floor measurement This will provide enough rail length to allow the stairlift to be adjusted so that the fl...

Страница 8: ...om of the stairs and the plastic rack facing up Place and object that measures 1 2 between end plate and the floor See Figure 4 4 Figure 4 4 NOTE Use the chair box or another heavy object like a toolb...

Страница 9: ...rear of the first step from the bottom landing The second and third brackets should be placed and tightened on the steps on each side of the rail joint again so the back of the bracket touches the rea...

Страница 10: ...STALLATION 1 Measure A top landing to B bottom landing See Figure 4 12 Figure 4 12 2 7 of overrun should be added for a normal overrun with no obstructions within 3 9 of the nose of the top step See F...

Страница 11: ...ing it is ready for use 4 Use the installation switch the black switch on the top of the chassis to move the chassis at least 24 down the rail pushing gently on the chassis to ensure the chassis does...

Страница 12: ...erted Allen screw with a 5 64 Allen wrench This will be used to set the final upper limit for the stairlift See Figure 4 20 Figure 4 20 4 Remove the charging strips from the rail box Connect the charg...

Страница 13: ...ocation of a wall power supply Minimize wire length and intrusion Use care in routing the charger lead If possible secure along or inside wall to avoid the creation of a tripping hazard WARNING FOOTRE...

Страница 14: ...e vertical seat support shroud and secure to vertical seat support with four 4 screws that were removed in step 3 8 Position the seat directly aligned over the chassis and place onto the seat swivel p...

Страница 15: ...st See Figure 4 33 Figure 4 33 6 Re terminate the wires and connect the switch 7 Reassemble the armrests and seatbelt bolts REMOTE CONTROL RE PROGRAMMING All call send controls are factory programmed...

Страница 16: ...o smoothly accelerate downwards 5 Release the switch and the lift will come to an immediate stop 6 Run the lift all the way up and down the rail to ensure that the top of the seat back has at least a...

Страница 17: ...immediately stop the lift immediately call Harmar for assistance in diagnosing and repairing the problem Do not use the lift ADDITIONAL SYSTEM CHECK 1 After the successful testing of all safety switch...

Страница 18: ...ith the nuts on the same side as the folding mechanism See Figures 4 34 and 4 35 Figure 4 34 Figure 4 35 2 Expand and snap the two 2 brackets over the rail so the top is in the bracket groove See Figu...

Страница 19: ...will leave about 1 2 of clearance at the ball of the gas spring See Figure 4 41 Figure 4 41 7 Fasten down the near corner of the lower bracket using a drill that has extensions at least 10 and a 3 8 s...

Страница 20: ...il toward the wall See Figure 4 45 Figure 4 45 12 Reinstall the two 2 plastic caps on the feet to cover the threads See Figure 4 46 Figure 4 46 13 Carefully move the fork with your hand to make sure i...

Страница 21: ...end of the rail If the beep codes are not able to be cleared and the lift is not working please contact Harmar technical support If no light shows on the charger a problem with the AC power adapter ma...

Страница 22: ...cking the downward passage Folding rail model If the stairlift still does not operate after testing the sensors turn the unit off and re check all wire connections Turn the unit on again and re check...

Страница 23: ...SL300 PINNACLE STAIRLIFT Install Manual 26MAY2022 630 00100 J 23 NOTES...

Страница 24: ...1500 Independence Blvd Ste 220 Sarasota FL 34234 800 833 0478 harmar com...

Отзывы: