


CHAPTER 3: OPERATIONS
Setting the input levels:
To match your amplifier’s input sensitivity (gain) to your source unit’s output
level, we recommend the following procedure:
A.
Turn both input level controls counterclockwise to MIN (minimum).
B.
Play a dynamic music track through your source unit. Turn the source unit’s
volume control to the 3/4 position.
C
. Turn the front input level control dial clockwise towards MAX until you hear
distortion in the music (it’s no longer clear).
D.
Slowly turn the front level input control dial counterclockwise until the music
sounds clear again.
E.
Your front input level is now correctly set. Repeat this process with the rear
channels.
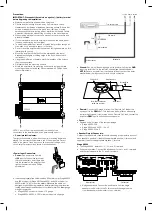
Setting the crossover
Properly setting crossover filter selectors optimizes frequency distribution for
efficient speaker operation and best sound.
Step 1:
Use the slider controls to select low-pass (LPF), FULL, or high-pass
(HPF).
• LPF: Low pass. Choose this setting if you are connecting a subwoofer(s) or
want to provide a low-pass filter for separate mid-bass speakers.
•
FULL: Full range. Choose this setting if you are connecting full-range
speakers and are not using a subwoofer in your system.
• HPF: High pass. Choose this setting to prevent low bass from reaching
midrange or full-range speakers when you are using a subwoofer in your
system.
Step 2:
Use crossover-filter frequency controls to adjust crossover point
settings for coaxial speakers and subwoofers to suit listener preference. Turn
the dials to the left to lower the crossover point and to the right to raise the
crossover point. Exact crossover settings for coaxial speakers and subwoofers
finally depend on your listening preferences. NOTE: crossover point does not
apply in FULL mode.
The Stage 3001A also lets you choose the center
frequency of the bass boost – the frequency that
receives the most boost effect. Turn the FREQ dial to
the right to adjust the center frequency. The frequency
you choose depends on your listening preferences.
CHAPTER 4: TROUBLESHOOTING
PROBLEM:
No audio and POWER INDICATOR is off.
CAUSE and SOLUTION: No voltage at BATT+ and/or REM terminals, or
bad or no ground connection. Check voltages at amplifier terminals with
VOM.
PROBLEM:
No audio and PROTECT INDICATOR flashes every 4
seconds.
CAUSE and SOLUTION: DC voltage on amplifier output. Amplifier may
need service; see enclosed warranty card for service information.
PROBLEM:
No audio and PROTECT INDICATOR is on.
CAUSE and SOLUTION: Amplifier is overheated. Make sure amplifier
cooling is not blocked at mounting location. Verify that speaker-system
impedance is within specified limits. Or, there may be voltage greater than
16V (or less than 8.5V) on BATT+ connection. Check vehicle charging
system.
PROBLEM:
No audio and PROTECT and POWER INDICATORS flash.
CAUSE and SOLUTION: Voltage less than 9V on BATT+ connection.
Check vehicle charging system.
PROBLEM:
Distorted audio.
CAUSE and SOLUTION: Gain is not set properly. Check INPUT LEVEL
setting. Check speaker wires for shorts or grounds. Amplifier or source
unit may be defective.
PROBLEM:
Distorted audio and PROTECT INDICATOR flashes.
CAUSE and SOLUTION: Short circuit in speaker or wire. Remove speaker
leads one at a time to locate shorted speaker or wire, and repair.
PROBLEM:
Music lacks dynamics or "punch."
CAUSE and SOLUTION: Speakers are not connected properly. Check
speaker connections for proper polarity.
PROBLEM:
Amplifier fuse keeps blowing.
CAUSE and PROBLEM: The wiring is connected incorrectly or there is a
short circuit. Review installation precautions and procedures in manual.
Check wiring connections.
PROBLEM:
Engine noise—whining or clicking—in system when the
engine is on.
CAUSE and PROBLEM: Amplifier is picking up alternator noise. Turn
down gain. Move audio cables away from power wires. Install an
alternator noise filter on power line between battery and alternator. Check
ground connections on the amplifier since a loose or improper ground is
one of the main causes for extraneous noise in your audio system.
Selecting the subwoofer phase
With the Stage A3001, you can choose a subwoofer
phase output of 0° or 180°. To check your sub's
phase, play music with lots of bass and listen as
another person slowly turns the dial back and forth
between 0 and 180 degrees. The correct setting is the
one that gives you more bass. If you don't detect any
real difference, leave the dial in the 0 setting.
© 2018 HARMAN International Industries, Incorporated. All rights reserved.
JBL is a trademark of HARMAN International Industries, Incorporated, registered in the
United States and/or other countries. Features, specifications and appearance are subject
to change without notice.
HARMAN International
Industries, Incorporated
8500 Balboa Boulevard,
Northridge, CA 91329 USA
www.jbl.com
CHAPTER 5: SPECIFICATIONS
Model
Stage A6002
60W
60W
90W
N/A
0.2V
0.2V
0.2V
0.2V
>75dB
>75dB
>75dB
>75dB
<1%
<1%
<1%
<1%
20A
2 x 15A
2 x 20A
2 x 15A
95 x 230 x 190 (mm)
95 x 260 x 190 (mm)
95 x 325 x 190 (mm)
95 x 313 x 190 (mm)
1.16kg
1.381kg
1.806kg
1.609kg
9 – 16V
9 – 16V
9 – 16V
9 – 16V
<1.0A
<1.2A
<1.5A
<1.5A
70W
70W
110W
300W
140W
140W
220W
N/A
280W
560W
880W
600W
20Hz – 20kHz @ -1 dB
20Hz – 20kHz @ -1 dB
20Hz – 20kHz @ -1 dB
10Hz – 320Hz @ -3 dB
12V
12V
12V
12V
0.5V
0.5V
0.5V
0.5V
5V
5V
5V
5V
Stage A6004
Stage A9004
Stage A3001
RMS power
@ 4 ohms
RMS power
@ 2 ohms
RMS bridged
power @ 4 ohms
Total
peak power
Frequency
response
Maximum high
input signal
level
High input
maximum
sensitivity
Maximum
line input
signal level
Model
Stage A6002
Stage A6004
Stage A9004
Stage A3001
Line input
signal maximum
sensitivity
Line-in
signal-to-noise ratio
(reference to 1 watt)
THD+ N at
rated power
(20Hz – 20kHz)
Fuse
size
Dimensions (H x W x D)
Weight
Operating
voltage
Quiescent
current draw
Bass EQ level and frequency:
You can increase the bass output of your system with
the Bass EQ feature up to +12dB. Turn the LEVEL dials
to the right to increase the bass output.
12
A
B
C
D
E


