THANK YOU
for choosing the JBL Stage 800BA powered subwoofer. To ensure
maximum performance, we strongly recommend that you have it installed by a
qualified professional – while these instructions offer general installation guidance,
they do not show specific installation methods for your particular vehicle. If you do
not have the necessary tools or hands-on experience, do not attempt the
installation yourself; instead, ask your authorized JBL car-audio dealer about
professional installation options.
INSTALLATION
IMPORTANT:
Disconnect the vehicle’s negative (–) battery terminal before
beginning the installation.
•
Always wear protective eyewear when using tools.
•
When making electrical connections, make sure they are secure and
properly insulated.
•
If you must replace the fuse, be sure to use the same type of fuse and
current rating as that of the original.
CHOOSING A MOUNTING LOCATION
Choose a location that doesn’t prevent you from loading or unloading cargo,
interfere with fold-down seats, or keep you from being able to open or close the
trunk lid, or interfere with the safe operation of the vehicle.
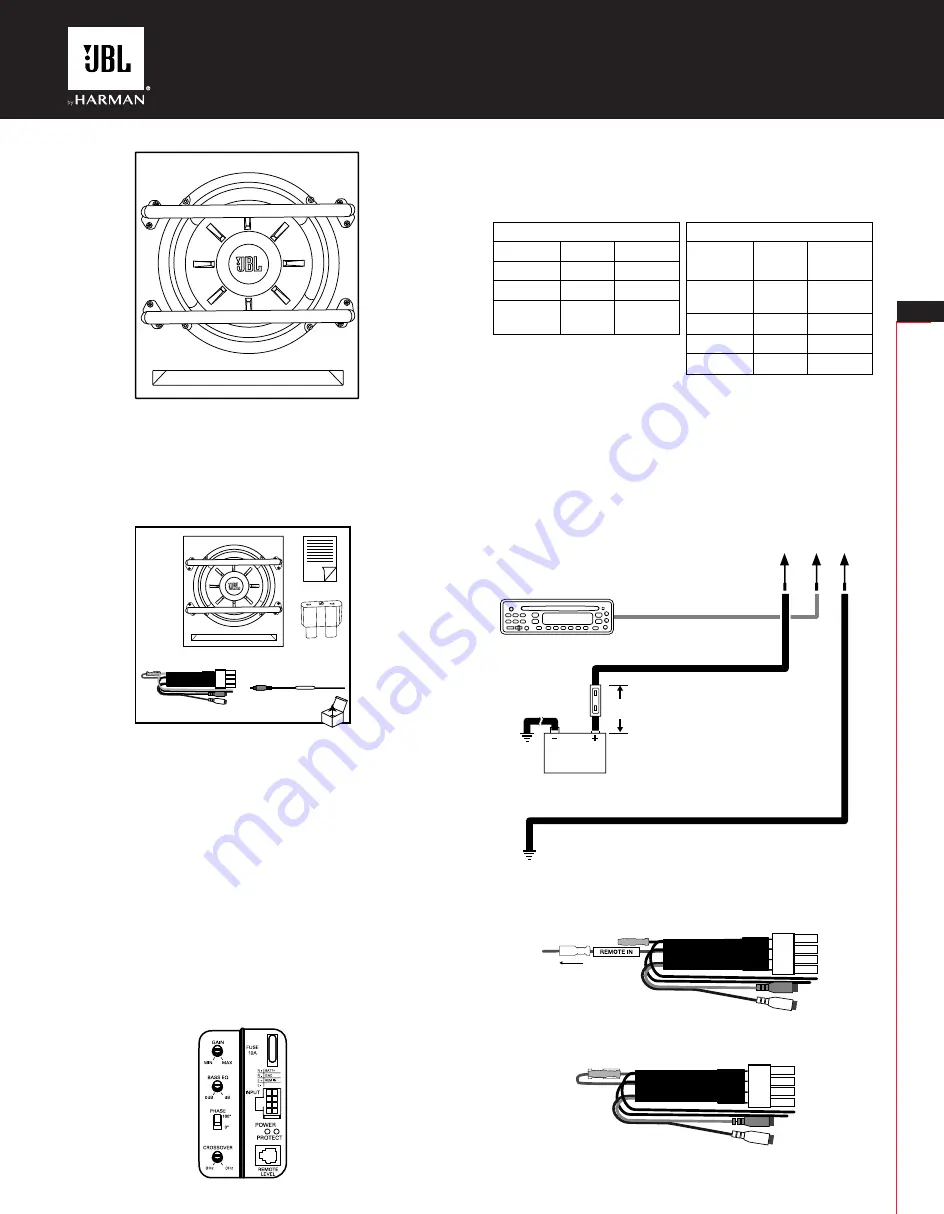
STAGE 800BA WIRING
You’ll make all signal and connections, and adjust all settings at the panel on the
back of the Stage 800BA.
The package includes a wiring harness that features all necessary wires for power,
ground, and signal, and plugs into the “INPUT” connector on the back panel of
the Stage 800BA. It also includes a pair of RCA adapters for use with
speaker-level inputs.
FOR POWER
Connect the end of the red 16-gauge power wire to your vehicle’s + (positive)
battery terminal. Note: If an extension cable is necessary because of your
mounting location, we recommend that you connect the extension to the power
wire using solder. You must also install a fuse holder with a 10A fuse in-line and
within 18" of the battery.
FOR GROUND
Connect the 16-gauge black ground wire to a solid, metal point on the vehicle’s
chassis using a ring terminal. Use sandpaper to clear the paint from the metal
surface at the chassis location. Use a star-type lock washer to secure the wire.
REMOTE IN
If you’re using line-level inputs to provide signal to the Stage 800BA (see below),
uncouple the bullet connector on the blue/white wire, and connect the longer wire
marked with “REMOTE IN” to the remote output wire on your source unit.
If you’re using speaker-level inputs to provide signal to the Stage 800BA (see below),
you must leave the bullet connector coupled so that the blue/white wire makes a
loop.
When you’ve made all the necessary power and signal connections to the Stage
800BA wiring harness, plug the harness into the input marked “INPUT”.
Stage 800BA Subwoofer
+12 volt
To in-dash receiver
Vehicle battery
Vehicle chassis
Remote Ground
>#10AWG (0.82mm
2
) wire
>#10AWG (0.82mm
2
) wire
10A fuse
18" (46cm)
Wiring harness
+12V
16AWG
Red
GND
16AWG
Black
Remote in
22AWG
Blue/white
RCA
White – left
Red – right
Speaker-level input adapters
RCA
White – left
Red – right
L+
22AWG
Gray
L-
22AWG
Gray/Black
R+
22AWG
Green
R-
22AWG
Green/black
9
6
20
REMOTE OUT
x1
x1
x1
x2
x1
To radio remote
output wire
EN


