background image

15

Operation

5. 

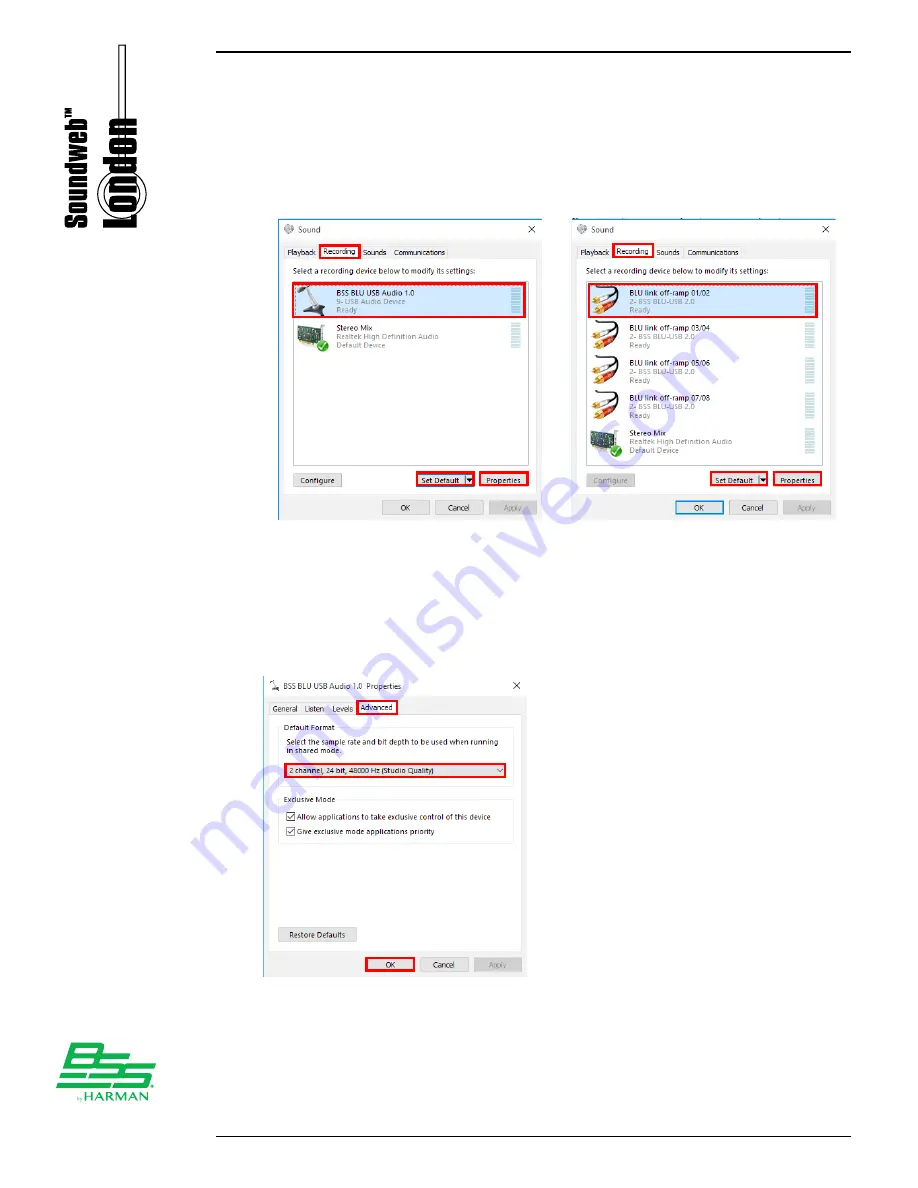
To off-ramp signals from the BLU link bus to the computer: select the 

Recording

 tab, select the BLU-USB from the list, then click the 

Set 

Default

 button. When the BLU-USB has been configured as the default 

recording device it will be indicated with a green check mark. Now click 

the 

Properties

 button. 


Class 1 (2 x 2) Mode

Class 2 (8 x 8) Mode

6. 

In the Properties window, go to the 

Advanced

 tab then select the sample/

bit rate setting which matches the BLU link bus. If using Class 1 mode, 

you MUST set the sample rate to 48000Hz. If using Class 2 mode, it is 

recommended to select the "24 bit" setting for best performance. When 

done, click 

APPLY

 then 

OK


Содержание BSS Soundweb London BLU-USB

Страница 1: ...Installation Guide 8 x 8 USB BLU link Bridge BLU USB...

Страница 2: ...reened and connected as follows This equipment must be earthed It should not be necessary to remove any protective earth to prevent ground loops Any such disconnections are outside the recommended pra...

Страница 3: ...e BLU USB 5 Assigning BLU link Channels with the DIP Switches 6 Applying Power to the BLU USB 7 Making Connections 8 BLU link Port Status LED Descriptions 9 Attaching the Cable Cover 10 OPERATION 11 S...

Страница 4: ...ons are required around a large conference table Other BLU USB example applications include Conferencing using soft codecs Interface Cisco Jabber Microsoft Skype for Business etc with a Soundweb Londo...

Страница 5: ...ded Screws for Mounting to Surface 4 Washers for Mounting to Surface Cable Cover Power Supply with IEC Cable USB Cable 2 Meter Features 8 x 8 USB BLU link Bridge No Driver Needed when Operating at 48k...

Страница 6: ...tches Use these DIP switches to assign BLU link on ramp from computer to BLU link and off ramp from BLU link to computer channel banks See Assigning BLU link Channels with the DIP Switches on page 6 f...

Страница 7: ...uting more than 2 channels to from the Windows computer and or 2 operating the BLU link bus at a 96kHz sample rate To use the full capabilities of the BLU USB with a Windows computer the BLU USB Windo...

Страница 8: ...ts to the side of the BLU USB chassis using the four included fine threaded screws 2 Mount the BLU USB to the surface using the four included coarse threaded screws and washers Mounting Surface NOTE F...

Страница 9: ...hannels This table can also be found printed on the bottom of the BLU USB chassis NOTE Channels 1 256 are available when operating at a 48kHz BLU link sample rate channels 1 128 are available when ope...

Страница 10: ...included power supply s 2 pin Euroblock connector to the BLU USB s Power input 2 Connect the included IEC power cable from the power supply to the AC mains outlet White Black To AC Mains NOTE The BLU...

Страница 11: ...peration USB Port BLU link IN NOTE All BLU link connections must be made using Category 5e or higher cabling Connecting the last BLU link device in the chain back to the first device will provide redu...

Страница 12: ...eived from the connected device The green LEDs light to indicate the port is linked to the BLU link bus IN OUT BLU link 12VDC 4 W BLU link ON RAMP UL600 No Orange LEDs On This indicates the device is...

Страница 13: ...ower and BLU link cables are routed through an access hole in the surface use the included Cable Cover to hide the cables and access hole for a clean look To attach the Cable Cover 1 Line up the Cable...

Страница 14: ...LED This mode is USB Class 2 compliant and requires an additional driver be installed to use the BLU USB with a Windows computer NOTE Mac computers do not require any additional drivers and will use t...

Страница 15: ...48kHz BLU link sample rate When using the BLU USB BLU link will always be the clock master and provide the clock for the USB connection This means that any computer audio played back through USB which...

Страница 16: ...s either 48kHz 24 bit or 96kHz 24 bit If using a software application that allows independent audio routing consult the software application s help for information on configuring audio hardware and ro...

Страница 17: ...evice it will be indicated with a green check mark Now click the Properties button Class 1 2 x 2 Mode Class 2 8 x 8 Mode 4 In the Properties window go to the Advanced tab then select the sample bit ra...

Страница 18: ...device it will be indicated with a green check mark Now click the Properties button Class 1 2 x 2 Mode Class 2 8 x 8 Mode 6 In the Properties window go to the Advanced tab then select the sample bit...

Страница 19: ...em Preferences 2 Click the Sound icon 3 To on ramp signals from the computer to the BLU link bus under the OUTPUT tab select the BLU USB as the output device 4 To off ramp signals from BLU link to the...

Страница 20: ...ist then select the sample bit rate setting which matches the BLU link bus If using Class 1 mode you MUST set the sample rate to 48000Hz If using Class 2 mode it is recommended to select the 24 bit se...

Страница 21: ...mance To adjust the BLU USB s ASIO settings 1 From the software program locate the ASIO control panel See the software program s help file for further information 2 Once the ASIO control panel has bee...

Страница 22: ...devices which require manual sample rate configuration must also be re programmed to match Once the manually configured BLU link devices have been re configured any auto sensing BLU link devices that...

Страница 23: ...20 Dimensions DIMENSIONS IN OUT BLU link 12VDC 4 W BLU link ON RAMP BLU link OFF RAMP UL60065...

Страница 24: ...48kHz 96kHz compatible with Class 2 USB mode only Connectors 2 x RJ45 Ethernet connector Maximum Cable Length 100m 328ft on Category 5e cable between devices Pass Through Latency 4 Fs 0 08ms at 48kHz...

Страница 25: ...ndon BLU USB Installation Guide PN 5078115 A Microsoft Skype and Windows are registered trademarks of Microsoft Corporation in the United States and or other countries Cisco and Jabber are registered...

Отзывы: