background image

23

3-90-08326R35_11/14

Cleaning Internal Components

recommended once per month or after each ton of 

pellets burned:

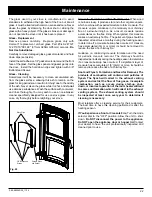
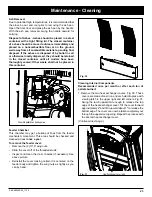
1. Remove the two heat exchanger covers. Fig. 30. These 

covers are made of cast iron and are held into place with 

a swing latch in the upper right and left corners. Fig 31. 

Swing  the  latch  upward  far  enough  to  release  the  top 

edge of the heat exchanger cover. Tilt the cover forward 

approximately 2" and lift it upward about 1" to release the 

bottom edge. The cover can now be taken completely out 

through the upper door opening. Repeat the process with 

the second heat exchanger cover. 

(Continued next page;)

maintenance - Cleaning

Heat Exchanger cover latch

Fig. 31

Feeder Chamber

This chamber may get a buildup of fines from the feeder 

mechanism movement. This area should be checked and 

cleaned at least 

once a year.

To remove the feeder cover:

•  Remove the (2) 5/16" wing nuts.
•  Slide the cover off of the threaded studs.
•  Inspect and clean the inner chamber if necessary. See 

above picture.

•  Reinstall the cover making certain it is centered on the 

feeder body and tighten the wing nuts as tightly as you 

can by hand.

Fig. 30

Ash removal

Due to potential high temperatures, it is recommended that 

the stove be out and cool prior to removing the ash pan. 

Open the front door and grasp the ash pan by the handle. 

With  the  ash  pan  removed,  swing  the  handle  upward  for 

carrying. 

disposal of Ashes - Ashes should be placed in a steel 

container with a tight fitting lid. The closed container 

of ashes should be moved outdoors immediately and 

placed  on  a  noncombustible  floor  or  on  the  ground, 

well away from all combustible materials, pending final 

disposal. If the ashes are disposed of by burial in soil 

or otherwise locally dispersed, they should be retained 

in the closed container until all cinders have been 

thoroughly cooled. Other waste shall not be placed in 

this container.

Possible pellet fines buildup area.

Содержание Accentra Freestanding Pellet Stove

Страница 1: ...z votre concessionnaire de Harman Home HEATING Save these instructions Installation Operating Manual Model s Accentra Freestanding Pellet Stove NOTICE SAVE THESE INSTRUCTIONS Hot glass will cause burn...

Страница 2: ...0 3 2 EN 61000 3 3 PREVENTION DES INCENDIES Respecter scrupuleusement les instructions du constructeur pour l installation et les consignes de fonctionnement Respecter les r gles de s curit en vigueur...

Страница 3: ...nual With its specially designed burn pot and the Advance Igniter Automatic Ignition System the unit can burn a large variety of pelletized fuels with varying ash content The accordion style cast iron...

Страница 4: ...lows you to choose between Room Temp Mode Stove Temp Mode or OFF Also allows you to vary the distribution blower speed by turning the knob to the high or low side of each mode Feed adjuster Sets the m...

Страница 5: ...ficed for exact room temperature Therefore as it gets colder more pellets will be burned automatically The distribution blower speed will vary according to the position of the mode selector pointer an...

Страница 6: ...box low pressure switch will not allow the auger motor or the igniter element to operate if the view door is open 4 Adjust Feed Rate If this is your first fire or you are trying different pellets set...

Страница 7: ...operation with the temperature dial set at 4 or less the distribution fan will not operate A 3 on the temperature dial and a 4 on the feed adjuster is approximately 80 output The distribution blower...

Страница 8: ...ning and then fill the hopper with pellets As the system works they will be burned 2 The TEST cycle will operate the feeder motor for exactly one minute Turning to TEST again and again may feed too mu...

Страница 9: ...e firing side and at least 7 87 200mm on the other sides In Canada you may follow smaller U S floor protection requirements ONLY if the user agrees to completely shut down the appliance and allow it t...

Страница 10: ...as far as shown in Fig 10 11 12 Clearances May Only be Reduced Using Methods Approved by the Regulating Authority Having Jurisdiction Note that the clearances shown are minimum for safety but do not l...

Страница 11: ...bolt to a plate and the stove then sits on the plate The rubber leveling feet are removed to allow the stove to fit down over the leg plate The leg kit adds 2 95 inches in height The leg kit can also...

Страница 12: ...turer s components to provide an effective vapor barrier where the chimney or other component penetrates to the exterior of the mobile home DO NOT MIX COMPONENTS FROM DIFFERENT MANUFACTURERS The top s...

Страница 13: ...se a safety concern If the unit is adjusted too high only efficiency is lost If the unit is adjusted too low the low draft pressure switch will not allow the feeder motor or the igniter to operate A s...

Страница 14: ...e installed even if only installed on the rear of the unit as a return air sensor There is an intake screen on the bottom of the rear sheet metal enclosure This is an ideal place to tie wrap the senso...

Страница 15: ...o the unit Vent Pipe Pellet venting pipe also known as PL vent is constructed of two layers with air space between the layers This air space acts as an insulator and reduces the outside surface temper...

Страница 16: ...ove especially during a power failure It may be necessary to add additional ventilation to the space in which the pellet appliance is located Consult with your local HVAC professional to determine the...

Страница 17: ...lure Note Do not place joints within wall pass throughs Fig 20 Fig 21 3 Ft to Combustibles 3 Ft to Combustibles 3 Ft to Combustibles 3 Ft to Combustibles 2 Preferred method This method also provides e...

Страница 18: ...his method can be used for normal operation This method also provides natural draft in the event of a power failure The damper area must be sealed with a steel plate not supplied Kaowool mineral wool...

Страница 19: ...ddition to the sealing system used by the manufacturer Pipe size should be increased to 4 using this method THE chimney must be of a type suitable for solid fuel burning 6 Installing into an existing...

Страница 20: ...t temperatures at least 3 feet away from the flue termination PL vent manufacturer s firestop spacer and support 1 MIN No insulation or other combustible materials are allowed within 3 of the PL vent...

Страница 21: ...ulator I The clearance to service regulator vent outlet must be a minimum of 6 feet J The clearance to a non mechanical air supply inlet to the building or the combustion air inlet to any other applia...

Страница 22: ...their customers The best time to have this cleaning performed is after the heating season If You Experience a Soot or Creosote Fire Turn the mode selector dial to the OFF position Allow the unit to sh...

Страница 23: ...Remove the 2 5 16 wing nuts Slide the cover off of the threaded studs Inspect and clean the inner chamber if necessary See above picture Reinstall the cover making certain it is centered on the feede...

Страница 24: ...combustion intake assembly is held into place with two swing latches Fig 32 Swing each latch until it hangs down away from the retainer stud Now the assembly can be taken out by tilting the right sid...

Страница 25: ...s of the burn pot grate Simply push the allen wrench down through each hole ensuring it is clear of any build up paying attention not to damage the igniter element in the process Figure 36 The igniter...

Страница 26: ...hts will remain on The Control Board ESP combination is responsible for all high limit safety control There are 2 high limits one normal operation high limit and one backup high limit The control has...

Страница 27: ...over and air intake 3 Burn pot or heat exchanger tubes may need to be cleaned 4 Combination of all the above 5 6 status blink A6 blink control board status indication is caused by poor or incomplete c...

Страница 28: ...properly through the feed system Tested and approved for use with wood pellets and a mixture of shelled field corn and wood pellets ONLY Burning of any other fuel will void your warranty NOTICE Heart...

Страница 29: ...amp BTU Range 0 to 40 000 Feed Rate 75 lbs hr on minimum on maintenance 5 lbs hr on maximum Flue Size 3 inch Pellet Vent Pipe Maximum Wattage 440 Watts Start cycle and test Start Cycle Wattage 340 Wat...

Страница 30: ...NECTIONS 1 3 2 WHITE PLUGGED BROWN 5 6 7 EMPTY WHITE WHITE WHITE 4 8 10 9 RED BLUE YELLOW PART NO 3 90 00877 BLACK 11 WHITE 11 PIN PLUG MALE FEMALE CONNECTIONS GREEN WIRE IS GROUND BONDED TO STOVE FRA...

Страница 31: ...et temperature knob to desired amount Turn mode selector knob onto Room Temp mode After the fire has lit watch that the fuel does not feed too fast that it pushes the red glowing fuel bed off of the b...

Страница 32: ...tinued operation Your appliance will recognize when power is restored What happens depends on ESP temperature and whether it is equipped with automatic ignition In Automatic setting units equipped wit...

Страница 33: ...tion warranty coverage begins on the date of first occupancy of the dwelling or six months after the sale of the product by an independent authorized HHT dealer distributor whichever occurs earlier Th...

Страница 34: ...y does not cover the following Changes in surface finishes as a result of normal use As a heating appliance some changes in color of interior and exterior surface finishes may occur This is not a flaw...

Страница 35: ...15 1 10 247778A Post 008408015 1 10 247260A Y Gasket Hopper Throat 3 44 677185 Y Gasket Hopper Top 1 00 375501 Y Grommet 3 4 3 31 960021 Hopper Switch 48 Post 008403501 3 20 232108 Y Additional servic...

Страница 36: ...Plunger Threaded Pkg of 3 3 31 5500 3 Hopper Lid Ball Spring Mount Bracket Pre 11340 2 00 247116 Hopper Lid Glass Assembly w Gasket Pre 11340 1 10 247100 Y Hopper Hinge Assembly Qty 2 req Pre 11340 1...

Страница 37: ...2 Sets 1 00 00247 Y 22 Cast Door w Rope and Grill 1 10 247109A Door Rope 1 00 00888 Y 23 Cast Air Grill 3 00 247114 24 Door Glass 3 40 777000 Y Glass Rope 1 00 2312 Y 25 Glass Retainer Qty 2 req 2 00...

Страница 38: ...77152 Y 37 6 Gear Motor 4 RPM 3 20 08752 Y 37 7 Sprocket Kit 1 00 06626 Y 37 8 Bracket Gear Motor 1 10 677005 Y Grommets Spacers Pkg fo 25 1 00 960026 37 9 3 4 Feeder Tensioner 3 31 00075 Y 37 10 3 1...

Страница 39: ...0 06810A 38 5 Gasket Feeder Air Intake Pkg of 6 3 44 72224 6 Y 38 6 UL Feeder Air Intake 1 10 247239 38 7 Gasket Ultra Air Intake Pkg of 10 3 44 677160 10 Y 38 8 Ultra Feeder Weldment 1 10 724132 Y 38...

Страница 40: ...35 Y Fuse 6 AMP Pkg of 5 3 20 49447 5 Y Gasket Base and Sides 5 Ft 1 00 37525 Y Gasket Burn Pot Tailpipe Pkg of 5 1 00 07381 Y Hopper Muffler Fittings 1 00 18186618 Y Hopper Switch Retrofit Kit 1 00 2...

Страница 41: ...41 3 90 08326R35_11 14 Service Maintenance Log Date Of Service Performed By Description Of Service...

Страница 42: ...42 3 90 08326R35_11 14 Service Maintenance Log Date Of Service Performed By Description Of Service...

Страница 43: ......

Страница 44: ...ting appliance boasts uncompromising attention to detail and helps preserve our planet by using environmentally responsible fuels Signature of Boxer Your premium quality hearth product designed and as...

Отзывы: