


Harman® • Absolute43 Installation Manual_R2 • 2015 - ___ • 03/15
14
3-90-00778i
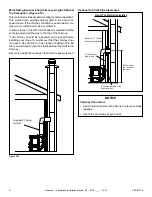
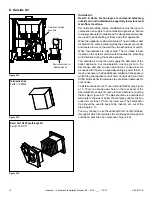
Optional Top Vent Pipe Clearances
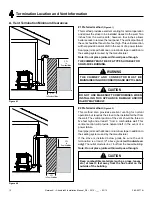
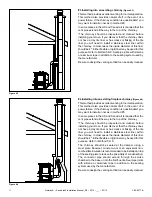
#8 Installing into an existing chimney using the Optional
Top Vent option. (Figure 4.10)
This method provides excellent venting for normal operation.
This method also provides natural draft in the event of a
power failure. If the chimney condition is questionable* you
may want to install a liner as in method #6.
In some places in the US and Canada it is required that the
vent pipe extend all the way to the top of the chimney.
*The chimney should be inspected and cleaned before
installing your stove. If you discover that the chimney does
not have a clay tile liner or has cracks or flaking of the tile
liner you will need to install a stainless steel liner within the
chimney.
Be sure to design the venting so that it can be easily cleaned.
Figure 4.10
4"/102mm from back of top
flue vent to wall
Minimum 6” (25mm)
from top of pipe to ceiling
6"/152mm from
pipe to wall
View of Top Vent Option Installed
6"/152mm from
floor to center of
flue crock
Single wall 6” Chimney
connector
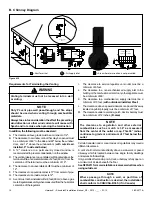
NOTICE
Chimney Connectors
• Seal single wall joints with silicone to prevent smoke
leakage.
• Use three (3) screws at each Joint.


