Harman Kardon SB 16/230 Скачать руководство пользователя страница 21

Speaker Placement

SB 16/230

6

Speaker Placement

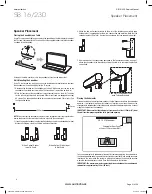
Placing the Soundbar on a Table

If your tV is placed on a table, you can place the soundbar on the table directly in front of 

the tV stand, centered with the tV screen. attach the supplied rubber feet to the soundbar 

as shown in the illustration.

as long as the table’s surface is flat, the soundbar will rest on the rubber feet.

Wall-Mounting the Soundbar

If your tV is attached to a wall, you can use the included wall-mount brackets to mount 

the soundbar on the wall directly below the tV screen.
1.  determine the location for the soundbar on the wall. make sure that the top of the 

soundbar will not block your view of the tV screen when it is mounted on the wall.

2.  mark the locations of the soundbar wall-mount bracket holes on the wall. the holes 

for the left and right brackets are spaced 600mm apart and are designed to accept 

#8 screws. the top and bottom holes for each bracket are spaced 25mm apart. see 

the illustration below.

NOTE: 

to ensure that the soundbar will be level, use a carpenter’s level, laser sight or other 

device to ensure that the two sets of holes are at exactly the same height.
3.  If you are using the soundbar's optical digital audio input, select the extended wall-mount 

brackets. otherwise, select the shallow wall-mount brackets.

4.  attach the two wall-mount brackets to the wall at the locations you marked, using 

hardware that is appropriate for the wall’s construction and materials. note that the 

soundbar weighs 3.6kg (8 lb). be sure to use hardware that can support this weight.

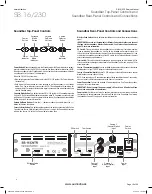
5.  after making all of the connections described in the 

Connections section

, on page 7, 

attach the soundbar to the brackets by sliding the slots in its feet onto the brackets’ 

vertical tabs.


Placing the Subwoofer

since our ears do not hear directional sound at the low frequencies where the subwoofer 

operates, it will perform well from just about any location in your room. however, the 

strongest bass reproduction is likely to be heard when the subwoofer is placed in a corner 

along the same wall as the soundbar. 

IMPORTANT: Make sure that the subwoofer’s rear panel is at least 150mm (6") from 

the wall to allow proper operation of its port tube opening.

you can experiment with subwoofer placement by temporarily placing the subwoofer in 

the listening position and playing music with strong bass content. move around to various 

locations in the room while the system is playing and listen until you find the location 

where the bass performance is best. place the subwoofer in that location.

IMPORTANT: The maximum wireless operating distance between the soundbar and 

subwoofer is approximately 15.3m (50 feet).

slide slots in soundbar Feet 

onto tabs on brackets

when optical digital 

Input is used

when optical digital Input 

is not used

sb 16 ctr soundbar

subwoofer

subwoofer rear panel 

at least 150mm from wall

25mm

600mm

0243CSK - HK SB16 230V OM v6.indd   6

07/10/10   15:59:02

harman/kardon

SB 16/230 Service Manual

Page 21 of 29

www.audiodna.sk

Содержание SB 16/230

Страница 1: ...ev 0 06 2011 8500 Balboa Boulevard Northridge California 91329 CONTENTS ESD WARNING 2 PACKAGE GUIDE AND PARTS CENTER 3 PACKAGE GUIDE AND PARTS SUB 4 EXPLODED VIEW AND PARTS CENTER 5 EXPLODED VIEW AND...

Страница 2: ...the unit under test 2 After removing an electrical assembly equipped with ES devices place the assembly on a conductive surface such as aluminum foil to prevent electrostatic charge build up or exposu...

Страница 3: ...harman kardon SB 16 230 Service Manual Page 3 of 29 www audiodna sk...

Страница 4: ...harman kardon SB 16 230 Service Manual Page 4 of 29 www audiodna sk...

Страница 5: ...harman kardon SB 16 230 Service Manual Page 5 of 29 www audiodna sk...

Страница 6: ...0 00613 2BCE 010 7610 05246 E 25PF12DZB FW01 E 352 AM04020D210 E 316 AL 00553 E 316 AG 00557 E 352 FM04020D605 E 320 RUB 00057 0BAE 2009 12 03 0 1 0 ISSUE REVISIONS DATE NAME 2009 12 03 1 316 AL 00553...

Страница 7: ...RUB 00057 0BAE Rubber pad for subwoofer cabinet 051 A05264D E POWER AMP PCB ASSY SB15 SUB 051 A05264C E PCB WIRELESS BCB ASSY SB15 SUB 051 A05264B E PRE AMP PCB ASSY SB15 SUB 051 A05264A E STANDBY PCB...

Страница 8: ...R23 24 9k R19 22k R22 14 3k R20 VCC VSS SGND 100n C15 82 5k R15 12 1K R11 OUT Netsw1_3 6 8k R17 10u C16 220n C18 10u C17 V 1 OUTa 2 INa 3 INT 4 Vref 5 SENCE 6 SW 7 INb 8 OUTb 9 GND 10 U4 NJM2761 10 4...

Страница 9: ...C 16 U06 CS4340 AGND 4 7K R33 100n C32 100n C29 100n C21 1000u 10V C20 10k R42 10k R43 10k R28 10k R40 1n C23 1n C31 AGND 8 1 4 3 2 U05A NJM4560 3 9k R35 20k R27 150p C19 3 9k R41 20k R39 150p C27 8 4...

Страница 10: ...n C50 100n C57 100n C56 100n C51 100n C52 100n C58 1u C26 1u C20 1n C23 1n C25 220p C53 470p C60 470p C59 470p C13 470p C14 15n C39 15n C27 100n C07 100n C06 100n C05 100n C04 2 2u C10 5 6k R14 5 6k R...

Страница 11: ...0R R15 D07 SF16 std 3 6V 1 2 CON3 Header 2B 1 2 CON2 Header 2B 12VB Q02 8050S 470u 16V C04 22uH L1 Inductor 470u 16V C05 D02 UF302 GND 3 6V 0 1u C09 0 1u C11 D08 1N4148 1 2 3 CON1 Header 3 K1 Relay S...

Страница 12: ...r cabinet 2 Attach EVA foam gasket attach EVA foam gasket 3 load woofer screw PN 352 AM04008C1334 E X 16 pcs 4 load tweeter add adhesives attach tweeter bar and screw down screw pn 352 AM03008C1086 E...

Страница 13: ...o tweeter and black to tweeter 7 Apply adhesives Assemble knobs LEDs Screw PN 352 AM03008C1086 E X 1 pcs 8 Assemble Amp Screw down amp Screw X 9 pcs PN 352 AM03008C1086 E black red cables on crossover...

Страница 14: ...xover harness to the amp plug in button key harness left channel crossover right channel crossover 11 attach baffle to rear enclosure scrw PN 352 AM03510D112 E X 20 pcs 1 harman kardon SB 16 230 Servi...

Страница 15: ...13 Snap in the top gloss trim panel snap in the bottom gloss trim panel 14 attach the side end cap peel off adhesive and add super glue attach the end cap to the cabinet harman kardon SB 16 230 Servic...

Страница 16: ...Active speaker soundbar SB 16 230 Owner s Manual 0243CSK HK SB16 230V OM v6 indd 1 07 10 10 15 59 00 harman kardon SB 16 230 Service Manual Page 16 of 29 www audiodna sk...

Страница 17: ...nections 8 Operation 9 Turning the Soundbar On and Off 9 Turning the Subwoofer On and Off 9 Adjusting the System s Volume 9 Muting the System 9 Soundbar Surround Mode Button 9 Soundbar src source butt...

Страница 18: ...contains the system s left and right speakers and stereo amplifiers and features digital signal processing with virtual 3D surround circuitry that creates a complete surround sound experience without...

Страница 19: ...reless Code Switch Selects between four different channels for the wireless subwoofer signal IMPORTANT Be sure to set the subwoofer s Wireless Code switch to the same channel that you set the soundbar...

Страница 20: ...tch on page 10 for more information Wireless Code Switch Selects between four different channels for the wireless subwoofer signal IMPORTANT Be sure to set the soundbar s Wireless Code switch to the s...

Страница 21: ...that is appropriate for the wall s construction and materials Note that the soundbar weighs 3 6kg 8 lb Be sure to use hardware that can support this weight 5 After making all of the connections descri...

Страница 22: ...al or optical digital outputs you can use the supplied optical digital audio cable and a coaxial digital audio cable not supplied to connect them to the soundbar s Optical and Coaxial digital inputs N...

Страница 23: ...e unswitched AC outlet DO NOT plug this cord into the accessory outlets found on some audio components 2 Plug the subwoofer s power cord into an active unswitched AC outlet DO NOT plug this cord into...

Страница 24: ...will not be using the system for an extended period set the subwoofer s Power switch to the Off position Adjusting the System s Volume Press the soundbar s Volume Up and Down buttons to raise and low...

Страница 25: ...the soundbar and subwoofer is approximately 50 feet 15 3m Subwoofer Crossover Knob The subwoofer s Crossover knob adjusts the subwoofer s crossover between 50Hz and 150Hz The higher you set the Cross...

Страница 26: ...he buttons do not flash after three seconds release the buttons and try again 3 You now have 20 seconds to momentarily press the soundbar button that you want to program Power Surround Volume Down Vol...

Страница 27: ...r Check that the Subwoofer Volume Control is not turned all the way down fully counterclockwise Check that the Wireless Code switches on the subwoofer and soundbar are both set to the same setting num...

Страница 28: ...Power requirement 24V DC 2 5A 2 7A Dimensions H x W x D 110mm x 920mm x 89mm 4 5 16 x 36 1 4 x 3 1 2 Weight 3 6kg 8 lb SB 15 230 Subwoofer Woofer 10 254mm cone Enclosure type Ported Power requirement...

Страница 29: ...arman kardon is a trademark of HARMAN International Industries Incorporated registered in the United States and or other countries Features specifications and appearance are subject to change without...

Отзывы: