background image

22

PLAYER/RADIO MENU

Player/Radio Menu

Using the Status Bar Menu

The on-screen Status Bar contains many playback
features. To see the Status Banner Menu, press
STATUS 

D

on the remote control while a disc is

playing. Use the ARROW 

9

buttons on the

remote to move through the different features in
the Status Bar. When a feature is highlighted, press
ENTER 

6

on the remote to select it and to

change it with the help of the options listed on the
screen. Press ENTER 

6

to activate the change.

Title:

The number shown indicates the number

of the title that is currently playing. 

Chapter:

The number shown indicates the  number

of the chapter that is currently playing on a disc. 

Time:

This item displays the time in DVD mode. To

change the Time mode, first move the cursor to the
TIME. The current mode will be  highlighted. 

Press ENTER and the ARROW button to
activate:

Title Elapsed, Title Re maining, Chapter

Elapsed, Chapter Remaining. Depending on the
choice made, the bar will show a graphic view on
where the disc is currently playing.
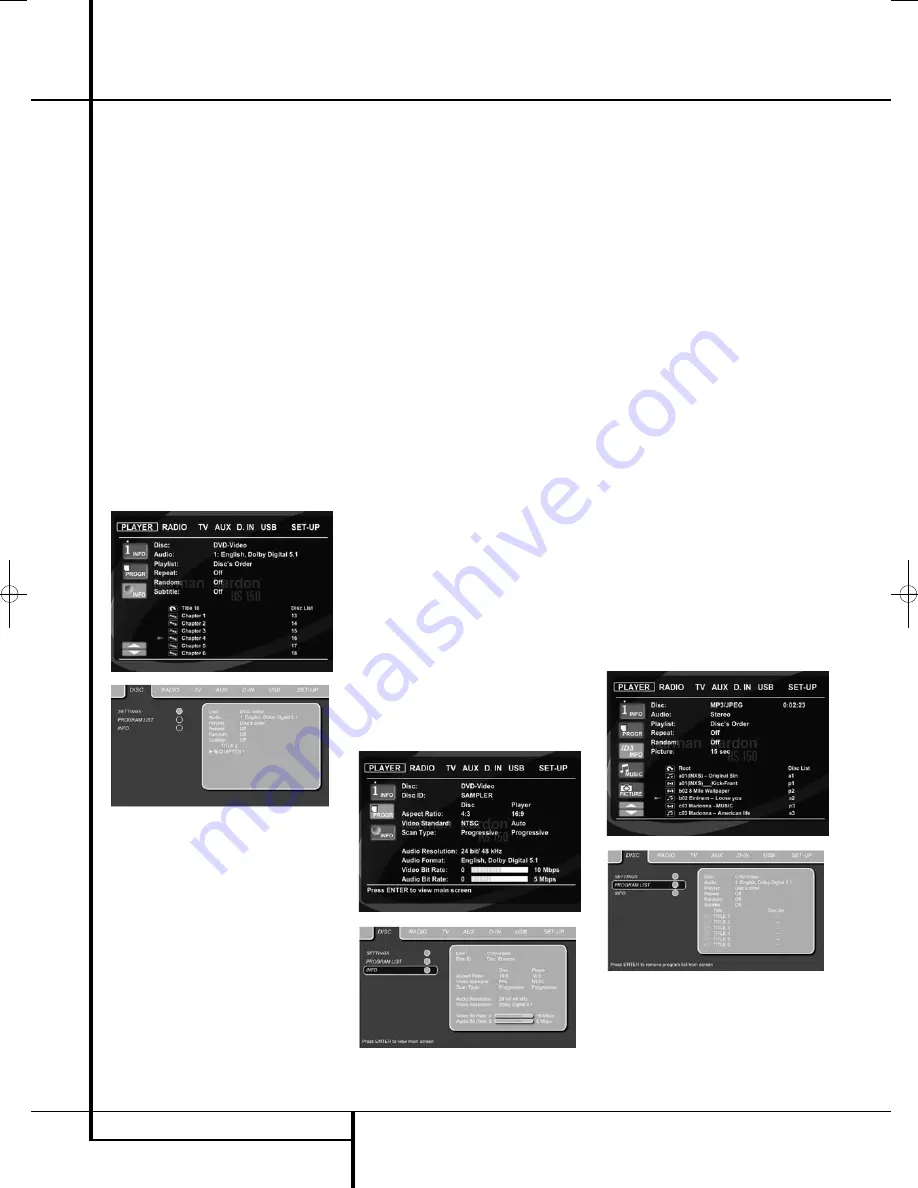
PLAYER Menu

Once all the settings have been made, you are
ready to enjoy your HS 150. Once you have
inserted a disc into the drawer you can explore
the PLAYER Menu by pressing the OSD button.
This menu hosts all playback and program fea-
tures, as well as all disc information. As you will
see, the layout of this menu is comparable to the
SET-UP Menu. The functionality is the same too.
The Submenus are shown on the left side of the
screen, with INFO activated by default. As in the
SET-UP Menu, settings can be highlighted with
the ARROW 

9

buttons and selected with the

ENTER 

6

button on the remote control.

Options for the settings are shown in the Lower
Menu Line on the bottom of the screen.

Disc:

Shows the type of the disc.

Audio:

Shows the audio track that is currently

playing. Options are shown on both Menu Lines
on the bottom of the screen.

Playlist:

Sets the order in which the current disc

is played back.

Repeat:

Sets the repeat mode. 

Random:

Activates Random Playback when

 possible.

Subtitle:

Shows the subtitle of the disc currently

playing.

If you have selected any of the high resolution
screen formats you will be able to use the
Thumbnail function to quickly and easily search
for image files. Any JPEG image file that has been
created on the computer with a thumbnail image
included will show up on the right top of the
screen when scrolling though the contents list.

In the PLAYER Menu, the chapter, track or picture
currently playing will be marked with an arrow
symbol in front of the Chapter (DVD), Track (CD,
MP3, WMA) or Picture (JPEG). Chapters, tracks
and pictures can be selected from this list at any
time by moving the cursor to the desired chapter
or track and pressing ENTER 

6

to confirm. 

The top part of this screen can be de-activated to
show the complete Track list on the screen. To
de-activate, move the cursor to the upper INFO
(or i INFO) Submenu on the left side of the
screen. Press ENTER 

6

until the icon is

 highlighted in light blue and the full Track list is
visible on the screen. In the same way the Disc
list can be removed from the screen by 
de-activating the PROGRAM Submenu.

When the HS 150 is in play mode, pressing the
PLAY button on the remote control will highlight
the track being played.

Information Displays

In DVD and MP3 mode, activating the DISC INFO
(DVD) or ID3 INFO (MP3) Submenu will show
information about the player and the disc cur-
rently playing. The first lines will show Disc Type
and Disc ID. Below you can compare the Aspect
Ratio, Video Standard and Scan Type available on
the disc with the actual output of your player or
ID3 info for MP3 files.

In the lower part of the screen the Audio
Resolution and Audio Format are shown, (DVD
only) and at the bottom a graphical presentation
of the Video Bit Rate (DVD only) and the Audio
Bit Rate of the disc currently playing.

Programmed Play

In STOP mode, the Disc List can be used to create
your own program list for DVD, CD, MP3, WMA
or JPEG discs. Move the cursor to the right of the
menu, into the Disc List. If the disc list is not
active, move the cursor to the PROGRAM icon on
the left to activate. Move the cursor to the Disc
List, and select Clear Program to clear the current
list. Once the disc list is clear move the cursor up
or down to the first track you would like to pro-
gram and press ENTER 

6

. The cursor will move

to the options in the Lower Menu Line. You can
either add the selected track (or picture) to the
playlist or give it the number you would like it to
have in your playlist, or clear the track from the
list. Move the cursor down to the next track you
would like to program and continue until your
playlist is complete. Once completed press PLAY
on the remote control or, move the cursor up to
the Playlist setting and select Programmed order
from the options and press PLAY to start the
playback.

0124CSK - HK HS 150 ENGv3_PRESS.qxp:32432_HS200_Eng  24/02/09  09:12  Side 22

Содержание HS 150

Страница 1: ...ENGLISH HS 150 Home Cinema System OWNER S MANUAL...

Страница 2: ...e this manual with the remote control front panel controls and rear panel connections certain conventions have been used EXAMPLE bold type indicates a specific remote control or front panel button or...

Страница 3: ...test growing consumer electronics products ever brought to market but this may nevertheless be the first DVD player you ve owned Although many of the features of the DVD resemble those of standard CD...

Страница 4: ...ly on a carpeted surface I Avoid installation in extremely hot or cold locations or an area that is exposed to direct sunlight or heating equipment I Avoid moist or humid locations I Do not obstruct t...

Страница 5: ...ution To conserve bandwidth analog compression interlacing is employed first the odd numbered lines of a frame are displayed followed by the even numbered lines The result is that only half of the vid...

Страница 6: ...sible that some discs may include a mix of features that are not compatible with the DVD Similarly although the DVD is capable of a wide range of features not all discs include every capability of the...

Страница 7: ...of audio image of video files or a USB hub The USB inputs are designed to power a single USB device at a time If additional hard disks are connected through a hub it is necessary that additional exter...

Страница 8: ...laying these indicators will show the current track time time remaining in the current track or the total remaining time on the disc NOTE The Indicators NOE will also display text messages about the D...

Страница 9: ...l 4 AC Power Cord Connect this plug to an AC outlet If the outlet is controlled by a switch make certain that it is in the ON position 5 FM Antenna Connect to the supplied FM antenna 6 Audio In Connec...

Страница 10: ...R or MiniDisc recorder F Subwoofer Trigger Output Connect this trigger output to the trigger input of the Harman Kardon subwoofer so that the subwoofer will switch on and off at the same time as the r...

Страница 11: ...s Button Skip Step Next Button Play Button Search Slow Reverse Button STOP Button Search Slow Forward Button Macro Buttons Pic Pic Button Zoom Button Playlist Button Random Button A B Repeat Button Vo...

Страница 12: ...on Allows you to search forward through a disc while it is in play mode Each time you press this button the search speed changes as indicated by a number of arrows on the right top of your screen Afte...

Страница 13: ...ducts or leave it in a car parked in direct sunlight as there can be a considerable rise in temperature inside the car After playing store the disc in its case Do not write on the label side with a b...

Страница 14: ...ents NOTE To be able to listen to the sound of a live TV show through the loudspeakers of your HS system you need a connection between the audio output of your TV and the HS controller to achieve this...

Страница 15: ...a compatible computer sound card to the Optical and Coaxial Digital Inputs 89 Connect the Coaxial Digital Output E on the rear panel of the HS to the matching digital input connections on a CD R or Mi...

Страница 16: ...ure at all not even the Harman Kardon screen check the setting of the video input used on your TV most SCART inputs on TVs can be configured in the TV s menu If this doesn t work connect your TV with...

Страница 17: ...session DVD containing Windows Media Audio files may not be supported open session discs are not supported the DVD player does not support PC data this DVD player does not support an unfinalized disc...

Страница 18: ...ent setting to indicate that the setting can be changed by pressing the left or right ARROW Button 9 Press the ARROW Buttons 9 until the requested setting is shown and confirm this setting by pressing...

Страница 19: ...io to a greater or lesser degree depending on which setting you choose Three options are available MINIMUM does not make any changes to the original playback and should be used when the volume setting...

Страница 20: ...e DVD and adjust the output accordingly Movie Choose this option for optimal play back of material that was shot on film even though you are viewing it on video via a DVD Video Choose this option for...

Страница 21: ...pictures of natural faces flowers fruit and vegetables and other well known natural articles of our life most usefull for an optimal setting of the color intensity 2 If your TV has a Tint option with...

Страница 22: ...ded will show up on the right top of the screen when scrolling though the contents list In the PLAYER Menu the chapter track or picture currently playing will be marked with an arrow symbol in front o...

Страница 23: ...3 and in the Upper Menu Line to store all your radio stations in the tuner s memory Rearranging the station list Once all the stations have been stored in the memory you can rearrange the station lis...

Страница 24: ...bility to increase or decrease the input level of the analog input so that its sound will have the same level as the radio the DVD player or the other audio inputs DIGITAL IN MENU In addition to all a...

Страница 25: ...ote control will highlight the track being played If you have a USB device that contains both music files MP3 WMA and JPEG images you can choose to run these simultaneously mixing the MP3 or WMA audio...

Страница 26: ...press them as noted in Step 5 7 When all buttons to be erased have been pressed press the Learn button to complete the process To erase all codes within a single device follow these steps 1 Press and...

Страница 27: ...ngala 7678 Lithuanian 7684 Macedonian 7775 Malagsy 7771 Malay 7783 Malayalam 7776 Maltese 7784 Maori 7773 Marathi 7782 Moldavian 7779 Mongolian 7778 Naru 7865 Nepali 7869 Norwegian 7879 Occitan 7967 O...

Страница 28: ...nking on the front panel display The protective circuitry has been activated because of a short circuit Turn off the system eliminate the short circuit problem and turn on the power again The audio in...

Страница 29: ...bracket or table specified by the manufacturer or sold with the apparatus When a cart is used use cau tion when moving the cart apparatus combination to avoid injury from tip over 13 Unplug this appar...

Страница 30: ...all channels are recorded discretely and processed digitally Manufactured under license from Digital Theater Systems Inc US Pat No 5 451 942 and other worldwide patents issued and pending DTS and DTS...

Страница 31: ...p 75 Ohms C PAL 0 3 Vp p 75 Ohms NTSC 0 286 Vp p 75 Ohms Audio line Outputs Audio L R 2 Vrms 1 kilohms General Power requirements AC 230 V 50 Hz Max power consumption 300 W Idle power consumption Les...

Страница 32: ...Drive Woodbury New York 11797 516 422 HKHK 4545 Fax 516 682 3523 USA only www harmankardon com Harman Consumer Group Inc 2 route de Tours 72500 Ch teau du Loir France 2009 Harman Kardon Incorporated P...

Отзывы: