background image

RIGHT

LEFT

RIGHT

LEFT

OPTICAL 1

COAXIAL

OPTICAL 2

RIGHT

LEFT

RIGHT

LEFT

OPTICAL 1

COAXIAL

OPTICAL 2

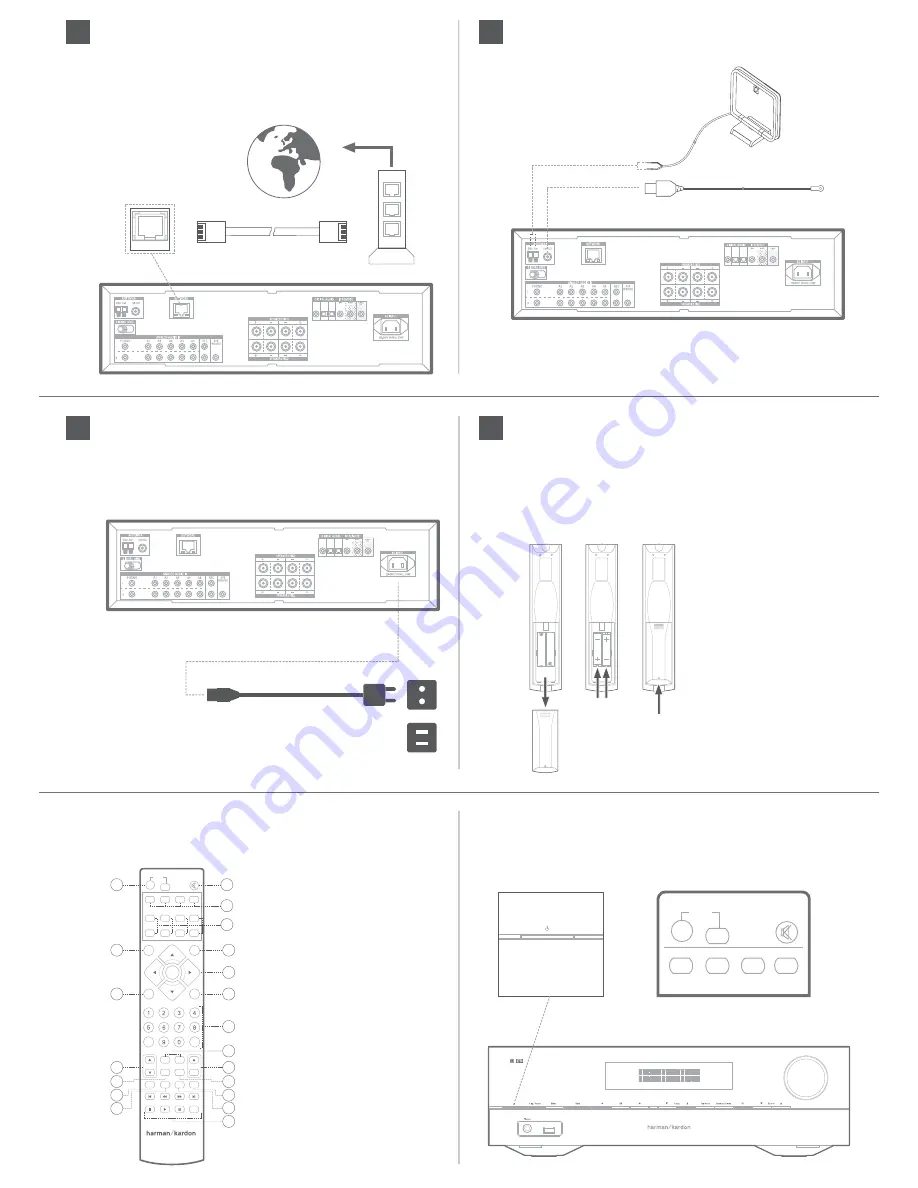
Connect Your Home Network

Use a Cat. 5 or Cat. 5E cable (not supplied) to connect the Stereo 
receiver’s Network connector to your home network to enjoy 
Internet radio and content from DLNA®-compatible devices that 
are connected to the network. Download the full owner's manual 
at www.harmankardon.com for network setup information.

Connect the Radio Antennas

NOTE: To connect, remote IR and trigger equipment, please 

download the Stereo receiver Owner’s Manual from 

www.harmankardon.com.

Connect to AC Power

Stereo receiver :
Connect the supplied AC power cord to non-switched AC 
power outlet.

Using the Remote Control

You will be using the following remote-control buttons to 
configure your Stereo receiver:

Turn On the Stereo receiver

Press the front-panel Power button or push the ON button on the remote 
control.

8

9

11

To Internet

Network Modem

AC Power Cord

Set Up the Stereo receiver

Install the Batteries in the Remote Control

Remove the remote control’s battery cover, insert the two 
supplied AAA batteries as shown in the illustration, and replace 
the battery cover.

NOTE:

 Remove the protective 

plastic from the Stereo 
receiver’s front panel so it 
doesn’t reduce the remote 
control’s effectiveness.


12

1. Remove

     Cover

2. Insert

    Batteries

3. Replace

     Cover

Power Button

Remote Power Button

AM Antenna (supplied)


FM Antenna (supplied)

RIGHT

LEFT

RIGHT

LEFT

OPTICAL 1

COAXIAL

OPTICAL 2

POWER

Mute

Stereo

USB

Bluetooth

Phono

FM/AM

AUX

Digital

vTuner

Network

MENU

Harman Volume

TV

ON

OFF

CD

Cable/Sat

OK

Exit

Tone Control

Clear

Vol

CH/Tuner

Direct

P-Scan

A-Preset

MEM

RDS

Prev.CH

Sleep

DIM

Speaker 1

Speaker 2

1)  Power On / Off

2) Mute

3)  External device direct remote 


control (programmable)

4)  Source selection

5)  Harman Volume

6)  Menu access

7)  Navigation pad

8)  Tone control

9) Exit 

10)  Numeric keys

11)  Volume control

12)  Speaker 1 / 2 selection

13)  Preset selection

14) Sleep

15) Dimmer

16)  Preset scan

17)  Auto preset

18)  RDS function

19) Memory

20)  External device control

1

5

8

11

14

16

17

2

3

4

6

7

9

10

12

13

15

18

19

20

POWER

Mute

Stereo

TV

ON

OFF

CD

Cable/Sat

Содержание HK 3700

Страница 1: ... Stereo receiver directly on a carpeted surface Do not place the Stereo receiver in moist or humid locations in extremely hot or cold locations in areas near heaters or heat registers or in direct sunlight CAUTION Before making any connections to the Stereo receiver ensure that the Stereo receiver s AC cord is unplugged from the Stereo receiver and the AC outlet Making connections with the Stereo ...

Страница 2: ...he Stereo receiver to the terminal on the speaker usually black IMPORTANT Make sure the and bare wires do not touch each other or the other terminal Touching wires can cause a short circuit that can damage your Stereo receiver Connect the speakers as shown in the illustration Connect Your Speakers 1 Unscrew Cap 2 Insert Bare Wire 3 Tighten Cap HK 3770 3 4 Wire with black stripe is _ terminal Front...

Страница 3: ...ous auxiliary AUX analog inputs can be selected by the remote control using the AUX button Simply press the AUX button to cycle between the various inputs AUX 1 AUX 2 AUX3 AUX5 AUX1 KH 3770 only Your Stereo receiver s digital audio inputs label on the back panel of the stereo receiver COAXIAL OPTICAL 1 and OPTICAL 2 can be selected by the remote control using the DIGITAL button Simply press the Di...

Страница 4: ...tereo receiver Install the Batteries in the Remote Control Remove the remote control s battery cover insert the two supplied AAA batteries as shown in the illustration and replace the battery cover NOTE Remove the protective plastic from the Stereo receiver s front panel so it doesn t reduce the remote control s effectiveness 12 1 Remove Cover 2 Insert Batteries 3 Replace Cover Power Button Remote...

Страница 5: ...touch 2nd through 5th generation and iPod nano 4th through 7th generation HK 3770 only Feature Description HK 3700 Stereo Receiver HK 3770 Stereo Receiver GENERAL FEATURES Output Power at 8Ω 85W 8Ω 120W 8Ω Amplification Type Class A B Class A B Internet Radio Yes Yes Ethernet Connectivity via RJ 45 Yes Yes MP3 WMA File Play from USB Use built in 192 kHz 24 bit DAC decoder Use built in 192 kHz 24 b...

Страница 6: ...B Usable sensitivity loop 500μV Distortion 1kHz 50 mod 1 0 Selectivity 10kHz 30dB HK 3770 Stereo Receiver General Specifications Power requirement 120V AC 60Hz Power consumption 0 5W standby 240W maximum Dimensions H x W x D 4 3 4 x 17 5 16 x 11 13 16 121mm x 440mm x 300mm Weight 6kg Bluetooth Optical and coaxial inputs Built in 24bits 192kHz DAC Phono input HARMAN GreenEdge technology New compact...

Страница 7: ... 2 this device must accept any interference received including interference that may cause undesired operation This Class B digital apparatus complies with Canadian ICES 003 Cet appareil numérique de la classe B est conforme à la norme NMB 003 du Canada Federal Communication Commis sion Interference Statement This equipment has been tested and found to comply with the limits for a Class B digital ...

Отзывы: