


8
MS 150
Operation
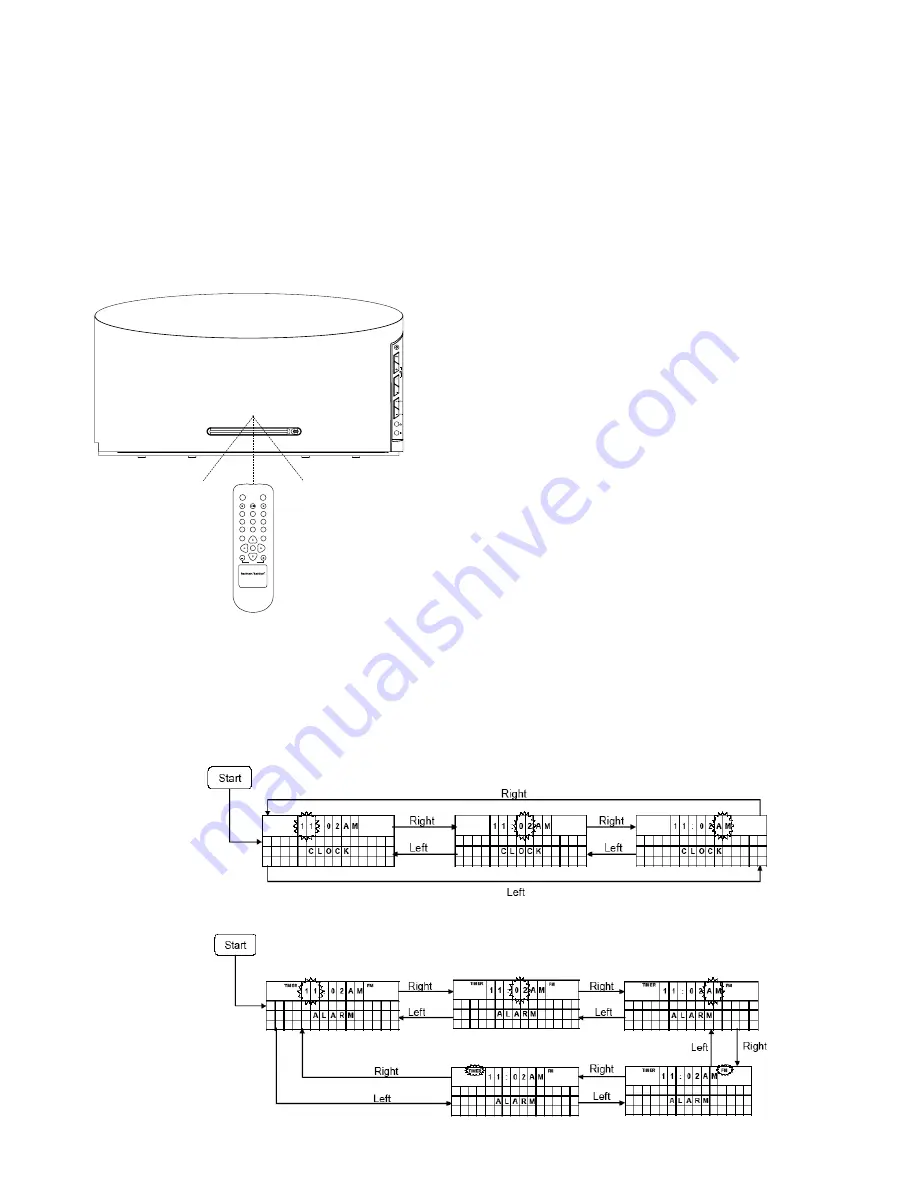
Figure 1: Setting the Clock
Figure 2: Setting the Alarm
Using the Remote Control
Aim the remote at the front of the MS 150. The remote IR sensor is located in the
middle of the front panel, behind the mesh grille, about 25mm (1 in) above the CD slot.
Do not block the sensor. The remote has a range of approximately 6m (20 ft), up to
30 degrees off center. If the batteries require replacement, see Step 2 of the Installation
section. Use caution and dispose of batteries according to environmental requirements.
Never throw the batteries into fire, and remove them from the remote if it will be unused
for a long period of time.
30º
30º
STANDBY
ON
MUTE
SOURCE
TUNE
PLAYBACK
SLEEP
CLOCK ADJ
ALARM ADJ
PR–
PR+
VOLUME
TUNE–
TUNE+
EJECT
MS 100
Setting the Clock
While the unit is in the Standby mode, set the clock: Press the Clock Adjust Mode
button on the remote, and use the
/
buttons to set the correct hour, minute
and 12/24-hour format setting when they flash. To change between AM and PM,
increase or decrease the hour setting. Use the
/
buttons to move the cursor to
the previous or next position, and press the Clock Adjust Mode button again when you
are finished. See Figure 1 below.
Turning On the MS 150
To turn on the MS 150, press the Power On button on the remote, or press the
On/Standby button on the MS 150’s front panel. The FM Radio will begin to play.
Setting the Alarm
For automatic turn-on at a programmed time, set the alarm. First, press the Standby but-
ton to put the unit into the Standby mode; you cannot set the alarm while the unit is on.
Press the Alarm Adjust Mode button on the remote, and use the
/
buttons to
set the alarm time (hour, minute and 12/24-hour format setting) and alarm source
(FM radio, CD player, iPod/iPhone in dock) as they flash. To change between AM and PM,
increase or decrease the hour setting. Use the
/
buttons to move the cursor to the
previous or next setting. To arm the alarm, use the
/
buttons to change the Alarm
message to “Alarm On,” and press the Alarm Adjust Mode button again when you are
finished. The Timer indicator will appear in the Message Display when the alarm has
been set. See Figure 2 below.
At the set time, the MS 150 will automatically turn on and begin playing the selected
source. If CD or iPod/iPhone was selected and there is no disc loaded or iPod/iPhone
docked, the MS 150 will switch to the FM radio source.
Play will begin at the set volume level for 10 minutes and then shut off automatically.
Press any button to place the unit in Snooze mode. The alarm will remain off for 9
minutes, then it will resume.
Press and hold the On button while the alarm is playing to turn it off and return to
normal play.
Setting the Alarm Volume
The default alarm volume level is 12. To change the alarm volume level, place the MS
150 in the Standby mode. Then press the Source button. The SETTINGS menu appears in
the MS 150 Message Display. Press the
button to toggle between the ALARM VOLUME
and EQ menu options. When ALARM VOLUME is displayed, use the
/
buttons to set
the volume level (0-30). Press the Source button to save your selection.
Setting the Equalization (EQ)
The MS 150 has two equalization modes: TAbLE (the default) and WALL. Use the TAbLE
setting when the MS 150 is free-standing. Change the setting to WALL if the MS 150 is
located against a wall to reduce the bass and optimize audio quality.


