background image

50

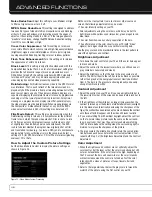
ADVANCED FUNCTIONS

through the available characters. To move to the next character,
either press the 

3

Button, or press the next desired Alphanumeric

Key. Press the OK Button when you have finished.

To execute an activity, press the Activity Button, then the Alphanumeric
Key you selected as the command button in Step 4. If you selected
the AVR Power On or Off Button in Step 4, you do not need to press
the Activity Button first.

To view the steps previously programmed for an activity without
executing it:

1. Press and hold the AVR Settings Button for 3 seconds. The

remote will enter Program mode, and its Main Menu will be 
displayed.

2. Use the 

1

/

5

Buttons to scroll to the Activity option, and press

the OK Button.

3. Use the 

1

/

5

Buttons to select the Read Activity option, and press

the OK Button.

4. Use the 

1

/

5

Buttons to select the command button, and press

the OK Button.

5. Use the 

1

/

5

Buttons to scroll through the steps programmed

into the activity. It is not possible to make any changes. When
you have finished, press the OK Button or the Back/Exit Button 
to exit Program mode.

It isn’t possible to “edit” a command within an activity. To delete the
activity:

1. Press and hold the AVR Settings Button for 3 seconds. The remote

will enter Program mode, and its Main Menu will be displayed.

2. Use the 

1

/

5

Buttons to scroll to the Activity option, and press

the OK Button.

3. Use the 

1

/

5

Buttons to select the Delete Activity option, and

press the OK Button.

4. Use the 

1

/

5

Buttons to select the command button or title, and

press the OK Button. The activity, including any title you gave it,
will be deleted.

Punch-Through Programming

The punch-through feature allows you to operate one component,
while setting certain groups of controls to operate another component.
For example, while using the AVR controls for surround modes and
other audio functions, you may operate the transport controls of
your DVD player. Or while using the remote to control video functions
on your TV, you may use your cable box to change channels.

To program punch-through control while operating any device:

1. Press and hold the AVR Settings Button for 3 seconds. The

remote will enter Program mode, and its Main Menu will be 
displayed.

2. Use the 

1

/

5

Buttons to scroll to the Punch-Through option,

and press the OK Button.

3. Use the 

1

/

5

Buttons to select either Channel or Transport 

control, and press the OK Button.

4. Use the 

1

/

5

Buttons to scroll to the device in use, and press 

the OK Button. For example, to change channels using the cable
or satellite set-top box while using the remote to operate the TV,
select the TV source in this step.

5. Use the 

1

/

5

Buttons to select the punch-through device

(CBL/SAT in the example given in step 4), press the OK Button,
and the Punch-Through programming will be saved.

To undo punch-through programming, follow the same steps as
above, but select the same Source in Steps 4 and 5.

NOTE:

The Volume and Mute controls are always dedicated

to the AVR.

Back Light

The AVR remote is equipped with a back light to illuminate the keys
and LCD Display to facilitate its use in a darkened home theater
environment.

To turn the back light on or off at any time, press the Back Light Button.

The back light’s turn-on mode may be programmed:

• Normal: 

The back light stays off unless the Back Light Button 

is pressed.

• On Full: 

The back light will turn on any time a key is pressed.

In both modes, the back light will remain on for 5 seconds after the
last button press, and then turn off automatically.

To program the remote’s back light mode:

1. Press and hold the AVR Settings Button for 3 seconds. The

remote will enter Program mode, and its Main Menu will be 
displayed.

2. Use the 

1

/

5

Buttons to scroll to the Back Light option, and press

the OK Button.

3. Use the 

1

/

5

Buttons to select the Normal or On Full option, and

press the OK Button to finish.

Remote Reset

To reset the remote to its factory defaults, erasing all product
codes, learned codes, activities and other user programming:

1. Press and hold the AVR Settings Button for 3 seconds. The

remote will enter Program mode, and its Main Menu will be 
displayed.

2. Use the 

1

/

5

Buttons to scroll to the Remote Reset option, and

press the OK Button. The process may take a few minutes,
depending on the amount of user programming requiring erasure.
Please wait until the “Remote Reset Complete” message appears
before pressing any keys.

AVR 7550HD OM.qxd  2/25/09  11:53 AM  Page 50

Содержание AVR 7550HD

Страница 1: ...AVR 7550HD AUDIO VIDEO RECEIVER OWNER S MANUAL ...

Страница 2: ...aratus 11 Only use the attachments accessories specified by the manufacturer 12 Use only with a cart stand tripod bracket or table specified by the manufacturer or sold with the apparatus When a cart is used use caution when moving the cart apparatus combination to avoid injury from tip over 13 Unplug this apparatus during lightning storms or when unused for long periods of time 14 Refer all servi...

Страница 3: ...unit on soft woods or other materials that may be damaged by heat or heavy objects Some surface finishes may be particularly sensitive to absorbing such marks due to a variety of factors beyond our control including the nature of the finish cleaning materials used and normal heat and vibration caused by the use of the product or other factors We recommend that caution be exer cised in choosing an ...

Страница 4: ...ecording 37 Using Docking Station 39 Selecting a Surround Mode 40 ADVANCED FUNCTIONS 40 Audio Processing and Surround Sound 40 Analog Audio Signals 40 Digital Audio Signals 40 Surround Modes 41 Dolby Surround Settings 41 Manual Speaker Setup 44 Audio Effects 45 Video Adjustments 47 Multizone Operation 47 System Settings 48 Advanced Remote Control Functions 51 Processor Reset 51 Memory 52 TROUBLESH...

Страница 5: ...eatures and their operation If you have any questions about this product its installation or its operation please contact your Harman Kardon retailer or custom installer or visit the Web site at www harmankardon com Harman Kardon AVR 7550HD 7 2 Channel Audio Video Receiver Audio Section 105 Watts x 7 seven channels driven at full power at 8 ohms 20Hz 20kHz 0 07 THD 735 watts total High current cap...

Страница 6: ...utomated setup microphone supplied Full color user interface and setup menu generated in high definition video Text based on screen menus available to Zone 2 Two line dot matrix front panel display Color coded connections Programmable learning seven device main remote control includes AVR control over The Bridge II Source input renaming Lip Sync Delay up to 180msec RS 232 serial port for system co...

Страница 7: ...site Front Analog Audio Front Inputs Source List Surround Modes Audio Effects Menu AVR Settings Main Power Switch Standby On Switch Info Settings Volume Message Display Power Indicator Remote IR Sensor NOTE To make it easier to follow the instructions throughout the manual that refer to this illustration a copy of this page may be downloaded from the Product Support section at www harmankardon com...

Страница 8: ...screen and the menu line will appear in the front panel display See the Advanced Functions section for more information on surround modes Source List Press this button to select a source device which is a component where a playback signal originates e g DVD Menu Button Press to display the menus for the tuner the USB device The Bridge II the Network or Internet Radio when any of those sources is i...

Страница 9: ... ZONE 2 OUT SUBWOOFER 2 ANALOG IN 4 ANALOG IN OUT SURR RIGHT 5 RADIO ANTENNAS SPEAKERS 8 VIDEO COMPONENT VIDEO LR 46800 EP Patent 1004222 US Patent 7 181 023 6 389 139 6 516 132 6 381 747 6 836 549 US Patent Nos 5 315 448 AVR7550HD 6 8 Channel Inputs Analog 1 5 Inputs Analog 3 Outputs Analog 4 Outputs Coaxial 1 2 3 Digital Audio Optical 1 2 3 Digital Audio Coaxial Digital Audio Output Network Opti...

Страница 10: ...tion for more information on programming this setting in the Info Settings menus for each source Zone 2 Infrared IR Input Connect a remote IR receiver located in the remote zone of a multizone system to this jack to control the AVR and any source devices connected to the Remote IR Output from the remote zone Remote Infrared IR Input and Output When the remote IR receiver on the front panel is bloc...

Страница 11: ...HDMI connection connect the component video outputs of the source to one of the sets of component video inputs Do not make any other video connections to that source Component Video Monitor Outputs If you are using one of the Component Video Inputs and your television or video display is component video capable but does not have HDMI connect these jacks to the video display NOTES Due to copy prote...

Страница 12: ...gation Activity Menu Disc Menu Channel Sleep Settings Transport Controls Source Settings IR Transmitter Lens LCD Display Last Back Exit Light Record Info Settings AVR Settings Remote Menu Zone Selector NOTE To make it easier to follow the instructions throughout the manual that refer to this illustration a copy of this page may be downloaded from the Product Support section at www harmankardon com...

Страница 13: ...his button to turn on the device Device Power Off Button Press a device s Source Selector then press this button to turn off the device LCD Display This two line text display informs you of the current device mode i e which source is active on the upper line When you press a key the command will appear briefly on the lower line Source Selectors Press one of these buttons to select a source device ...

Страница 14: ...recordings when an audio or video recorder is in use AVR Settings Remote Menu Button Press to display the AVR s Main Menu or to switch the remote to AVR device mode Press and hold for 3 seconds to access the menu for the remote control The menu commands and options will appear in the LCD Display The functions are program the codes for a device learn codes for an individual key change the device ty...

Страница 15: ...tor OK Transport Controls Zone Indicator Volume Controls Back Exit Menu Source Selectors Sleep Settings AVR Settings NOTE To make it easier to follow the instructions throughout the manual that refer to this illustration a copy of this page may be downloaded from the Product Support section at www harmankardon com ...

Страница 16: ...rce device for the remote zone It will also turn on the multizone system and switch the remote to the source s device mode You may select a different external source device than that for the main room but not different internal sources the tuner USB Internet Radio or the Network If you select the same source as that for the main room then any commands sent to the source will affect both zones The ...

Страница 17: ...tizone system where the surround back channels power loudspeakers located in another room Many people expect the surround speakers to play as loudly as the front speakers Although all of the speakers in the system will be calibrated to sound equally loud at the listening position most artists use the surround speakers for ambient effects only and they program their materials to steer very little s...

Страница 18: ...outputs look similar to full range analog audio jacks they are filtered to allow only the low frequen cies to pass Don t connect these outputs to any other devices Figure 3 Subwoofer CONNECTING SOURCE DEVICES TO THE AVR Audio and video signals originate in source devices including your Blu ray Disc or DVD player CD player DVR digital video recorder or other recorder tape deck game console cable or...

Страница 19: ...eaker outputs in case another 2 channel digital audio source is in use in the main listen ing area The AVR 7550HD is only capable of processing one PCM source at a time You may only record materials from DVDs or other copy protected sources using analog connections Remember to comply with all copy right laws if you choose to make a copy for your own personal use Figure 7 Analog Audio Multichannel ...

Страница 20: ...080i resolution for the Component Video Monitor Outputs For improved video performance consider upgrading to an HDMI capable video display with 1080p resolution ANTENNAS The AVR 7550HD uses separate terminals for the included FM and AM antennas The FM antenna uses a 75 ohm F connector See Figure 13 Figure 13 FM Antenna The AM loop antenna needs to be assembled Connect the two leads to the spring t...

Страница 21: ...Channel System NOTE Some speaker manufacturers offer 6 1 channel speaker systems for 6 1 channel surround sound formats such as Dolby Digital EX DTS ES Discrete and Matrix modes and DTS Neo 6 mode Using the AVR 7550HD in a 6 1 channel configuration is not recommended The 6 1 channel formats will sound better when played through a 7 1 channel system The same surround back channel information is pla...

Страница 22: ...of audio and video inputs available and these sources may be used for any device type NOTE You may match any device type to any source The device type is only relevant for programming control codes into the handheld remote and as explained on page 27 you may reassign any Source Selector s device type Any audio or video source may be connected to any matching jack on the AVR regardless of device ty...

Страница 23: ... connect to each source Assign only one unique digital audio input to each digital source Assign analog audio inputs to analog sources or as second ary connections for digital sources for backup for recording or to make the source available to the multizone system Any source using an HDMI Input requires no additional connection for audio unless The source doesn t output multichannel audio through ...

Страница 24: ...eakers to the subwoofer s left and right speaker output terminals Consult the owner s manual for the subwoofer for specific installation instructions STEP FOUR Connect Dock To enjoy content stored on a compatible iPod not included con nect The Bridge II dock included to its proprietary connector STEP FIVE Connect FM Antenna Connect the included FM antenna to the 75 ohm FM antenna terminal STEP SIX...

Страница 25: ... the benefit of 7 2 channel audio in the main room simultaneously with multizone operation However the benefit is achieved with the expense of an additional compo nent i e the amplifier B Connect the remote room s speakers directly to the Surround Back Zone 2 Speaker Outputs Reassign the Surround Back amplifier channels to power the speakers see page 47 Your main system will be limited to 5 2 chan...

Страница 26: ...od when docked in The Bridge II To access the functions for a particular device switch the remote s device mode Press the AVR Settings Button to access the codes that control the receiver or the Source Selector Buttons to access the codes for the devices programmed into the remote To program the codes for a source device into the remote 1 Turn on the source device 2 Access the remote s menu system...

Страница 27: ...y learn a new code into the following buttons Device Power On Off Alphanumeric Keys Last Button Back Exit Button Menu Button Navigation Buttons OK Button Disc Menu Button the four Soft Keys Channel Up Down Volume Up Down Mute and the Transport Controls including Record NOTE If you press the wrong destination button and wish to cancel the learning process you must wait about 30 seconds for the remo...

Страница 28: ...witch in The Power Indicator on the front panel will turn amber indi cating that the AVR is in Standby mode and is ready to be turned on Normally you may leave the Main Power Switch on even when the receiver is not being used 2 There are several ways to turn on the AVR from Standby mode a Press the Standby On Switch on the front panel b Using the remote press the AVR Power On Button or any of the ...

Страница 29: ...to calibrate the receiver to match the loudspeakers optimizing sound reproduction Until recently most receivers required manual calibration and configuration a tedious process that called for a good ear or the purchase of an SPL sound pressure level meter Although you may configure the AVR 7550HD manually as described in the Advanced Functions section it is recommended that you take advantage of t...

Страница 30: ... Leave this submenu at its default settings and return to it later if your system requires fine tuning See the Advanced Functions section for more information Video Modes Displays the Video Modes submenu where you may make picture adjustments for each source independently Leave the settings at their factory defaults Picture adjustments should be made to your video display first with this menu used...

Страница 31: ...MI Output the two devices will communicate with each other and the AVR will auto matically select the best available video output resolution If the display is connected to the AVR s Component Video Outputs there is no automatic detection of the display s capabilities and the video output resolution must be manually adjusted to match the display s capabilities which may be obtained from the display...

Страница 32: ... the AVR will automatically switch to the analog audio input This can be useful for older cable television systems that broadcast channels in both analog and digital audio If an analog audio connection was made select it here If not choose the Off setting and the AVR will always use the digital audio connection Zone 2 Audio Determines the audio source for the multizone system remote zone Select th...

Страница 33: ...ommercial advertisements are often much louder than the main feature Another is that details heard in the recording studio at typically high reference volumes are lost at the lower volumes used by many listeners The AVR 7550HD uses two Dolby Volume techniques to address these issues The Leveler module maintains a consistent listening volume within a source e g while watching commercial television ...

Страница 34: ...headphones into the jack behind the front panel door for private listening The default Dolby Headphone bypass mode delivers a conventional 2 channel signal to the headphones Press the Surround Modes Button on the front panel or the remote to switch to Dolby Headphone virtual surround processing which emulates a 5 1 channel speaker system No other surround modes are available for the headphones SOU...

Страница 35: ...nadian customers should visit xmradio ca or call XM Listener Care at 1 877 GETXMSR 1 877 438 9677 The AVR 7550HD is an XM Ready device and is able to receive the XM service when a user supplied XM antenna module is connected and the service activated Select an antenna module designated for XM Ready audio components An XM Ready module uses the special connector on the AVR and is controlled by the A...

Страница 36: ...n random order press the Menu Button and select the Random Photos setting Each press of the OK Button turns the setting on or off To view a slideshow of images select a folder containing the images for playback You may also select audio files stored on the same device for playback as background music to the slideshow Select the audio file then the image files When both music and a slideshow are pl...

Страница 37: ... the menu from view from the top level press the Back Exit Button or the 7 Button NOTES The Repeat Random and Slideshow Speed settings are global for Network Playback and USB Playback Changing these settings for one of these sources will have the same effect for the other source Although video content may appear in the menu the AVR does not support video playback from the network connection RECORD...

Страница 38: ...his setting While a selection is playing the song title and play mode icon will appear in the front panel Message Display If a video monitor is connected to the AVR 7550HD and the system is not in iPod Manual Mode the Now Playing screen will appear and display the play mode icon song title artist and album A graphic bar indicates the current play position within the track If random or repeat play ...

Страница 39: ...n only two main speakers are present in the system Dolby Virtual Surround may be used to create an enhanced soundfield that virtualizes the missing speakers Select between Wide and Reference modes Stereo When 2 channel playback is desired select the number of speakers used for playback 2 CH STEREO uses only two speakers As described on page 40 you may select Analog Bypass mode for a pure analog si...

Страница 40: ...ound channel information directly into the signal The result is improved sound quality and startling directionality since each channel is reproduced discretely Even when only two channels are encoded the digital signal allows for a higher sampling rate that delivers greater detail High resolution recordings sound extraordinarily distortion free especially at high frequencies Surround Modes Surroun...

Страница 41: ...elect the surround mode category Virtual Surround Stereo Movie Music or Video Game Press the OK Button to change the mode Each category is set to a default surround mode Virtual Surround Dolby Virtual Speaker Reference Stereo 7 channel stereo Movie Logic 7 Movie Music Logic 7 Music Video Game Logic 7 Game You may select a different mode The choice of surround modes depends on the number of speaker...

Страница 42: ... at the center However you may have had to place some speakers a little further away from the listening position than others Sounds that are supposed to arrive simultaneously from different speakers may blur due to different arrival times Use the AVR s delay adjustment to compensate for real world speaker placements Measure the distance from each speaker to the listening position and write it down...

Страница 43: ...kers If you set the front speakers to a numeric crossover frequency the subwoofer setting will always be LFE All low frequency information will always be sent to the subwoofer If you don t have a subwoofer either upgrade to full range speakers or add a subwoofer at the earliest opportunity If you set the front speakers to LARGE select one of the three settings for the subwoofer L R LFE This settin...

Страница 44: ...nd then moving to the next channel several seconds later as indicated by the highlight bar Adjust the level for any channel when the test tone is paused there using the 7 3Buttons Use the 1 5Buttons to move the cursor to another line and the test tone will follow the cursor When this setting reads MANUAL the test tone will not move to the next channel until you use the 1 5Buttons Individual Channe...

Страница 45: ...een 16 9 images are displayed on a full screen 4 3 device in letterbox format Black bars may appear above and below the image When displaying full screen images on a widescreen device black or gray bars may appear to the left and right of the image pillar boxing Plasma and CRT monitors may suffer from burn in when the same image such as the horizontal or vertical bars is left on screen for a long ...

Страница 46: ...m to display the picture settings as shown in Figure 35 Figure 35 Video Modes Custom Processing With a color bar test pattern from a test disc or other source on screen the following adjustments may be made The color intensity setting on your TV Color adjustments using the color bars which may be left to right black white yellow cyan turquoise green magenta red blue black The color transition seen...

Страница 47: ...rom the main listening area However if the same source has been selected for both the main listening area and the remote zone listeners in both areas will hear the same content NOTE Only analog audio sources including The Bridge II are available to the multizone system The USB Network and Internet Radio sources are also available To hear digital devices such as a CD player in the remote zone follo...

Страница 48: ...ng by the difference between your speakers sensi tivity and 88dB If your speakers have a lower sensitivity decrease the Dolby Volume Calibration setting by the difference between 88dB and your speakers sensitivity Menu Appearance Menu Transparency Select whether video programs will be visible when the menu system is in use Select Normal for a fully transparent background Medium for partial transpa...

Страница 49: ... in punch through controls Up to 11 activities may be programmed NOTE Use caution when programming complicated activities It isn t possible to program a pause or delay before sending commands after Power On and the component may not be ready to respond to commands immediately after powering on To program or record an activity 1 Press and hold the AVR Settings Button for 3 seconds The remote will e...

Страница 50: ...ess and hold the AVR Settings Button for 3 seconds The remote will enter Program mode and its Main Menu will be displayed 2 Use the 1 5Buttons to scroll to the Punch Through option and press the OK Button 3 Use the 1 5Buttons to select either Channel or Transport control and press the OK Button 4 Use the 1 5Buttons to scroll to the device in use and press the OK Button For example to change channe...

Страница 51: ... the front panel Standby On Switch so that the Power Indicator turns amber Then press the front panel AVR Settings and Source List Buttons simultaneously until the RESET message appears If the receiver does not function correctly after a processor reset contact an authorized Harman Kardon service center for assistance Authorized service centers may be located by visiting the Web site at www harman...

Страница 52: ... back channels to the main room does not play through Surround were reassigned to multizone Back Speakers operation The XM Preview Channel 001 XM antenna is not plugged in Use an XM antenna module designed for use with XM Ready home is silent audio equipment and plug the module into the XM Radio Jack XM antenna is not located in such The XM antenna module needs an unobstructed view of the a way as...

Страница 53: ...7550HD Source Digital Audio Connection Analog Audio Connection Video Connections Cable TV satellite TV HDTV CBL SAT HDMI 2 Analog 1 HDMI 2 or other device that delivers television programs DVD Audio Video SACD DVD HDMI 1 Analog 2 HDMI 1 Blu ray Disc HD DVD player Media Server including Media Server HDMI 4 Analog 5 HDMI 4 Harman Kardon DMC 1000 TV TV Optical 1 Analog 3 Component 1 Video game consol...

Страница 54: ...e signals are passed directly to the volume control without any bass management processing The speakers remain full range and cannot be adjusted When the Tone Mode setting is On the defaults are the same as for the other audio inputs The settings are global for the remaining audio inputs Table A2 continued USB Internet Radio Network Source A Source B Source C Source D Surround Modes Auto Select Lo...

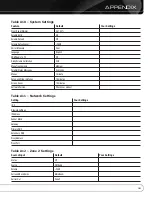
Страница 55: ...10 feet Surround Back Right 10 feet Surround Back Left 10 feet Subwoofer 1 12 feet Subwoofer 2 12 feet A V Lip Sync Delay See Info Settings Menu 0mS Table A5 Source Settings Cable Sat DVD Media Server Radio TV Game AUX The Bridge Device Type Surround Modes Video Input The Bridge II Audio Input The Bridge II Resolution to Display Adjust Lip Sync Change Name N A Audio Auto Polling N A Zone 2 Audio T...

Страница 56: ...Polling N A N A N A Zone 2 Audio USB Internet Radio Network Zone 2 Video N A N A N A Trigger 2 Dolby Volume Record Out Table A6 Audio Effects Settings Default Cable Sat DVD Media Server Radio TV Game AUX The Bridge Dolby Volume See Source Tone Control Off Treble 0dB Bass 0dB LFE Trim 0dB EQ On Speaker Setup Position 1 Table A6 continued USB Internet Radio Network Source A Source B Source C Source ...

Страница 57: ...ent Off Black Level Off Deinterlacing On Film Mode Detect 3 02 Table A7 continued USB Internet Radio Network Source A Source B Source C Source D Video Mode Brightness Contrast Color Sharpness Picture Adjust Overscan Noise Reduction MPEG Noise Reduction Cross Color Suppressor Flesh Tone Enhancement Black Level Deinterlacing Film Mode Detect Note These settings are only available when the Video Mode...

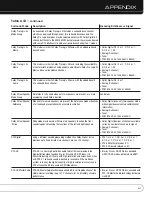
Страница 58: ...inued USB Internet Radio Network Source A Source B Source C Source D Auto Select Virtual Surround Stereo Movie Music Game Center Width Dimension Panorama Note These settings are only available when Dolby Pro Logic II or IIx Music mode has been selected Access these settings by selecting the Edit option Table A9 Remote Control Codes Source Input Device Type if changed Product Brand and Code Number ...

Страница 59: ...arency Medium Volume Status Messages 3 seconds Menus 1 minute Setup and Slide In Menus 15 minutes Screen Saver 10 minutes Software Version Check your product Table A11 Network Settings Setting Your Settings ID Network Settings IP Address Subnet Mask Gateway Primary DNS Secondary DNS Proxy Address Proxy Port Table A12 Zone 2 Settings Source Input Default Your Settings Status Off Source FM Radio Vol...

Страница 60: ...rueHD delivered via HDMI Dolby Digital such as night mode settings while delivering fully lossless audio that is a true reproduction of the studio master recording Dolby Digital Stereo Delivers a 2 channel downmix of Dolby Digital materials Dolby Digital 1 0 0 or 1 2 0 0 or 1 3 0 0 or 1 2 1 0 or 1 2 2 0 or 1 3 2 0 or 1 Dolby Digital EX Dolby Pro Logic II Analog decoder that derives five full range...

Страница 61: ...n speakers are present the Reference mode virtualizes Dolby Digital uses only two speaker mode Reference a full surround presentation with accurate localization when signal does not contain center channel information Analog 2 channel Tuner PCM 32kHz 44 1kHz or 48kHz Dolby Virtual Speaker Wide mode may be used with two main speakers to widen the front Dolby Digital number of channels available Wide...

Страница 62: ... 0 or 1 Music suitable for music recordings DTS 96 24 Analog 2 channel PCM 32kHz 44 1kHz or 48kHz Logic 7 A Harman International proprietary technology Logic 7 technology enhances See below Mode Group 2 channel and matrix encoded recordings by deriving separate information for the surround back channels This provides more accurate placement of sound improves panning and expands the sound field eve...

Страница 63: ...e or a downmix of a multichannel signal The signal is digitized and bass for multichannel management settings are applied making it appropriate when a Tuner subwoofer is used PCM 32kHz 44 1kHz 48kHz 96kHz 2 Channel Stereo Maintains an analog input signal in that form bypassing all digital processing Analog 2 channel Analog Bypass i e surround and bass management Requires Tone Control setting to be...

Страница 64: ...7 30 36 38 31 39 40 41 42 28 29 32 37 33 34 35 5 10 11 12 13 14 6 7 9 8 15 16 17 43 45 44 46 47 48 49 50 52 53 54 55 56 57 58 51 Refer to the numbered buttons in Figure 38 when using the Function List Figure 38 Remote Control Function List Reference ...

Страница 65: ...ty Activity Activity Activity Activity Activity 30 Back Exit Back Exit Back Exit Back Exit Back Exit Clear Back Back Exit 31 Menu Menu Menu Menu Menu Menu Menu Menu Menu 32 Up Up Tune Up Tune Up Channel Preset Up Up Up Up Up 33 Left Left Preset Down Preset Down Preset Category Down Left Left Left Left 34 OK OK OK OK OK Enter Enter OK OK 35 Right Right Preset Up Preset Up Preset Category Up Right R...

Страница 66: ...9 Activity Activity Activity Activity Activity Activity Activity Activity Activity Activity 30 Back Exit Bypass Clear Exit Cancel Exit Exit Cancel Back Exit Back Exit 31 Menu Menu Start Menu Menu Menu Menu Menu Menu 32 Up Up Up Up Up Up Up Up Up 33 Left Left Left Left Left Left Left Left Left 34 OK OK Select Enter Setup Select Enter OK OK 35 Right Right Right Right Right Right Right Right Right 36...

Страница 67: ...er countries iPod not included Made for iPod means that an electronic accessory has been designed to connect specifically to iPod and has been certified by the developer to meet Apple performance standards Apple is not responsible for the operation of this device or its compliance with safety and regulatory standards A BUS is a registered trademark of Leisure Tech Electronics Pty Ltd Audiovox is a...

Страница 68: ...8500 Balboa Blvd Northridge CA 91329 www harmankardon com 2009 Harman International Industries Incorporated All rights reserved Part No CQX1A1308Z ...

Отзывы: