background image

4

.1

4

 - 

Spr

ay

er


setup

Gener

a

l


in

f

o

U

nlo

ad

in

t

h

e


spr

ay

er

 f

rom


t

h

e


truck


F

or


t

h

e


unlo

ad

in

o

t

h

e


spr

ay

er

, y

ou


nee

d a c

r

a

ne

. Wh

en


unlo

ad

in

w

it

h a c

r

a

ne


ple

a

se


o

b

ser

v

e


t

h

e


li

f

tin

points

 a

s


s

h

o

w

n


on


t

h

e


pi

c

ture

a

n

m

ak

e


sure


t

ha

t


t

h

e


str

a

ps


or

 b

elts


use

d f

or


li

f

tin

g a

re


stron

enou

gh. 

ATTENTION! O

nl

li

f

t


t

h

e


spr

ay

er

 wh

en


t

h

e


t

a

n

k

s

 a

re


empt

y! 

P

ullin

t

h

e


spr

ay

er

 a

t


t

h

e


tie

 d

o

w

n

 h

ooks


F

or


mo

v

in

t

h

e


spr

ay

er


or


lo

ad

in

it


to


e

.g. a 

tru

ck, 

it

 ca

n

 b

e


pulle

in


t

h

e


h

oo

k

s

 a

t


t

h

e


re

a

r

-

en

d (A) 

or

 a h

oo

k ca

n

 b

e

 fa

stene

into


t

h

e

 h

ole


in


t

h

e


f

ront


en

o

t

h

e


spr

ay

er

 (B). 

B

e

f

ore


puttin

t

h

e


spr

ay

er


into


oper

a

tion


A

lt

h

ou

gh 

t

h

e


spr

ay

er

 ha

s

 b

een

 a

pplie

d w

it

h a 

stron

g a

n

prote

c

ti

v

e


sur

fac

e


tre

a

tment


on


steel


p

a

rts

, b

olts


et

c. 

in


t

h

e

 fac

tor

y, 

it


is


re

c

ommen

d

e

to

 a

ppl

y a f

ilm


o

f a

nti

c

orrosion


oil

 (

e

.g. CA

S

TROL R

US

TILO 

or


S

HELL EN

S

I

S

 FL

U

ID) 

on

 a

ll


met

a

l


p

a

rts


in


or

d

er


to

 av

oi

d ch

emi

ca

ls

 a

n

d f

ertili

z

ers

 d

is

c

olorin

t

h

e


en

a

mel

. If 

t

h

is


is

 d

one

 b

e

f

ore


t

h

e


spr

ay

er


is


put


into


oper

a

tion

 f

or


t

h

e


f

irst


time

it

 w

ill

 a

l

way

s

 b

e


e

a

s

to

 c

le

a

n


t

h

e


spr

ay

er

 a

n

d k

eep


t

h

e


en

a

mel

 c

le

a

n

 f

or


m

a

n

y y

e

a

rs

. Th

is


tre

a

tment


s

h

oul

d b

e


ca

rrie

out


e

v

er

time


t

h

e


prote

c

tion

 f

ilm


is

 wa

s

h

e

o

ff.

Support

 ja

ck


Th

e


support

 jack 

is


store

in


t

h

e

 b

r

ack

et


on


t

h

e


spr

ay

er

s


ri

gh

t


si

d

e

 wh

en


t

h

e


spr

ay

er


is

 a

tt

ach

e

to


t

h

e


tr

ac

tor

. T

o


use


t

h

e


support

 jack: L

i

f

t


t

h

e

 jack 

o

ff 

t

h

e


stor

ag

e

 b

r

ack

et

. Th

e


support

 jack ca

n


t

h

en

 b

e


mounte

to


t

h

e


d

r

awba

r


e

x

tension


on


eit

h

er


si

d

e

 a

s


pre

f

erre

d a

n

se

c

ure

d by a 

lin

ch 

pin

T

o


remo

v

e


t

h

e


support

 jack: L

i

f

t


t

h

e

 jack, 

remo

v

e


t

h

e


lin

ch 

pin

 a

n

pull


out


t

h

e


support

 jack. 

Se

c

ure


t

h

e

 jack a

t


t

h

e


stor

ag

e

 b

r

ack

et

 w

it

t

h

e


lin

ch 

pin

Содержание NAVIGATOR 3000

Страница 1: ...NAVIGATOR 3000 3500 4000 Supplement to Instruction book 67802003 Version 2 00 03 2010 Supplement to 67021703 Version 1 10 US 02 2009...

Страница 2: ......

Страница 3: ...on Some of the features on your HARDI sprayer were suggested by growers There is no substitute for on farm experience and we invite your comments and suggestions If any portion of this instruction boo...

Страница 4: ...1 Welcome 1 2...

Страница 5: ...d to be trained in correct plant protection and in safe handling of plant protection chemicals to avoid unnecessary risk for persons and the environment when doing your spray job Frame Very strong and...

Страница 6: ...for easy identification and operation A function is activated by turning the handle towards the desired function ATTENTION If a valve is too tight to operate or to loose liquid leakage the valve needs...

Страница 7: ...etc in the factory it is recommended to apply a film of anticorrosion oil e g CASTROL RUSTILO or SHELL ENSIS FLUID on all metal parts in order to avoid chemicals and fertilizers discoloring the ename...

Страница 8: ...wheel changing or wheel bearing changing etc then jack up the sprayer under the axle where shown DANGER Be sure to place sprayer on level and firm ground to avoid sprayer falling down from the jack A...

Страница 9: ...m being damaged by the tractor wheels P T O shaft etc all hoses cables and wires are held by the hose bracket fitted to the sprayer platform Check that the length of the hoses and cables are sufficien...

Страница 10: ...re connection The hydraulic system requires a minimum oil pressure of 2 175 p s i 150 bar max oil pressure of 3 050 p s i 210 bar and an oil capacity of approx 6 6 gal 25 liters ATTENTION After having...

Страница 11: ...wings need to be adjusted inwards or outwards 3 Relieve the pressure from the fold cylinder by unfolding the boom a few inches 4 If the boom rests to far in on the transport brackets loosen the nut B...

Страница 12: ...proper torque and tightening sequence of wheel hubs to rims WARNING Securely support the sprayer during axle adjustments Never attempt to adjust axles with liquid in the tank Always block wheels on o...

Страница 13: ...ubricator till new grease becomes visible Pictograms in lubrication oiling plans tell the following 1 Lubricant to be used see Recommended lubricants 2 Operating hours before next lubrication ATTENTIO...

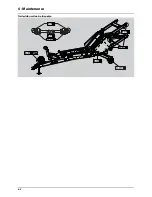
Страница 14: ...6 Maintenance 6 2 Trailer lubrication oiling plan...

Страница 15: ...R46 A Total length 23 2 23 2 B Total width 11 5 11 5 C Total height 12 0 12 3 D Draw to axle 14 9 14 9 Wheels 12 4x42 320 90 R46 A Total length 23 2 23 2 B Total width 11 5 11 5 C Total height 11 9 1...

Страница 16: ...2495 16820 66 7017 336 7353 14360 2505 16860 80 6865 665 7530 13810 3220 17030 88 6963 644 7607 14580 2525 17110 90 6985 655 7640 14610 2535 17140 100 7091 681 7772 14680 2594 17270 Weights with empt...

Страница 17: ...0 49 6 4 8 88 1000 49 1 5 8 147 1000 47 5 7 5 220 1000 45 9 9 5 Pump model 363 10 0 PSI RPM GPM HP 0 540 51 2 2 4 29 540 49 9 3 1 58 540 49 1 3 9 88 540 48 6 4 6 147 540 48 0 6 4 220 540 47 0 8 4 Pump...

Страница 18: ...r safety valve 220 psi 15 bar Max pressure on the pressure manifold 290 psi 20 bar Max pressure on the suction manifold 100 psi 7 bar Hydraulics Operating temperature range 36 F to 167 F 2 to 75 C Max...

Страница 19: ...xceed 10 Amp HC 2500 Function Sig Opt 1 Pressure sensor Brn Blu Opt 2 RPM sensor Brn Blu Blk Speed Brn Blu Blk Flow Brn Blu Blk L end nozzle Pendulum lock at HAY LPY Brn Blu R endnozzle Pendulum lock...

Страница 20: ...r Brn Blu Blk Speed Brn Blu Blk Flow Brn Blu Blk L end nozzle Pendulum lock at HAY LPY Brn Blu R endnozzle Pendulum lock at HAY LPY Brn Blu Reg Yellow Brn Blu Bypass EC on off Brn Blu Sec 9 User defin...

Страница 21: ...the owner or to a third party nor can we be called upon to be responsible for labor charges other than originally agreed incurred in the removal or replacement of components 3 The customer will be res...

Страница 22: ...warranty shall be final and conclusive and the purchaser agrees to accept its decisions on all questions as to defect and to the exchange of any part or parts 12 No employee or representative is auth...

Страница 23: ......

Страница 24: ...A6 Phone 519 659 2771 Fax 519 659 2821 For Product Service or Warranty Information Please contact your local HARDI dealer To contact HARDI directly Please use the HARDI Customer Service number 1 866 7...

Отзывы: