background image

soap and water and rinse with lemon juice and vinegar.  If the fluid comes into
contact with the eyes, flush with water for several minutes and contact a doctor
immediately.  Never burn Batteries, as they can explode in a fire.  Do not charge
the ATV with a leaking Battery.  Only a qualified technician should replace or
perform maintenance on the Batteries.  Contact local solid waste authorities for
instructions on correct disposal or recycling of the Batteries.

13.

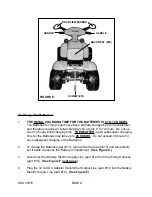
THE INITIAL CHARGING TIME FOR THE BATTERIES IS 8 TO 12 HOURS.
The Batteries for this product have been 

partially charged by the manufacturer,

and therefore require an 

initial charging time of only  8 to 12 hours.  Do not ex-

ceed 12 hours 

initial charging time.  THEREAFTER, each subsequent charging

time for the Batteries may take up to 20 HOURS.  Do not exceed 20 hours for
any subsequent charging of the Batteries.

14.

BEFORE OPERATING, START THE ATV AND CHECK FOR EXCESSIVELY
LOOSE PARTS OR MACHINE VIBRATION. 
If this is found, turn off the ATV and
correct the problem before operating.

15.

ALWAYS HAVE CHILDREN WEAR LOCAL, STATE, AND FEDERALLY AP-
PROVED SAFETY HELMET, ELBOW/KNEE PADS, AND SAFETY CLOTHING
WHEN OPERATING THIS PRODUCT.

16.

TO AVOID ACCIDENTAL INJURY, INSTRUCT USERS TO AVOID MAKING
SUDDEN STARTS, STOPS, AND TURNS.  DO NOT ALLOW THIS PRODUCT
TO BE USED ON STEEP INCLINES, WET, OR SANDY AREAS.

REQUIRED MINIMUM EXTENSION CORD GAUGE – 120 VOLT

NAMEPLATE

AMPERES

(At Full Load)

EXTENSION CORD LENGTH

0 - 25

Feet

25 - 50

Feet

50 -100

Feet

100 – 150

Feet

150– 200

Feet

0 - 5

16

16

16

12

12

5.1 - 8

16

16

14

10

-

8.1 - 12

14

14

12

-

-

12.1 - 15

12

12

10

-

-

15.1 - 20

10

10

10

-

-

17.

ALWAYS TURN THE  IGNITION  SWITCH TO  ITS “OFF”  POSITION  AND  RE-
MOVE THE IGNITION KEY BEFORE PERFORMING ANY INSPECTION, AD-
JUSTMENTS, MAINTENANCE, OR CLEANING PROCEDURES.

18.

THIS PRODUCT IS EQUIPPED WITH AN AUTOMATIC SHUTDOWN DEVICE.
During overload or improper operation, the ATV will automatically shutdown for
approximately 15 to 20 minutes.  After this period, the ATV may be started again.

SKU 03516

PAGE 5

FIGURE B

Содержание 03516

Страница 1: ...11 Visit our Web site at http www harborfreight com Copyright by Harbor Freight Tools All rights reserved No portion of this manual or any artwork contained herein may be reproduced in any shape or form without the express written consent of Harbor Freight Tools For technical questions please call 1 800 444 3353 ...

Страница 2: ...eep this manual and invoice in a safe and dry place for future reference GENERAL SAFETY WARNINGS AND PRECAUTIONS 1 DRESS SAFELY MAKE SURE THAT CHILDREN ALWAYS WEAR LOCAL STATE AND FEDERALLY APPROVED SAFETY HELMET ELBOW KNEE PADS AND SAFETY CLOTHING WHEN OPERATING THIS PRODUCT Do not allow children to wear loose clothing or jewelry as they can become caught in moving parts Wear a protective hair co...

Страница 3: ... PRECAUTIONS 1 THIS PRODUCT SHOULD BE ASSEMBLED ONLY BY AN ADULT AND OP ERATED ONLY UNDER ADULT SUPERVISION 2 THE RECOMMENDED AGE LIMITS FOR THIS PRODUCT ARE AGES 5 TO 7 YEARS 3 DO NOT EXCEED THE MAXIMUM LOAD CAPACITY 107 POUNDS FOR THIS PRODUCT This product is designed only for one rider Do not allow passengers on this product Do not allow product to be jumped on 4 MAINTAIN A SAFE PLAY ENVIRONMEN...

Страница 4: ...LECTRICAL OUTLET FIGURE A 9 REDUCE THE RISK OF ACCIDENTAL STARTING Make sure the ATV s Ignition Switch is in the OFF position and the Ignition Key is removed before plugging the 12 Volt DC Adapter Transformer into a grounded 3 hole 120 Volt electrical outlet 10 DO NOT ABUSE THE 12 VOLT DC ADAPTER TRANSFORMER CORD Do not use the Cord to pull its Plug from an electrical power outlet Keep the Cord aw...

Страница 5: ... AND CHECK FOR EXCESSIVELY LOOSE PARTS OR MACHINE VIBRATION If this is found turn off the ATV and correct the problem before operating 15 ALWAYS HAVE CHILDREN WEAR LOCAL STATE AND FEDERALLY AP PROVED SAFETY HELMET ELBOW KNEE PADS AND SAFETY CLOTHING WHEN OPERATING THIS PRODUCT 16 TO AVOID ACCIDENTAL INJURY INSTRUCT USERS TO AVOID MAKING SUDDEN STARTS STOPS AND TURNS DO NOT ALLOW THIS PRODUCT TO BE...

Страница 6: ...nterclockwise to the ON position To turn off the ATV turn the Ignition Key clockwise to its OFF position and remove the Ignition Key See Figure C 3 The ATV features two speed settings Low Speed approx 3 mph and High Speed approx 6 mph Make sure the ATV is at a complete stop prior to select ing the desired speed on the Low High Speed Switch Do not attempt to change speeds while the ATV is in motion...

Страница 7: ... CAUTION THIS PRODUCT SHOULD BE ASSEMBLED ONLY BY AN ADULT To Assemble The Steering Linkage 1 With assistance raise and hold the front end of the ATV off the ground surface 2 Insert a Washer part 3 on each side of the Front Steering Linkage part 2 See Figure D next page 3 Insert the Front Steering Linkage part 2 upward through the Front Chassis part 4 and Front Bumper part 5 See Figure D 4 Insert ...

Страница 8: ...teering Linkage part 2 to the Steering Rod part 9 and secure the Front Steering Linkage to the Steering Rod with a Cotter Pin part 10 See Figure D CAP NUT 8 WASHER 3 SLEEVE 7 VIBRATION MUFFLER 6 FRONT BUMPER 5 FRONT CHASSIS 4 WASHER 3 FRONT STEERING LINKAGE 2 WHEEL 1 STEERING ROD 9 COTTER PIN 10 FIGURE D To Install The Back Rest 1 Insert the Back Rest part 20 into the two mounting holes located at...

Страница 9: ...g time THEREAFTER each subsequent charging time for the Batteries may take up to 20 HOURS Do not exceed 20 hours for any subsequent charging of the Batteries 2 To charge the Batteries part 11 remove the Seat part 15 and temporarily set it aside to expose the Battery Compartment See Figure C 3 Disconnect the Battery Electric Supply Line part 12 from the Wiring Harness part 13 See Figure F next page...

Страница 10: ...Battery Electric Supply Line part 12 back into the Wiring Harness part 13 See Figure F 10 Re install the Seat part 15 on the ATV See Figure C ADAPTER TRANSFORMER OUTPUT LINE 14 WIRING HARNESS 13 BATTERY ELECTRIC SUPPLY LINE 12 BATTERIES 11 FIGURE F OPERATING INSTRUCTIONS 1 Once seated on the ATV select the desired speed Low or High and direction Forward or Reverse on the Instrument Panel part 18 S...

Страница 11: ...s damaged 4 BATTERY AND FUSE REPLACEMENTS For your personal safety it is recom mended that only a qualified technician replace the 6 Volt DC Batteries part 11 and 40 Amp Fuses part 24 5 DAILY With a soft brush cloth or vacuum remove all dirt and debris from the ATV If necessary a mild detergent may be used Do not expose the electrical system of this product to water or any other liquids When neces...

Страница 12: ...cription Qty Part Description Qty 1 Wheel 4 14 Adapter Transformer 1 2 Front Steering Linkage 1 15 Seat 1 3 Washer 4 16 Head Light 1 4 Front Chassis 1 17 Tail Light 1 5 Front Bumper 1 18 Instrument Panel 1 6 Vibration Muffler 2 19 Throttle Pedal 1 7 Sleeve 2 20 Back Rest 1 8 Cap Nut 2 21 Screw 4 9 Steering Rod 1 22 Ignition Key not shown 2 10 Cotter Pin 1 23 Wrench not shown 1 11 Battery 2 24 Fuse...

Отзывы: