background image

6

Turn off circuit breakers and wall switch to the fan 
supply line leads. 


DANGER: 

Failure to disconnect power supply 

prior to installation may result in serious injury or 
death.

 1. 

 2. 

ASSEMBLY INSTRUCTIONS

ON

OFF

ON

OFF

2

1

Lowes.com/harborbreeze

7 ft

min.

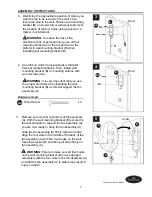
This fan assembly (A) can only be mounted on an 
indoor wall or on an enclosed porch or enclosed 
patio wall.

To prevent personal injury and damage, ensure 
that the hanging location allows the fan assembly 
(A) a clearance of 7 ft. from the floor to prevent 
accidental contact with the blade. 
 

      CAUTION: 

If you are going to attach the fan 

assembly (A) to a wood stud or wood post, the 
stud or wood post must be wide enough and thick 
enough to sustain the wall mounting bracket (B) 
and the weight of the fan assembly (A).

A

Of

f

On

Содержание JP18EB3

Страница 1: ...ssing parts Before returning to your retailer call our customer service department at 1 800 643 0067 8 a m 6 p m EST Monday Thursday 8 a m 5 p m EST Friday ATTACH YOUR RECEIPT HERE Serial Number Purch...

Страница 2: ...mply with local codes ordinances the National Electrical Code and ANSI NFPA 70 1999 Hire a qualified electrician or consult a do it yourself wiring handbook if you are unfamiliar with installing elect...

Страница 3: ...s NOT a toy DO NOT play with the fan or allow anyone else to play with the fan To reduce the risk of personal injury or electrical shock do not operate the fan if the cord or plug has been damaged To...

Страница 4: ...th this fan for proper installation and safety A Fan Assembly 1 B Wall Mounting Bracket 1 C Front Cage 1 D Blade Assembly 1 E Back Cage 1 F Blade Assembly Nut 1 preassembled G Set Screw 1 preassembled...

Страница 5: ...and Wiring Handbook DANGER Make sure the wall mounting bracket is securely attached to the building structure and can support the full weight of the fan Failure to do this can result in serious injur...

Страница 6: ...be mounted on an indoor wall or on an enclosed porch or enclosed patio wall To prevent personal injury and damage ensure that the hanging location allows the fan assembly A a clearance of 7 ft from t...

Страница 7: ...unting bracket B to mounting surface with wood screws AA WARNING It is very important that you use the proper hardware when installing the wall mounting bracket B as this will support the fan assembly...

Страница 8: ...nter of the back cage E 7 7 A E 2 A E Install four back cage screws CC into each of the four holes in the center of the back cage E to secure back cage E to motor on fan assembly A 8 8 Replace set scr...

Страница 9: ...on motor Using the Allen wrench DD turn preassembled set screw located on the blade assembley D clockwise to secure blade assembly D to fan motor 10 CC Allen Wrench x 1 Hardware Used Re attach blade...

Страница 10: ...a supply circuit that is protected by a Ground Fault Circuit Interrupter GFCI to reduce the risk of personal injury electrical shock or death C 12 Hook BB E Place hook at top of front cage C over edg...

Страница 11: ...blade movement One turn of the dial will set the fan to HIGH H Two turns will set the fan to MEDUIM M Three turns will set the fan to LOW L Test the oscillation function with the wall control on the r...

Страница 12: ...prevents damage to your fan and the person using it and stops the power cord from overheating to the point where it could catch fire If you should need to replace the fuse unplug fan Locate the fuse...

Страница 13: ...or affixing accessories not produced by the manufacturer of this fan are the purchaser s own responsibility The distributor assumes no responsibility whatsoever for fan installation during the limite...

Страница 14: ...egistered trademark of LF LLC All Rights Reserved 14 LI1309 Lowes com harborbreeze BB CC AA 275422 B 275422 C 275422 D 275422 E 275422 F 275422 G 275422 AA 275422 BB 275422 CC 275422 DD B Wall Mountin...

Отзывы: