7
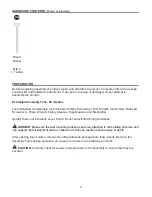
Wood Screw x 4
Hardware Used
AA
Stud
4
AA
AA
B
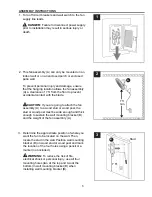
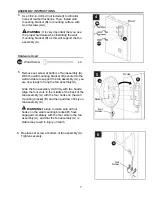
4. Use 3/32-in. drill bit (not included) to drill pilot
holes at marked locations. Then, install wall
mounting bracket (B) to mounting surface with
wood screws (AA).
WARNING:
It is very important that you use
the proper hardware when installing the wall
mounting bracket (B) as this will support the fan
assembly (A).
5. Remove set screw at bottom of fan assembly (A).
With the wall mounting bracket (B) secured to the
wall and able to support the fan assembly (A), you
are now ready to hang the fan assembly (A).
Grab the fan assembly (A) firmly with two hands.
Align the four slots in the middle of the back of the
fan assembly (A) with the four hooks on the wall
mounting bracket (B) and then pull down firmly on
fan assembly (A).
WARNING:
Failure to make sure all four
hooks on the wall mounting bracket (B) have
engaged completely with the four slots in the fan
assembly (A), and that the fan assembly (A) is
stable may result in injury or death.
ASSEMBLY INSTRUCTIONS
5
A
Slots
Hooks
B
Set
Screw
Replace set screw at bottom of fan assembly (A).
Tighten securely.
6.
6
A
Set
Screw

