Harbor Breeze BRADBURY BRD48BNK6LR Скачать руководство пользователя страница 19

19

CARE AND MAINTENANCE

OPERATING INSTRUCTIONS
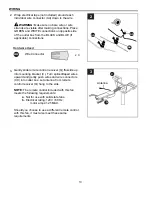
4A

4B

4C

4C. 

IMPORTANT:

 Reverse switch must be set 

either 

completely

 LEFT or 

completely

 RIGHT for 

fan to function. If the reverse switch is set in the 
middle position, fan will not operate.

4A. In 

warmer

 weather, setting the reverse switch 

in the LEFT position will result in downward airflow 
creating a wind chill effect.

4B. In 

cooler

 weather, setting the reverse switch 

in the RIGHT position will result in upward airflow 
that can help move stagnant, hot air off the ceiling 
area. 

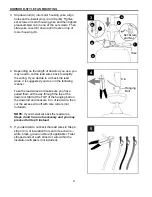
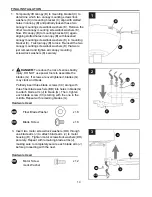
At least twice each year, lower canopy (B) to check downrod (A) assembly and tighten all screws on 
fan. Clean motor housing (D) with only a soft brush or lint-free cloth to avoid scratching the finish. 
Clean blades (G) with a lint-free cloth. You may occasionally apply a light coat of furniture polish to 
wood blades for added protection.
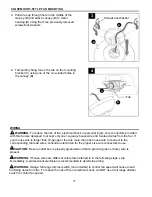
IMPORTANT:

 Shut off main power supply before beginning any maintenance. Do not use water or a 

damp cloth to clean the ceiling fan.

• Total wattage for the LED light kit on this fan is 18 watts; do not attempt to replace the LEDs.

Содержание BRADBURY BRD48BNK6LR

Страница 1: ...27 BRADBURY CEILING FAN MODEL BRD48BNK6LR BRD48MBK6LR BRD60OSB6LR Espa ol p 22 ATTACH YOUR RECEIPT HERE ADJUNTE SU RECIBO AQU Questions problems missing parts Before returning to your retailer call ou...

Страница 2: ...ce to radio communications However there is no guarantee that interference will not occur in a particular installation If this equipment does cause harmful interference to radio or television receptio...

Страница 3: ...x Most outlet boxes commonly used for the support of lighting fixtures are not acceptable for fan support and may need to be replaced Consult a qualified electrician if in doubt When mounting fan to a...

Страница 4: ...If any servicing is required call our customer service department WARNING To reduce the risk of fire or electrical shock do not use the fan with any solid state speed control device or control fan spe...

Страница 5: ...Yoke Cover 1 F LED Light Kit 1 G Blade 6 H Fitter Plate 1 I Shade 1 J Blade Arm 6 DESCRIPTION PART QUANTITY PACKAGE CONTENTS 5 E N O DESCRIPTION PART QUANTITY K Canopy Mounting Screw 4 Lock Washer pre...

Страница 6: ...Required for Assembly not included Electrical Tape Phillips Screwdriver Pliers Safety Glasses Stepladder and Wire Strippers Helpful Tools not included AC Tester Light Tape Measure Do It Yourself Wirin...

Страница 7: ...t to use a longer downrod not included Angle style mounting is best suited for angled or vaulted ceilings A longer downrod is sometimes necessary to ensure proper blade clearance 7 ft min 30 in min 3...

Страница 8: ...STYLE FAN MOUNTING skip to page 10 DOWNROD STYLE FAN MOUNTING Remove pin L and clip M from downrod A Partially loosen preassembled set screws and nut in motor housing yoke at top of motor housing D 1...

Страница 9: ...ad wires it is suggested you do so in the following manner Take the lead wires and make sure you have pulled them all the way through the top of the downrod Start at the TOP of the hanging ball on the...

Страница 10: ...OUNT STYLE FAN MOUNTING Remove preassembled canopy cover from bottom of canopy B To remove canopy cover from canopy B twist canopy cover until the two small protrusions on the inner lip of the canopy...

Страница 11: ...house wires are different colors than referred to in the following steps stop immediately A professional electrician is recommended to determine wiring WARNING Using a full range dimmer switch not in...

Страница 12: ...trol receiver Q to BLACK supply wire from ceiling Connect WHITE wire labeled AC IN N from remote control receiver Q to WHITE supply wire from ceiling Connect WHITE wire labeled TO MOTOR N from remote...

Страница 13: ...receiver Q flat side up into mounting bracket C Turn spliced taped wires upward and gently push wires and wire connectors CC into outlet box Let antenna from remote control receiver Q hang to the side...

Страница 14: ...ashers K securely 1 B K 1 2 DANGER To reduce the risk of serious bodily injury DO NOT use power tools to assemble the blades G If screws are overtightened blades G may crack and break Partially insert...

Страница 15: ...ed and securely tighten all three motor plate screws N 4 Motor Plate Molex Connections I H D 5 Partially loosen two fitter plate screws O on the underside of the fitter plate H and remove the other fi...

Страница 16: ...ly tighten all fitter plate screws O 8 Align slots on shade I with protrusions on underside of fitter plate H Turn shade I clockwise until it no longer turns NOTE Pull down gently on the shade I to ma...

Страница 17: ...llowing measures Reorient or relocate the receiving antenna Increase the separation between the equipment and receiver Connect the equipment into an outlet on a circuit different from that to which th...

Страница 18: ...n MEDIUM speed 1 button for fan LOW speed 0 button to turn fan OFF button to turn light ON or OFF Tap button quickly to turn lights off or on Hold button down to increase or decrease lights If you pre...

Страница 19: ...ll result in upward airflow that can help move stagnant hot air off the ceiling area At least twice each year lower canopy B to check downrod A assembly and tighten all screws on fan Clean motor housi...

Страница 20: ...ose 2 Unbalanced blades 3 Fan not securely mounted 4 Fan too close to vaulted ceiling 5 Set screw s on motor housing yoke is are not tightened properly 6 Set screw on hanging ball is not tightened pro...

Страница 21: ...ng or peeling Brass finish fans maintain their beauty when protected from varying weather conditions Any glass provided with this fan is not covered by the warranty Any replacement of defective parts...

Отзывы: