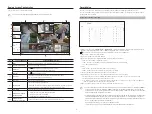
Hanwha Techwin Wisenet XRN-6410DB4 Скачать руководство пользователя страница 3

3

Installing the HDD

1

Use the front cover lock key to unlock the cover. 

Grab the front cover with both hands and pull it to 

the left to remove it.

2

Press the orange button on the hard disk bracket to 

the left and pull forward to separate the main body 

and the hard disk bracket.

3

Mount a HDD in the HDD bracket and screw it in 

using the screws provided.

4

Once the HDD is mounted in the bracket, push the 

bracket into the main body and close the front cover.


`

Fit the front cover into the right notch of the main body, then 

press and close until you hear a 'click'.


`

Use the front cover lock key to lock the front cover so that it 

does not get separated.

J


`

If you are adding a new or previously used HDD to this product in addition to the HDD(s) originally installed, format the new HDD 

manually in the set before use. 


`

For replacement or installation of an additional HDD you must contact your dealer or our customer center.
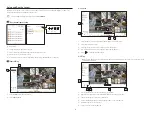
Installing the Rack

Rack Installation Requirements and Reference Dimensions

Classification

Requirements

Rack type

19-inch rack of EIA-310-D standard

POST count

4

POST distance

Depth 800 mm

Dimensions of mounting flange

C
B
A

Product

Product

Product width

EIA-310-D standard mounting 

flange

• 

Notable dimensions

Index

Dimension

A

450 mm (17.717 inches) min.

B

465 mm (18.307 inches) nominal

C

483.4 mm (19.031 inches) min.
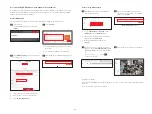
• 

Flange mounting holes (square holes are recommended for XRN-6410 series)

While EIA-310-D standard allows the mounting flange holes to be round, square, or tapped (threaded),  

the XRN-6410 series is only designed to work with round or square holes, but not tapped holes.

• 

Square mounting holes

15.90 mm (0.625 inches)

15.90 mm (0.625 inches)
12.7 mm (0.50 inches)

9.5 mm (0.375 inches) Square

44.45 mm (1.750 inches)

15.90 mm (0.625 inches)

15.90 mm (0.625 inches)

12.7 mm (0.50 inches)

Содержание Wisenet XRN-6410DB4

Страница 1: ...NETWORKVIDEO RECORDER Quick Guide XRN 6410DB4 XRN 6410B4 XRN 3210B4...

Страница 2: ...ture by P2P support Provides smartphone event alarm sending real time event messages Package Contents Recorder Mouse Quick Guide Power Cord 2 ea XRN 6410DB4 Power Cord 1 ea XRN 6410B4 XRN 3210B4 Termi...

Страница 3: ...set before use For replacement or installation of an additional HDD you must contact your dealer or our customer center Installing the Rack Rack Installation Requirements and Reference Dimensions Clas...

Страница 4: ...structure where the bottom of the product is mounted For installation stability fixed shelf dedicated to 19 inch rack that supports the load of at least 30 kg is recommended A shelf needs to be secur...

Страница 5: ...l iSCSI Network 1 Network 2 Network 3 Setup IP Type Choose the network connection method IP Address Subnet Mask Gateway DNS Enable online upgrade You can receive a new firmware notification when your...

Страница 6: ...of camera ID with password and password can be registered You cannot change the password for cameras registered with ONVIF and RTSP 5 Date Time Setup Set the date time time zone and DST and then clic...

Страница 7: ...played on the list or as a thumbnail Camera name Displays the camera name IP Address Displays the camera IP address Normal recording Event Configures Standard recording and Event recording FULL Record...

Страница 8: ...ck Time Search 2 1 Search a Select the layout of your choice from the channel groups you created in Live b Please select a date to search c Select the channel of your choice from the selected channel...

Страница 9: ...ck the Check capacity button to see if you can export f Click the Start button to proceed with the export Using Product Information You can check the product information manual firmware information FA...

Страница 10: ...seNet mobile on your smartphone and install and run it You can scan the QR code on the recorder by selecting Add device QR code 3 If you scan the QR code the device ID shown in the recorder is automat...

Страница 11: ...nimum suggested hardware and operating system requirements needed to run the Web Viewer Recommended browser Edge Chrome Supported browsers Chrome Edge and Safari Supported OS Works on all of the Windo...

Страница 12: ...for your recorder product ID b Select the type of recorder and model name c Click Product Registration Connect using DDNS address 1 Select DDNS site on the recorder setup menu and enter the product ID...

Страница 13: ...ronic accessories should not be mixed with other commercial wastes for disposal Correct disposal of batteries in this product Applicable in the European Union and other European countries with separat...

Страница 14: ......

Отзывы: