background image

10_

 installation

installation

Installing the HDD

■ 

If you are adding a new or previously used HDD to this product in addition to the HDD(s) originally installed, format the new HDD 
manually in the set before use.  
To learn how to format, see "

Device/Format

" in the Wisenet Recorder User Manual.

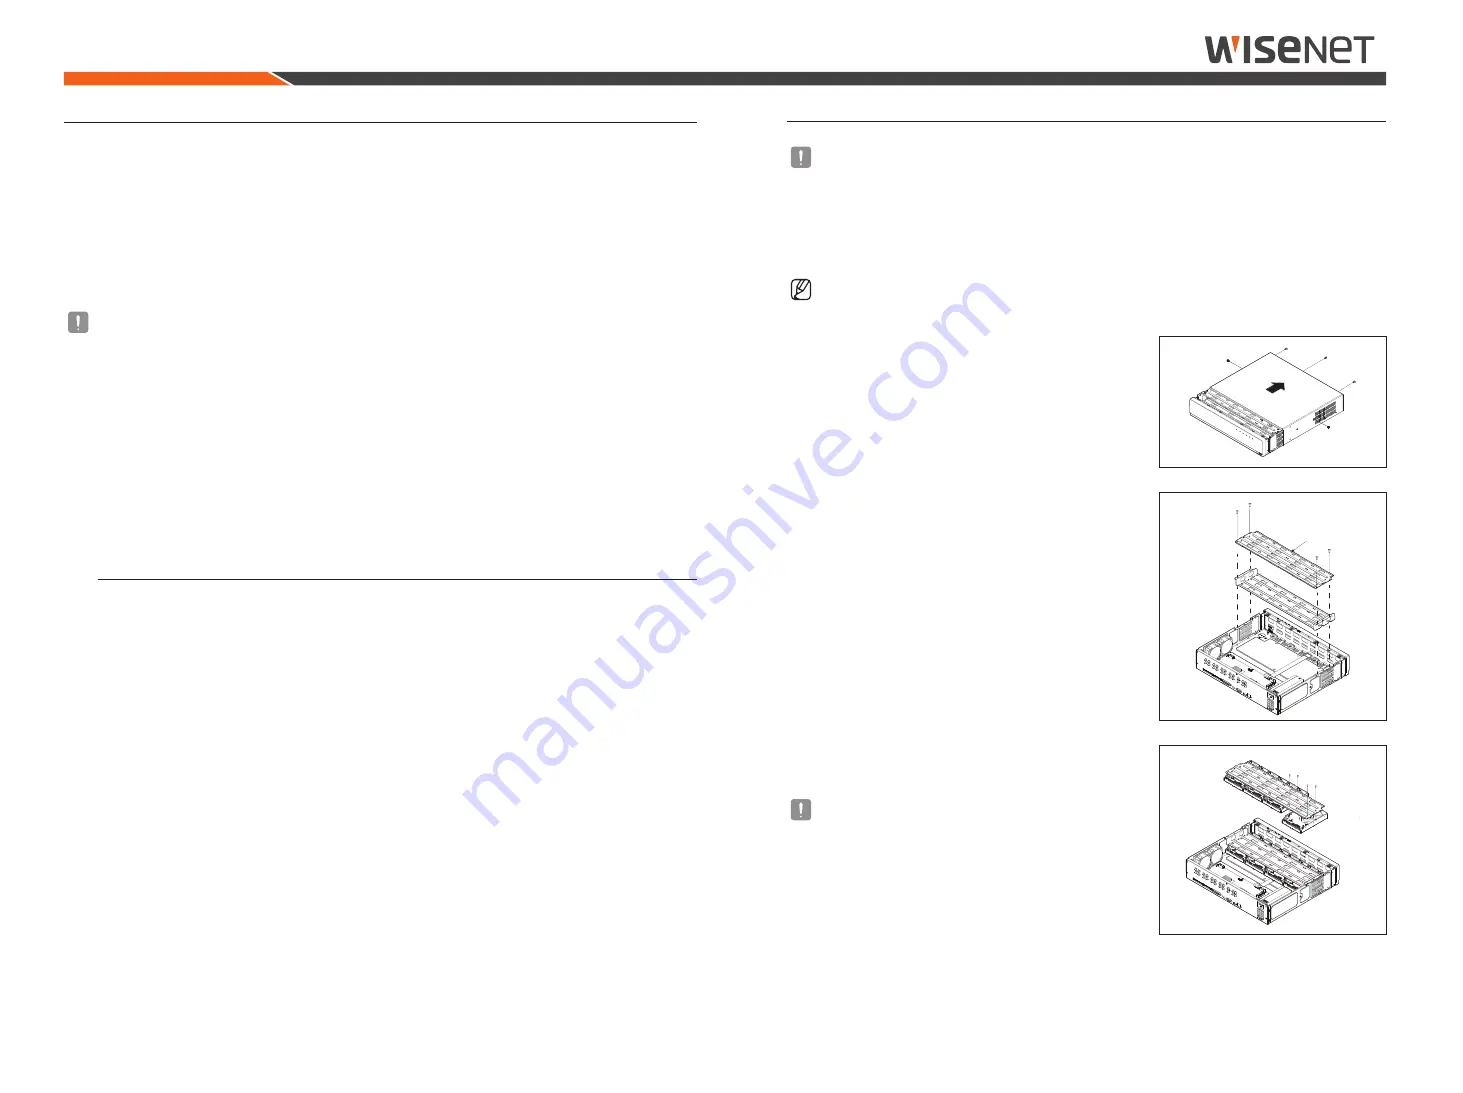
How to install an HDD in HrX-1635/HrX-835a

■ 

The following figures are based on Model HRX-1635.

1. 

Loosen the screws on the left/right sides and back and slide the 
cover back to remove it.

2. 

Loosen the left/right screws and remove the bracket.

Bracket

3. 

Install 8 HDDs to the bracket and fix them with screws. 

■ 

For the HRX-835A, install the HDD only to the bottom bracket.

■ 

To prevent damage to the HDD(s) due to vibration, it is recommended 
to install it first to the bottom bracket.

HDD aDDITIon

Make sure to unplug the power cord from the wall outlet to prevent possible electric shock, injury or product 
damage. 
Please consult your provider for further information on HDD installation since improper installation or settings may 
damage the product.

■ 

Number of HDDs supported 
- HRX-1635 : Max. 8 EA 
- HRX-835A : Max. 4 EA 
- HRX-1634 : Max. 2 EA

■ 

Make sure to unplug the power cord from the wall outlet before proceeding with the installation.

■ 

Cautions for data loss (HDD care)

Please pay attention so that the data inside the HDD is not damaged. 
Before adding a HDD, please check the compatibility with this product. 
HDD is vulnerable to malfunction due to its sensitive nature especially against shock when operating. 
Please ensure that the HDD is free from such shock. 
We are not liable for any damage to the HDD incurred by user's carelessness or miss use.

■ 

Cases might cause damage to HDD or recorded data

To minimize the risk of data loss from a damaged HDD, please backup data as often as possible. 
If exposed to shock when disassembling or installing, data stored in the hard disk may be damaged. 
A sudden power failure or turning off the product while in HDD operation may damage the hard disk drive. 
HDD or files stored inside may be damaged if the main body is moved or impacted during the HDD operation.

cautions when installing a HDD

1. 

Do not apply excessive force to the HDD.

2. 

Pay attention so as not to lose the disassembly screws or accessories.

■ 

If the screws or accessories are not put together correctly, the product may breakdown or not operate properly.

3. 

Please check the HDD compatibility before adding a HDD.

■ 

Please contact your nearest dealer to obtain the list of compatible devices.

Содержание Wisenet HRX-1634

Страница 1: ...HRX 1635 HRX 1634 HRX 835A DIGITAL VIDEO RECORDER Product Specification Manual ...

Страница 2: ...Use of this document and the subsequent results shall be entirely on the user s own responsibility Hanwha Techwin reserves the right to change the contents of this document without prior notice Design and specifications are subject to change without prior notice You can download the latest version from the Hanwha Techwin web site www hanwha security com The initial administrator ID is admin and th...

Страница 3: ...ly to cause harmful interference in which case the user will be required to correct the interference at his own expense Reorient or relocate the receiving antenna Increase the separation between the equipment and receiver Connect the equipment into an outlet on a circuit different from that to which the receiver is connected Consult the dealer or an experienced radio TV technician for help Before ...

Страница 4: ...mally restarting may take more time for restoring data from hard disk drive for proper operation Operating Temperature The guaranteed operating temperature range of this product is 0 C 40 C 32 F 104 F This product may not work properly if you run right after a long period of storage at a temperature below the guaranteed one Prior to using a device that has been stored for a long period in low temp...

Страница 5: ...ntents 7 Part Names and Functions Front 8 Part Names and Functions Rear installation 9 9 Checking the Installation Environment 9 Rack Installation 9 Power 10 HDD Addition connecting with other device 12 12 Connecting to an External Device 12 Connecting the USB 12 Connecting the Alarm Input Output 13 Connecting the Network ...

Страница 6: ...Time Event Smart Text Export ARB ARB support configuration feature for saving period by channel Various recording modes Normal Event Scheduled Recording Alarm Input Output Remote monitoring function by Windows Network Viewer Live monitoring of the camera Installation Wizard Function Recorder Web Viewer Supports the remote monitoring feature by DDNS P2P support Wisenet Viewer Wisenet mobile Provide...

Страница 7: ...DD LED turns on when accessing the hard disk ALARM Lights on when an event occurs NETWORK Displays both network connection and data transfer status BACKUP The LED will light up when the Export RecordedVideo is in operation POWER Shows the power ON OFF status USB Connects the USB devices USB 2 0 supported HRX 1634 DIGITAL VIDEO RECORDER REC HDD ALARM NETWORK BACKUP POWER Recorder Mouse Quick Guide ...

Страница 8: ... Audio Signal Output Port AUDIO IN Audio input signal port POWER Terminal to connect power to ALARM ALARM IN Alarm input ports HRX 1635 HRX 1634 1 16 CH HRX 835A 1 8 CH ALARM OUT Alarm output ports HRX 1635 HRX 1634 HRX 835A 1 4 CH RS485 422 Used to establish RS 485 or RS 422 communications TX TX RX RX AUDIO IN 5 16 Audio extension port Sold separately AUDIO IN 5 8 HDMI HDMI connector port VGA OUT...

Страница 9: ...e inlet at the bottom of the rack and the outlet on top 5 It is strongly recommended that a fan motor is installed at the inlet and the outlet for air circulation Please fit a filter at the inlet to screen dust or foreign substances 6 Please maintain the temperature inside the rack or surrounding areas between 0 C 40 C 32 F 104 F as shown in the figure 1 Figure 2 Rack Installation Install the Brac...

Страница 10: ...the power cord from the wall outlet before proceeding with the installation Cautions for data loss HDD care Please pay attention so that the data inside the HDD is not damaged Before adding a HDD please check the compatibility with this product HDD is vulnerable to malfunction due to its sensitive nature especially against shock when operating Please ensure that the HDD is free from such shock We ...

Страница 11: ...o problem with the connection terminal and wiring inside the product close the cover and fix it with screws How to install an HDD in HRX 1634 1 Loosen the screws on the left right sides and back and slide the cover back to remove it 2 Connect the SATA power cable of the HDD to the connector on the motherboard 3 Fix the HDD to the bottom of the recorder with screws 4 Check if there is any problem w...

Страница 12: ... devices while in operating the system If you use the USB device for Backup purposes format it with FAT32 on PC if it is not formatted on the Recorder Some USB devices may fail to function properly due to compatibility issue please check the device before using Only USB storage devices that comply with the standards having a metal cover are guaranteed for data transfer In case if the USB device s ...

Страница 13: ...P 192 168 1 10 Connecting the Network For more information about network connection see Setting the Network in theWisenet Recorder User Manual Network connection via Ethernet 10 100 1000BaseT Switch Windows NetworkViewer Network connection via router Brodband router xDSL or Cable Modem Windows NetworkViewer DDNS Server Data Center NETWORK xDSL or Cable Modem ...

Страница 14: ...either the retailer where they purchased this product or their local government office for details of where and how they can take these items for environmentally safe recycling Business users should contact their supplier and check the terms and conditions of the purchase contract This product and its electronic accessories should not be mixed with other commercial wastes for disposal Correct disp...

Страница 15: ......

Отзывы: