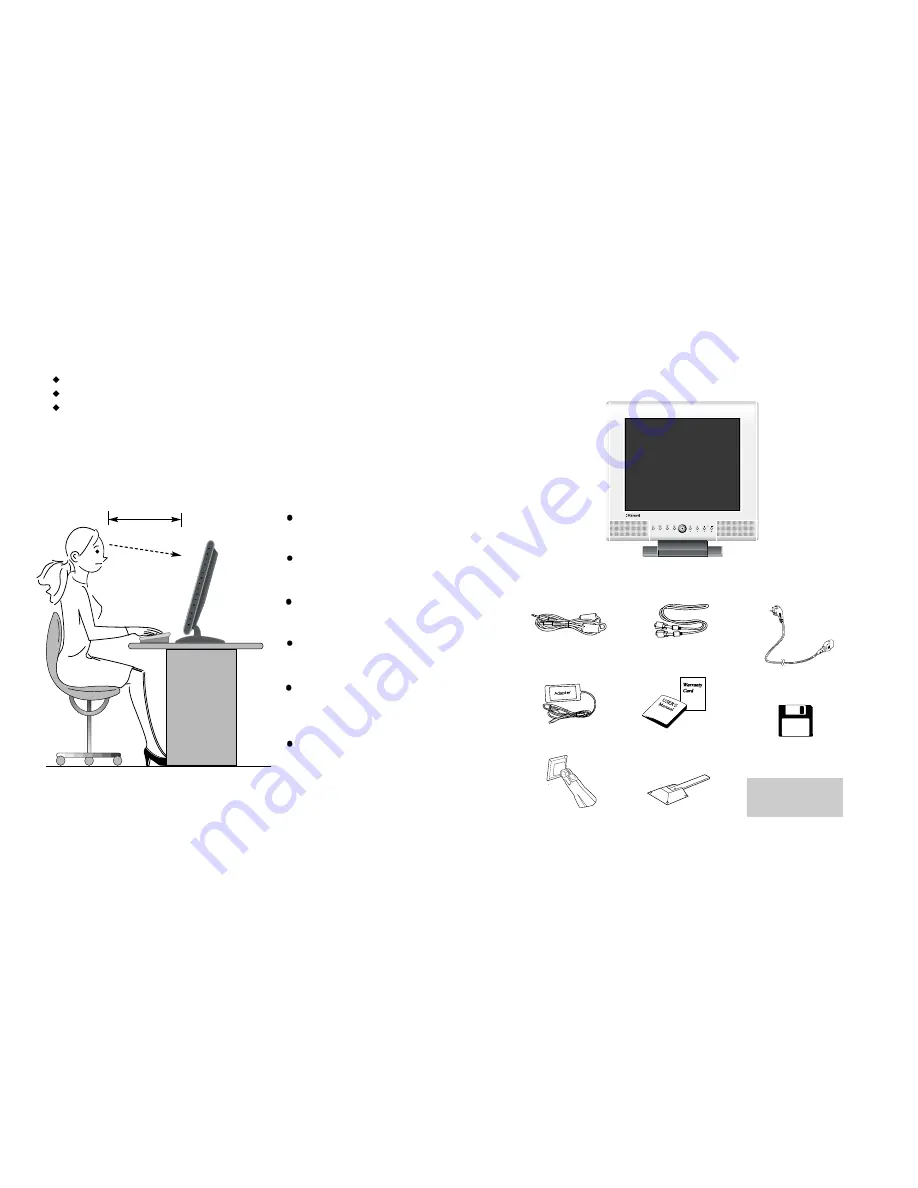
Hansol 700Fs Скачать руководство пользователя страница 3

3

2

Parts

LCD Monitor

Place the monitor to face the user and then adjust the monitor angle.

Take a break (for about 10 minutes) at every hour during the work with monitor. 

Refer to the following figure to take the correct posture. 

about 50cm

Look down the monitor

below the horizon.

Relax shoulders and arms, 

and sit back on the chair.

Adjust the monitor to 

prevent reflection.

Adjust the monitor stand 

to acquire required angle.

Keep feet flat on the ground.

Maintain the arms horizontally

and place hands softly on 
the keyboard.

Good Posture Guide

Stereo Cable

12V-DC Adapter

Arm

User's Manual /

Warranty Card

Signal Cable

AC Power Cable

Option Stand

Arm and Option 
Stand are optional.

Installation Disk

Installation Diskette

Содержание 700Fs

Страница 1: ...Printed in Korea Part No 942227020001 01 www hansolel co kr TFT LCD Color Monitor USER S MANUAL 17 Printed on the recyclable paper ...

Страница 2: ...ngle 6 Installing Monitor Driver 7 Power Management Feature 9 Name and Function of Front 10 Adjusting OSD 12 Installing VESA stand and USB 20 Installing Option Stand 21 Standard Signal Table 22 Specification 23 Troubleshooting 24 Warning 26 Table of Contents ...

Страница 3: ...tor below the horizon Relax shoulders and arms and sit back on the chair Adjust the monitor to prevent reflection Adjust the monitor stand to acquire required angle Keep feet flat on the ground Maintain the arms horizontally and place hands softly on the keyboard Good Posture Guide Stereo Cable 12V DC Adapter Arm User s Manual Warranty Card Signal Cable AC Power Cable Option Stand Arm and Option S...

Страница 4: ...s finished 1 Connect the adapter to 12V DC input terminal 2 Connect the computer cable to PC 3 Connect audio output to Audio In Stereo 4 Connect headphone or earphone to H Phone terminal 12V DC connection terminal Computer cable For PC For Macintosh Use adapter Adapter for Macintosh Optional Refer to the table on the rear side of the optional Macintosh adapter and adjust DIP switch by the resoluti...

Страница 5: ... close the installation Automatic Installation Manual Installation 1 Insert the Diskette in the Floppy driver 2 Click My Computer and follow the procedure below How to Adjust Monitor Angle How to Default Stand How to Option Stand Refer to page 21 for installation of VESA stand Click Control Panel Click Display Click Settings Run Click Install at Floppy driver and select the product model to set th...

Страница 6: ...not in use for a long period of time the monitor automatically reduces its power consumption meeting power saving standards of EPA and NUTEK The monitor is equipped with a power saving circuit that conforms to the world standard Display Power Manager Signalling DPMS mode of Video Electronics Standard Association VESA The power management feature requires that the video card of the computer should ...

Страница 7: ...form the following functions MUTE Cut off sound AUDIO Sound control function AUTO Press this button when OSD is not displayed to perform automatic setting MENU Press this button to display menus POWER Power switch Press this button when OSD is not displayed You can adjust contrast or brightness By pressing this button when OSD is displayed You can adjust gauge or select item VOLUME Press this butt...

Страница 8: ... 2 Use to select the H Position ICON 3 Use to adjust display left or right VOL MENU 1 Press the Menu button 2 Use to select the V Position ICON 3 Use to adjust display upward or downward VOL MENU 1 Press the Menu button 2 Use to select the Clock Phase ICON 3 Use to Correct fine trembling or Video noise VOL MENU 1 Press the Menu button 2 Use to select the Clock ICON 3 If Auto config function fails ...

Страница 9: ...3 Use into the submenu VOL MENU 1 Use to select Red Green Blue 2 Use to increase or decrease each color 3 Press the Menu button to exit VOL MENU 1 Use to select the Video Level 2 Use to adjust level 3 Press the Menu button to exit VOL MENU 1 Use to select the DOS Mode 2 Use to select Mode 3 Press the Menu button to exit VOL MENU 1 Use to select the I or II 2 Press the Menu button to exit I Blue to...

Страница 10: ...elect the Language 3 Use to select language in order VOL MENU 1 Press the Menu button 2 Use to select the Version 3 Check the version VOL MENU 1 Press the Menu button 2 Use to select the Information 3 You can know a display information Horizantal Vertical Frequency VOL MENU 1 Press the Menu button 2 Use to select the Auto Config 3 Use to readjust the display condition In most cass Auto Config adju...

Страница 11: ...lect the Mute 2 Use to select OFF ON 3 Press the Menu button to exit MENU VOL 1 Use to select the Bass 2 Use to adjust bass 3 Press the Menu button to exit MENU VOL MENU 1 Press the Menu button 2 Use to select the Factory Init 3 Use to return default setting VOL MENU 1 Press the Menu button 2 Use to select the Menu Exit 3 Use to exit menu VOL Sound Control MENU 1 Press the Menu button 2 Use to sel...

Страница 12: ...th 2 Unscrew six screws 3 Disassemble the stand 4 Locate the option stand on the supporter 5 Tighten four screws 6 Stand the monitor and spread out the stand bar Installing VESA Stand Installing VESA and USB Arrange the VESA stand on supporter and fix with four screws Installing USB Optional Install USB in the designated location in the rear side of the stand Use dedicated USB from Hansol Electron...

Страница 13: ...tion LCD Panel Synchro nization Model 700Fs Video Input Power Consumption Control key Front Part Multi Media Safety Standard EMI Dimension Power Adapter Standard Signal Table Pin assignment table D Sub Mini 15pin connector VGA 720 X 400 VGA 640 X 480 VGA 640 X 480 SVGA 800 X 600 XGA 1024 X 768 XGA 1024 X 768 SXGA 1280 X 1024 SXGA 1280 X 1024 MAC 640 X 480 MAC 832 X 624 MAC 1152 X 870 31 469 31 469...

Страница 14: ...ower LED is off No picture Check the signal cable between monitor and computer Refer to page 4 Perform AUTO config Check the computer connection cable Refer to page 4 Check if computer power is on Message No sigral is displayed on the screen Screen looks to be run down Perform Clock and Adjust PHASE Switch off on the monitor Remove accessories Video extension cable and others and switch on Screen ...

Страница 15: ... large number of equipment in a single line To prevent fire and electric shock pull out the plug in case of thunder and lightening To prevent fire and electric shock do not try to take the monitor apart or repair it yourself Contact your local service station or customer service center for inspection modification or repair AUTO EXIT VOL AUTO EXIT VOL AUTO EXIT VOL If you see smoke or smell somethi...

Отзывы: