background image

 HKS14355FW, HKS14355FS 

Introducing your refrigerator

EN-3

Introducing your refrigerator

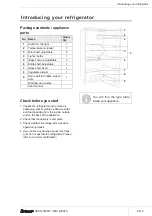
Package contents / appliance 
parts

No. Name

Quan-
tity

1

Switch for the light

1

2

Temperature controller

1

3

Door shelf, adjustable

5

4

Lights / bulbs

1

5

Glass shelves, adjustable

3

6

Bottle shelf, adjustable

1

7

Glass shelf, fixed

1

8

Vegetable drawer

1

9

Door shelf for bottles, adjust-
able

1

Warranty documents
User manual

Check before you start

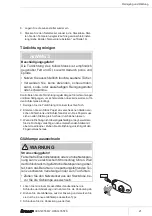
1. Unpack the refrigerator and remove all 

packaging, plastic profiles, adhesive strips 
and foam padding from the inside, outside 
and on the back of the appliance.

2. Check that the delivery is complete.
3. Check whether the refrigerator was dam-

aged during transit. 

4. If you notice any damage caused by trans-

port, do not operate the refrigerator. Please 
refer to our order confirmation.

1

2

3

4

5

6

7
8

9

You  will  find  the  type  plate 
inside your appliance.

Содержание HKS14355FW

Страница 1: ..._20200924 Bestell Nr Nachdruck auch auszugsweise nicht gestattet Anleitung Version 2001 01017_DE_20200924 Bestell Nr 22160219 Nachdruck auch auszugsweise nicht gestattet Anleitung Version 2001 01017_D...

Страница 2: ...igen 20 T rdichtung reinigen 21 Gl hlampe auswechseln 21 Wenn s mal ein Problem gibt 22 Service 23 Beratung Reklamation und Bestellung 23 Reparaturen und Ersatzteile 23 Umweltschutz leicht gemacht 24...

Страница 3: ...aschen ver stellbar 1 Garantieunterlagen Gebrauchsanleitung Kontrolle ist besser 1 Packen Sie den K hlschrank aus und ent fernen Sie alle Verpackungsteile Kunststoff profile Klebestreifen und Schaumpo...

Страница 4: ...e keine technischen Ver n derungen am Ger t vor Verwenden Sie das Ger t ausschlie lich wie in dieser Gebrauchsanleitung beschrieben Jede andere Verwendung gilt als nicht bestimmungsgem und kann zu Sac...

Страница 5: ...gt bei diesem Ger t nur durch Ziehen des Netzsteckers aus der Steckdose Ger t daher nur an eine gut zug ngliche Steckdose an schlie en damit es im St rfall schnell vom Stromnetz getrennt werden kann F...

Страница 6: ...nbare K ltemittel R600a Isobutan Zum Beschleunigen des Abtauvor gangs keine anderen mechanischen Einrichtungen oder sonstigen Mittel als die vom Hersteller empfohlenen benut zen Z B keine elektrischen...

Страница 7: ...Kleinteile vom Ger t abzuziehen und in den Mund zu stecken Bei der Entsorgung des Ger tes da rauf achten dass Kinder nicht im Ge r t ersticken k nnen z B K hl und Gefrierschubladen nicht herausneh me...

Страница 8: ...ung Insbesondere rohes Fleisch und Fisch ausreichend verpacken damit dane benliegende Lebensmittel nicht durch Salmonellen o kontaminiert wer den Die von den Lebensmittelherstellern empfohlenen Lagerz...

Страница 9: ...zur Beleuchtung des Ger teinneren verwenden Sie ist nicht zur Beleuch tung eines Raumes geeignet Beim Reinigen beachten Auf keinen Fall aggressive k rnige soda s ure l semittelhaltige oder schmirgelnd...

Страница 10: ...zweiten Person zu dem vorgesehenen Standort 2 Entfernen Sie das Verpackungsmaterial und s mtliche Schutzfolien au en und innen Den richtigen Standort bestimmen HINWEIS Besch digungsgefahr Der K hlschr...

Страница 11: ...eratur ein Bestimmungsgem er Gebrauch auf Seite 4 Klimaklasse bedeutet dass das Ger t f r den Betrieb bei der unten genannten Umgebungstemperatur bestimmt ist siehe Tabelle Klimaklassen Sinkt die Raum...

Страница 12: ...e minde stens 3 cm Abstand T ranschlag wechseln WARNUNG Stromschlaggefahr Zum Wechseln des T ranschlags ist es n tig die Ab deckung vom K hlschrank zu entfernen Dadurch k n nen stromf hrende Teile zug...

Страница 13: ...Sie daf r einen Kreuzschlitz Schrau bendreher Setzen Sie die beiden Schraubabdeckungen wieder ein 9 Kippen Sie den K hlschrank nach hinten maximal 45 da mit Sie auch das untere T rscharnier umsetzen k...

Страница 14: ...55FS K hlschrank aufstellen 14 15 Stellen Sie den K hlschrank vorsichtig aufrecht hin 16 Setzen Sie den Blindstopfen auf der gegen berliegenden Seite der T r wieder ein Sie haben den T ranschlag erfol...

Страница 15: ...en bevor Sie ihn in Betrieb nehmen Dadurch hat das Schmiermittel gen gend Zeit um in den Kompressor zur ckzuflie en 1 Reinigen Sie den K hlschrank vor dem ersten Einschalten siehe Reinigung und Wartun...

Страница 16: ...ergieverbrauch und die Temperatur im K hlschrank k nnen ansteigen wenn die Umgebungstemperatur ber oder unterschritten wird abh ngig von dem vorgesehenen Standort wenn die T r des K hlschranks h ufig...

Страница 17: ...men Die Fl chen die mit Lebensmitteln und zug nglichen Ablaufsystemen in Ber hrung kommen k nnen re gelm ig reinigen Rohes Fleisch und Fisch in geeigneten Beh ltern im K hlschrank so aufbewahren dass...

Страница 18: ...e k nnen sonst an der R ckwand festfrieren Legen Sie ein K hl Gefrierthermometer auf die Glasablage 7 ber der Gem se Schublade 8 um die richtige Temperatur kontrollieren zu k nnen Optimal sind etwa 6...

Страница 19: ...icht ver derben 2 Ziehen Sie den Netzstecker um den K hlschrank auszuschal ten Hinweis Wenn Sie die K hlleistung 0 einstellen dann ist der K hlschrank nicht ausgeschaltet 3 R umen Sie die Ablagen 3 5...

Страница 20: ...R ckseite des K hlschranks um den Energiever brauch m glichst gering zu halten K hlbereich reinigen 1 Stellen Sie den Temperaturregler 2 auf 0 ein und ziehen Sie den Netzstecker aus der Steckdose 2 Ne...

Страница 21: ...an verschiedenen Stellen zwi schen K hlschrank und K hlschrankt r ein Das Papier muss sich an allen Stellen gleich schwer durchziehen lassen 3 Wenn die Dichtung nicht berall gleichm ig anliegt erw rme...

Страница 22: ...e K hlstufe eingestellt Stellen Sie den Temperaturregler 2 weiter in Richtung MIN Der K hlschrank k hlt nicht ausrei chend Die Temperatur ist auf eine zu niedrige K hlstufe eingestellt Stellen Sie den...

Страница 23: ...n Jahren nach dem Inverkehrbrin gen des letzten Exemplars des Modells zur Verf gung T rdichtungen stehen f r einen Zeitraum von zehn Jahren zur Verf gung Kunden in Deutschland Wenden Sie sich bitte an...

Страница 24: ...n die Verpackung zumindest w hrend der Garantiezeit aufzube wahren Sollte das Ger t zur Reparatur eingeschickt werden m s sen ist es nur in der Originalverpackung ausreichend gesch tzt Wenn Sie sich v...

Страница 25: ...kennung Ihres Ger ts finden Sie unter Technische Daten Bestellnummer 22160219 48701624 Ger tebezeichnung K hlschrank Modellkennung HKS14355FW HKS14355FS Ger tema e H he Breite Tiefe 1420 mm 550 mm 580...

Страница 26: ...HKS14355FW HKS14355FS 26...

Страница 27: ...ugsweise nicht gestattet Anleitung Version 2001 01017_EN_20200924 Bestell Nr Nachdruck auch auszugsweise nicht gestattet Manual version 2001 01017_EN_20200924 Order no 22160219 48701624 Reproduction e...

Страница 28: ...f appliance EN 18 Cleaning the refrigerator EN 18 Cleaning the door seal EN 19 Changing the bulbs EN 19 If there s a problem EN 20 Service EN 21 Advice complaints and orders EN 21 Repairs and spare pa...

Страница 29: ...Door shelf for bottles adjust able 1 Warranty documents User manual Check before you start 1 Unpack the refrigerator and remove all packaging plastic profiles adhesive strips and foam padding from the...

Страница 30: ...minimum clearance dis tances are adhered to see Selecting the right location on page EN 9 Use the appliance exclusively as de scribed in this user manual Any other use is deemed improper and may resu...

Страница 31: ...t gap of at least 3 mm consult a qualified professional if necessary see Service on page EN 21 When positioning the appliance en sure the supply cord is not trapped or damaged Do not kink the supply c...

Страница 32: ...it e g by puncturing the refrigerant channels of the condensate evapo rator with sharp objects bending the piping or cutting open the insulation Until the point of proper disposal en sure that none of...

Страница 33: ...e shall not be made by children without su pervision Make sure children do not have unsu pervised access to the appliance Risks associated with using refrigerators WARNING Fire hazard Improper handlin...

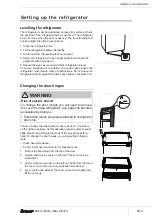
Страница 34: ...appliance can lead to damage to property Do not pull or lift the appliance by its doors or door handles Place the appliance only on a level and firm surface that can support the weight of the applianc...

Страница 35: ...ior and exterior Selecting the right location NOTICE Risk of damage The refrigerator may not work properly if it is exposed to temperatures that are colder than the lower limit of the temperature rang...

Страница 36: ...intended for operation at the specified ambient temperature see table Climate categories If the room temperature drops signif icantly below this the unit will not switch on as often This indicates tha...

Страница 37: ...efrigerator directly against the wall Leave space of at least 3 cm Changing the door hinges WARNING Risk of electric shock To change the door hinges you will need to remove the cover from the refriger...

Страница 38: ...screw covers 9 Tilt the refrigerator backwards maximum 45 to allow you to adjust the lower door hinge also 10 Unscrew both front levelling feet 11 Unscrew the lower hinge plate To do this use an 8mm...

Страница 39: ...about 12 hours before switching it on This allows the lubricant enough time to flow back into the compressor 1 Clean the refrigerator before switching it on for the first time see Cleaning and mainten...

Страница 40: ...and the temperature in the refrigerator can increase if the ambient temperature fluctuates above or below the pre scribed level depending on the selected location if the refrigerator door is opened f...

Страница 41: ...es that can come in contact with food and accessible drainage systems Store raw meat and fish in suitable containers in the refrigerator so that it does not come into contact with or drip onto other f...

Страница 42: ...hat is not directly against the rear wall Other wise it may freeze to the back wall Place a fridge freezer thermometer on the glass shelf 7 above the vegetable drawer 8 to check the correct temperatur...

Страница 43: ...place so that the food does not spoil 2 Pull out the mains plug to switch off the refrigerator Notice Switching the cooling power to 0 does not switch off the refrigerator 3 Take the shelves 3 5 6 an...

Страница 44: ...y to minimise energy consumption Cleaning the refrigerator 1 Set the temperature control 2 to 0 and pull the mains plug out of the socket 2 Remove the food and place it in a sufficiently cool room 3 R...

Страница 45: ...piece of paper between the refrigerator and the refrig erator door at various points The paper should be difficult to pull through at all points 3 If the seal is not uniform everywhere warm it gently...

Страница 46: ...rature is set to a cooling power that is too high Set the temperature controller 2 further towards MIN The refrigerator is not cooling enough The temperature is set to a cooling power that is too low...

Страница 47: ...parts are available for a minimum pe riod of seven years after the final version of the model has been placed on the market Door seals are available for a period of ten years Customers in Germany Plea...

Страница 48: ...d keeping the pack aging at least during the warranty period If the appliance needs to be sent out for repairs only the original packaging will provide sufficient protection If you would like to dispo...

Страница 49: ...efrigerant R600a Filling capacity refrigerant 30 g Foaming agent cyclopentane Rated power 90 W Supply voltage frequency rated current lamp power 220 240 V 50 Hz 0 55 A max 10 W Protection class I Clim...

Страница 50: ......
Отзывы: