background image

MicroScope User’s guide

22

chosen between Live and Capture .

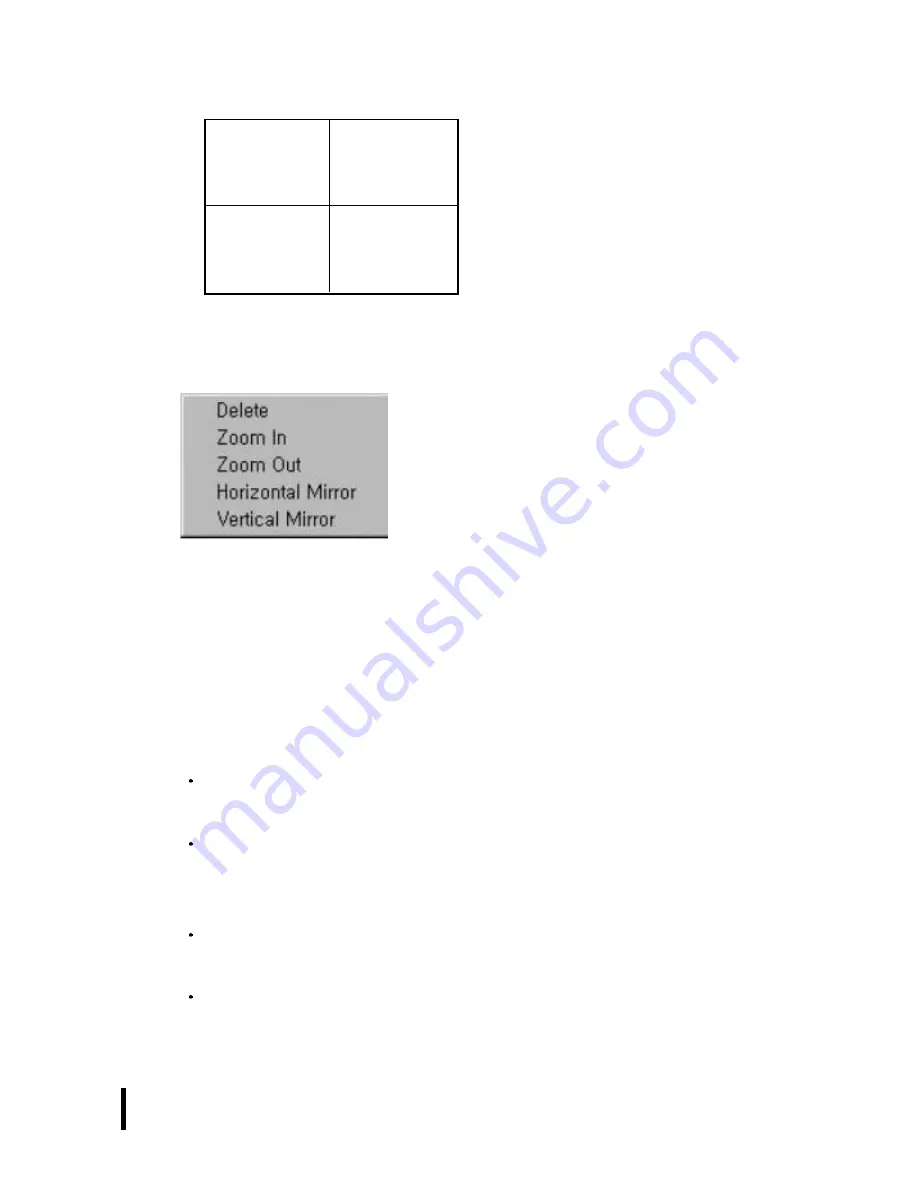
In the image is on, click the right mouse button and

then the popup menu is appeared as like below.

Delete : Delete the image.
Zoom In : The image can be magnified 12 times.
Zoom Out : The image can be zoomed out to 160*120.
Horizontal Mirror : Reverse the right and left image.
Vertical Mirror : Reverse the up and down image.

1-4) Folder window

This window shows picture file which would be now
loaded.
When picture is captured, this windows shows the
captured picture.

1-5) Temp window

When double-click the picture which was saved at
folder, the picture is saved at Temp window.
When double-click the screen of Temp Window, the
saved pictures are shown at screen window in a row.

1

2

4

3

Содержание MicroScope HVS -CM500PC

Страница 1: ...rving your or other people s eyes as LED light cause eye s injury HVS CM500PC USB User s guide Reg No 249826 for MicroScope Reg No 0246851 for multifunctional zoom camera as a practical new device field in Korean Intellectual Property Office Thank you for purchasing Hanse MicroScope ...

Страница 2: ...MicroScope User s guide 2 ...

Страница 3: ...ch part 7 7 How to use the mirror for ear observation 8 8 Applicable system network 8 9 Specifications 9 10 Install of Hardware 10 11 System Requirements 12 12 Install Program 12 13 How to uninstall program 23 14 How to update program 25 15 Warranty 26 1 Contents Microscope User s guide 3 ...

Страница 4: ...to avoid any dust or fingerprint on it and use soft fabric or something similar when you cleaning the lens To keep from damaging your HVS CM500PC USB avoid exposing it to moisture and extreme temperatures Do not use or store your HVS CM500PC USB where strong electrostatic or electrical noise may be generated Do not drop or give excessive shock to the HVSCM500PC USB Do not disassemble or touch the ...

Страница 5: ...features USB 1 1 compliant USB interface 1 3inch CMOS VGA 640X480 CIF 320X240 Portable with compact size X20 X75 Magnification with 17 monitor It depends on the distance of object LED for colse photography Several images can be analized recorded and printed with S W Image capture by H W S W Beauty care education tool inspection for components can be applied 3 Main features 5 ...

Страница 6: ...able to CCTV camera and camcorder s substitute LED function is to be operated only for close distance photographing Beauty cares Observing skin and hair condition 4 Applicaion Electronic components inspection Education tool in school ...

Страница 7: ...5 Composition Manual CD Stand option 6 Name of each part Power button Body Cable Base Focus control lever Lens LED Transparent window Microscope User s guide H L Mirror for ear observation 7 USB port ...

Страница 8: ...window from the body Assemble the mirror instead Never use this product for observing your or other people s eyes as LED light cause eye s injury 7 How to use the mirror for ear observation 8 Applicabie system network Microscope HVS CM500PC Computer ...

Страница 9: ...vice Type Digital Video Camera Frame Rate Up to 30 frames Interface USB Specifcation 1 1 Signal Noise Ratio c 56dB Pixel Resolution 640 480 VGA Exposure Control Automatic to 82dB Gain Control Automatic to 24dB USB Cable 1 5m 0 2 Supply Voltage 4V1 6V0 DC Internally regulated Through USB 20 75 magnification 9 ...

Страница 10: ...y Process 1 Connect MicroScope to USB port of your computer 2 After the message of New Hardware Found in the window of the wizard of Adding new Hardware Check the driver for the device and the click OK 3 Click Browse botton 10 Installation of Hardware ...

Страница 11: ...MicroScope User s guide 11 4 After checking driver folder in the CD Rom drive and then click OK button 5 After the message of Insert the disk on copying file and then click OK button ...

Страница 12: ...t 1024 768 16 bit display 11 System Requirements 1 To Install Program 1 Installation After excuting the setup exe file in the CD Rom drive program setup is started After the window of program version is displayed click Enter button Select I accept the terms of the license agreement and Press the next button 12 To Install Program ...

Страница 13: ... no in the customer information The serial no is as below Ex HDC00000A H Hanse Company name D Manufacturing Year C Manufacturing Month 00000 Serial no of Manufacturing A Manufacturer If the Hanse this is able to be omitted User name and company name out in customer s ...

Страница 14: ...er s guide 14 information window and click the next button Select the installation type users want to and click the next button Complete option is recommended for users Click the install button to set up the program ...

Страница 15: ...ope User s guide 15 Window is appeared for displaying installation The program will be updated on our homepage and to renew the updated program choose Yes check for program updates and click the finish button ...

Страница 16: ...llation is completed successfully 2 Note In case microscope program was installed before execute the existed set up program again Above the window select the Remove botton and click the Next button After remove the program completely execute the new version of setup exe and install program again ...

Страница 17: ...se MicroScope Note Don t start program without MicroScope If you do without connecting MicroScope to PC you ll see the below message In this case start the program after connecting MicroScope to PC To see only capture screen without live screen click Enterbutton In case you connect MicroScope to PC the above warning message won t appear ...

Страница 18: ...Scope User s guide 18 1 Menu window 2 Tool window 3 Screen window 4 Folder window 5 Temp window 1 1 Menu window Pointing Menu When click File pop up menu shows Open Print Print Setup Exit in a row 1 2 4 5 3 ...

Страница 19: ...ows chosen driver and picture file in folder Print Open Print Setup Mode and Pre view Print Setup Open Print Setup mode which is set by default Exit Exit the program 2 view When click View pop up menu shows Division 1 2 4 Division1 Screen 1 640 480 Division2 Screen 2 320 240 Division4 Screen4 320 240 3 Setup ...

Страница 20: ...ns of below icons are the same to the menu How to delete Image file Click on Open to choose an Image of folder screen saved as Image Capture then click right button of mouse so as to run Delete function How to save Image folder Please refer to the following Image saving default load and type C Program Files Hanse Electronics Date xxx0000YY Date four digit number ex 0717 XXX Prefix name five digit ...

Страница 21: ...e top and left side screen between live or capture Division You can select screen as one full screen two screens and four screens Exit You can put the head letter of title for screen that you want to record You can define the location of file that you want to capture 1 3 Screen window Screen 1 shows Live and Capture Screen 2 shows Capture only and screen 4 can be chosen between Live and Capture Sc...

Страница 22: ... to 160 120 Horizontal Mirror Reverse the right and left image Vertical Mirror Reverse the up and down image 1 4 Folder window This window shows picture file which would be now loaded When picture is captured this windows shows the captured picture 1 5 Temp window When double click the picture which was saved at folder the picture is saved at Temp window When double click the screen of Temp Window...

Страница 23: ...guide 23 1 How to Remove program 1 As the picture you can delete the program Start Program Hanse Uninstall 2 As the picture the window is appeared 3 Select the Remove and click the next button 13 How to uninstall program ...

Страница 24: ... the Yes 5 Restart the computer and the un installment is completed 2 Remove in the Control Panel 1 Click Start Control Panel Add Remove Program 2 Remove the Microscope 3 Remove in the installer 1 Execute the setup file 2 Choose Remove ...

Страница 25: ...r s guide 25 Please look through Hanse Electronics website http www hanseelec co kr 1 When setup next version will be uploaded at Hanse website 2 Run with download program from Hanse website 14 How to update program ...

Страница 26: ... S will be afforded at free of charge for one year after purchasing date 3 In case of the followings Hanse will afford A S with charge of cost even through warrant period 1 Out of order by user s mishandling or move 2 In case of wrong repair or damage by modification of inner part 3 Out of order by natural disaster or disorder in power source 4 In case of omission correction without confirmation l...

Страница 27: ...MicroScope User s guide 27 ...

Страница 28: ...Dong Gangseo Gu Seoul 157 862 Korea Tel 82 2 6675 2500 Fax 82 2 6675 2501 http www hanseelec com E mail hanse hanseelec co kr Factory 4L 33B Namdong Industrial Zone 613 3 Namchon Dong Namdong Gu Incheon 405 846 Korea Tel 82 32 816 8700 Fax 82 32 818 4473 ...

Отзывы: