Hans Grohe PuraVida 15073 1 Series Скачать руководство пользователя страница 3

3

Installation Considerations

For best results, Hansgrohe recommends that 
this unit be installed by a licensed, professional 
plumber.

Please read over these instructions thoroughly 
before beginning installation.  Make sure that 
you have all tools and supplies needed to com-
plete the installation.

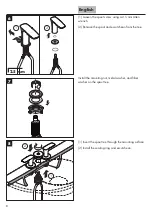
This faucet requires ½" hot and cold supply lines 
(not included).

Keep this booklet and the receipt (or other proof 
of date and place of purchase) for this product 
in a safe place.  The receipt is required should it 
be necessary to request warranty parts.  

Consideraciones para la instalación

Para obtener mejores resultados, la instalación 
debe estar a cargo de un plomero profesional 
matriculado.

Antes de comenzar la instalación, lea estas in-
strucciones detenidamente.  Asegúrese de tener 
las herramientas y los insumos necesarios para 
completar la instalación.

Este grifo requiere tuberías de suministro de 
agua caliente y fría de ½” (no incluidas).

Mantenga este folleto y el recibo (u otro com-
probante del lugar y fecha de compra) de este 
producto en lugar seguro.  El recibo se requiere 
en caso de ser necesario solicitar piezas bajo 
garantía.  

À prendre en considération pour l’installation

Pour de meilleurs résultats, Hansgrohe recom-
mande que ce produit soit installé par un plom-
bier professionnel licencié.

Veuillez lire attentivement ces instructions avant 
de procéder à l’installation. Assurez-vous de

  Assurez-vous de

Assurez-vous de 

disposer de tous les outils et du matériel néces-
saires pour l’installation.  

Ce robinet requiert des conduites d’alimentation 
d’eau chaude et d’eau froide de ½ po (non 
comprises).

Conservez ce livret et le reçu (ou une autre 
preuve sur laquelle figurent la date et l’endroit 
de l’achat) pour ce produit dans un endroit sûr.  
Le reçu est requis si vous commandez des pièces 
sous garantie.

Содержание PuraVida 15073 1 Series

Страница 1: ...PuraVida 15073xx1 Installation Instructions Warranty...

Страница 2: ...ression d eau maximum Presi n en servicio max 147 PSI Recommended hot water temp Temp rature recommand e d eau chaude Temperatura recomendada del agua caliente 120 140 F Max hot water temp Temp rature...

Страница 3: ...ramientas y los insumos necesarios para completar la instalaci n Este grifo requiere tuber as de suministro de agua caliente y fr a de no incluidas Mantenga este folleto y el recibo u otro com probant...

Страница 4: ...n the left and the cold supply must be on the right Place the metal washer and fiber washer on the valve 1 Push the valve up through the mounting surface 2 Install the sealing ring and mounting ring 1...

Страница 5: ...ndelle en fibre sur la valve 1 Poussez la valve vers le haut au travers du trou de la surface de montage 2 Installez l anneau de montage 1 D posez la valve sur la surface de montage 2 Serrez l crou de...

Страница 6: ...tall the handles 2 Secure the handle to the valve by rotating the escutcheon clockwise Inspect the alignment of the handles 1 If it is unsatisfactory loosen the screws and rotate the valve 2 Tighten t...

Страница 7: ...ign es 1 S il ne convient pas deserrez les vis et tournez le robinet 2 Serrez les vis 1 Gire los v stagos de las v lvulas a la posici n cerrada Instale las manijas 2 Fije la manija a la v lvula girand...

Страница 8: ...Allen wrench 2 Remove the spout and escutcheon from the tee Install the mounting nut metal washer and fiber washer on the spout tee 1 Insert the spout tee through the mounting surface 2 Install the s...

Страница 9: ...e raccord vers le haut au travers du trou de la surface de montage 2 Installez l anneau decoratif et le joint d tan ch it 1 Afloje el tornillo del surtidor 2 Retire el surtidor y el escudo Instale la...

Страница 10: ...hten the spout screw using a 2 5 mm Allen wrench Connect the hoses to the valves Tighten the hose nuts using two wrenches as shown Do not allow the hoses to twist A twisted hose may become loosened fr...

Страница 11: ...er du bec Installez les conduites d alimentation non comprises 1 Apriete la tuerca de montaje y los tornillos tensores 2 Coloque el surtidor sobre la T y el escudo Apriete el surtidor con una llave Al...

Страница 12: ...flow of water decreases over time clean the aerator Cleaning Nettoyage Limpiar Si le d bit d eau diminue au fil du temps nettoyez l a rateur Si el caudal de agua disminuye con el tiempo lave el airead...

Страница 13: ...Parts Pi ces d tach es Repuestos xx Finishes Couleurs Acabados 00 chrome 40 white chrome 95271xx0 95270xx0 94009000 94008000 95282000 13961000 96321001 95290000 97357001 98127000 95787000 92634000 963...

Страница 14: ...powders sponge pads or micro fiber cloths Cleaning Instructions for Faucets and Showers Please follow the cleaning material manufacturer s instructions In addition pay attention to the following poin...

Страница 15: ...e nettoyage pour robinetteries et douches Veuillez suivre les instructions du fabricant de produits articles de nettoyage De plus tenez compte des conseils suivants Nettoyez vos produits de robinetter...

Страница 16: ...e los detergentes La limpieza tiene que ser realizada seg n la dosificaci n y el tiempo de actuaci n en funci n del objeto y ajustada a las necesidades espec ficas del mismo Gracias a una limpieza per...

Страница 17: ...t to Hansgrohe Commercial products and ii for 5 years with respect to Axor products THIS WARRANTY DOES NOT COVER AND HANSGROHE WILL NOT PAY FOR A Conditions malfunctions or damage not resulting from d...

Страница 18: ...y gives you specific legal rights and you may also have other rights that vary from state to state TO THE EXTENT PERMITTED BY LAW ANY IMPLIED WARRANTIES OF MERCHANTABILITY AND FITNESS FOR A PARTICULAR...

Страница 19: ...19...

Страница 20: ...Hansgrohe Inc 1490 Bluegrass Lakes Parkway Alpharetta GA 30004 Tel 770 360 9880 Fax 770 360 9887 www hansgrohe usa com US Installation Instructions Part No 90486224 Revised 01 2011...

Отзывы: