30
31
Deutsch
Deutsch
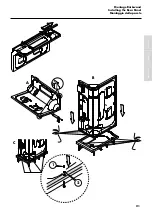
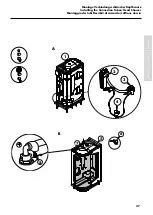
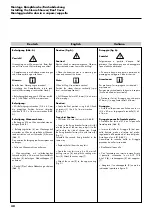
Montage obere Abdeckung (Dach) / Türgriff
•
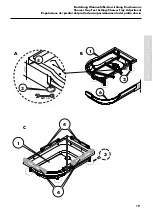
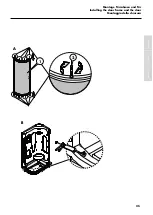
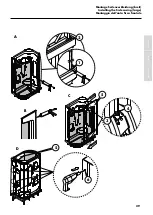
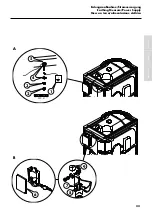
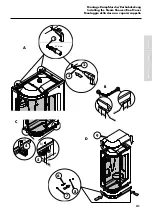
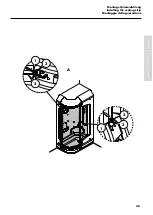
Silikon (3) oben an der Rückwand auf
gesamte Länge der Dichtfläche auftragen
(Abb. A).
•
Die obere Abdeckung (1) über den Ge-
windestangen (4) bzw. den Befestigungs-
bohrungen (2) positionieren und vorsichtig
absenken. Die obere Abdeckung muss sauber
aufliegen (Abb. A).
•
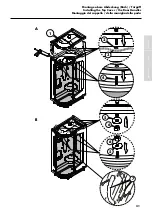
Die 8 Unterlegscheiben 6,4 x 18 (5) einset-
zen und mit dem 10 mm Maulschlüssel und
den 8 Muttern M6 (6) die obere Abdeckung
verschruaben (Abb. B).
Hinweis:
Befestigungsschrauben der oberen Abde-
ckung nicht zu stark festdrehen, um Beschädi-
gungen zu vermeiden!
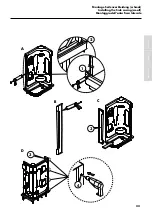
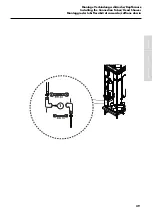
Türgriff montieren:
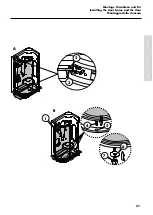
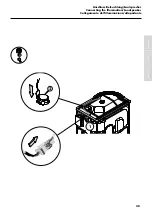
Die Türgriffe (7) montieren, dazu die 4 O-
Ringe in die Nut einlegen, die Schrauben
einsetzen und die Griffe festschrauben.
2 x Abschlussdeckel einsetzen.
Hinweis:
Türgriff außen: Befestigungsschraube unten
einsetzen!
Türgriff innen: Befestigungsschraube oben
einsetzen!
English
English
Installing the Top Cover / the Door Handles
•
Apply silicone (3) to the rear panel's top
over the sealing surface's entire length (Fig.
A).
•
Place the top cover (1) over the thread rods
(4) resp. the fixing holes (2). Put carefully the
top cover on the side panels. The top cover
must be adjusted to the side panels (Abb. A).
•
Insert the 8 6.4 x 18 washers (5) and
screw with the 8 M6 nuts (6) the top cover to
the other panels (Fig B).
Note:
To avoid any damage, the side casing’s fixa-
tion screws must not be secured too tightly!
Installing the door handles:
Mount the door handles (7) by placing the 4
o-rings into the groove, inserting the screws
and tightening the handles. Insert 2 end
covers.
Note:
Outside door handle: Insert the fixation screw
at the bottom!
Inside door handle: Insert the fixation screw
at the top!
Italiano
Italiano
Montaggio del cappello / della maniglia della porta
•
Applicare un cordone di silicone (3) lungo
il montante superiore della chiusura (Abb. A).
• Adagiare il cappello (1) in modo da
centrare, con i quattro fori (2) posti sul telaio
del cappello, le quattro barre filettate (4) del
la chiusura e con le quattro viti presenti sul
telaio del cappello, i quattro fori presenti sulla
superficie della parete (fig. A).
• Utilizzando la chiave fissa da 10 mm, otto
dadi E M6 (6) e otto rosette AMT 6,4x18 (5),
fissare il cappello alla parete e alla chiusura
(come illustrato in figura B).
Avvertenza:
Per evitare danni non serrare eccessivamente
le viti di fissaggio del cappello.
Montaggio della maniglia della
porta:
Montare le maniglie della porta (7) inserendo
le 4 guarnizioni toroidali nella scanalatura,
applicando le viti ed avvitando le maniglie.
Applicare 2 tappi terminali.
Avvertenza:
Maniglia esterna: applicare la vite di
fissaggio in basso!
Maniglia interna: applicare la vite di
fissaggio in alto!
Содержание PHARO Aquafun 120 Comfort L 21114000
Страница 21: ...21 2 1 A B C Deutsch Montage R ckwand English Installing the Rear Panel Italiano Montaggio della parete...
Страница 43: ...43 1 2 A B 1 Deutsch T rjustierung English Door adjustment Italiano Regolazione della porta...
Страница 53: ...53 D A B C E F Deutsch Brausenfunktionen English Shower Functions Setting Italiano Funzioni della doccia...
Страница 55: ...55 1 2 Deutsch Bedienelement Steam English Operating Element Steam Italiano Funzionamento bagno di vapore...
Страница 73: ...73 Deutsch English Italiano...
Страница 77: ...77 Deutsch English Italiano...

