HANOVER Instructional Book
Page | 8
Version 1.0
5 Burner
Страница 1: ...ustomerService Hanover Products com www Hanover Products com DANGER IF YOU SMELL GAS I Shut off the gas supply to the appliance at its source 2 Extinguish any open flames 3 Open grill hood to release...
Страница 2: ...16 17 i Checking for Gas Leaks 17 19 ii Unpacking Unit 20 V Gas Connections 21 i Natural Gas Requirements 21 ii Liquid Propane Gas and TankRequirements 21 iii Transporting and Storing LP Gas 22 23 VI...
Страница 3: ...o Replace Conventional Burner with Infrared Sear Burner 35 ii Preheating the Infrared Burner 35 iii Infrared Burner Cleaning 35 X Fuel Conversion 36 i Gas Regulator 36 37 ii Main Burner 38 iii Rear Bu...
Страница 4: ...nd Heat Zone Separators 1 Year all other components Appliances must be registered within 30 days of purchase to validate this warranty See warranty section for details Model 500432N 500432L 4 BURNER C...
Страница 5: ...e Tamer Flame Stabilizer Grid Zone Cooking Removable Heat Zone Separators Rotisserie Kit Motor Forks Optional Burner Commercial Quality Cast Stainless Steel Gas Type Each grill contains an NG LP Conve...
Страница 6: ...HANOVER Instructional Book Page 6 Version 1 0 BBQ SPECIFICATIONS NOTE ALWAYS have equipment measured by Contractor before beginning any project 3 Burner...
Страница 7: ...HANOVER Instructional Book Page 7 Version 1 0 4 Burner...
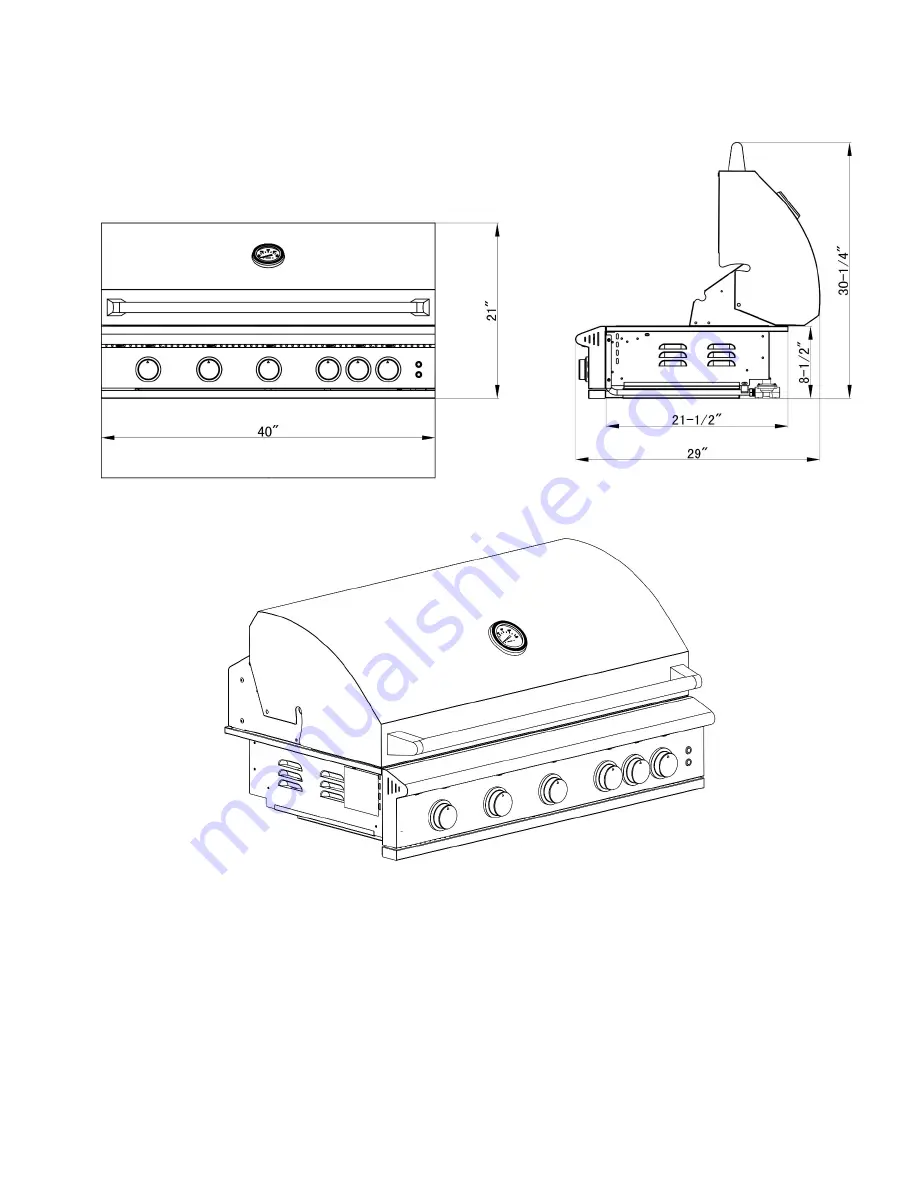
Страница 8: ...HANOVER Instructional Book Page 8 Version 1 0 5 Burner...
Страница 9: ...ized service agent NOTE This appliance is not intended for commercial use FOR YOUR SAFETY If you smell gas 1 Shut off gas to the appliance 2 Extinguish any open flame 3 If odor continues immediately c...
Страница 10: ...anual gas valve must be installed in the gas supply line to this appliance This applies to permanently installed natural gas and propane installations This does not apply to propane portable installat...
Страница 11: ...burner tube shutter hole securely over the valve orifice and ensuring the male post on the rear of the burner rests in the opening in the grill chassis Failure to do so could result in a fire and inju...
Страница 12: ...not approved to be installed in or on any recreational vehicles and or boats HANOVER Grills are for single family residential use only When determining a suitable location take into account concerns s...
Страница 13: ...irm level surface This appliance is not designedfor recreational vehicles and should not be installed on a boat or marine craft Protection from Weather Keep the appliance protected from adverse weathe...
Страница 14: ...appliance is turned on To prevent injuries do not use accessories that are not recommended by the manufacturer Before cleaning the appliance disconnect the rotisserie and trip the circuit breaker Nev...
Страница 15: ...eated surfaces sharp edges and dripping grease Be certain your appliance is properly installed and grounded by a qualified technician in accordance with applicable codes To guarantee the electrical sa...
Страница 16: ...he gas supplied to the appliance conforms to the model you purchased A Natural Gas appliance requires natural gas to operate an LP appliance requires liquid propane gas to operate Never connect the ap...
Страница 17: ...in Canada must be in accordance with the standard CAN CGA B149 2 Propane Installation Code A licensed contractor or local gas company representative must perform all natural gas connections Ensure th...
Страница 18: ...eak testing solution by spraying it on joints of the gas delivery system This includes all valves pipe connections joints lines and every point from the gas source to the burners Blowing bubbles in th...
Страница 19: ...sure all control valves are in the off position This can create a low flow of gas through the grill This would require the tank to be disconnected from the regulator and then reconnected to reset the...
Страница 20: ...etup We do however recommend the use of professional help during the installation of your unit as improper installation may affect your warranty Remove the unit from the box along with all accessories...
Страница 21: ...t be installed in an accessible place Liquid Propane LP Gas and Tank Requirement If your HANOVER Grill is for a Liquid Propane application an LP regulator set for 11 WC must be used and is for use wit...
Страница 22: ...tened to prevent leakage Always check for leaks before every use If one is not already available it is recommended that an ON OFF shutoff valve be installed at the gas supply source and that the gas s...
Страница 23: ...d tighten the regulator 5 Check for leaks using a soapy water solution by spraying on all connections including all of the valves fittings lines etc any and all gas connections have the ability leak a...
Страница 24: ...hould combustible materials such as a combustible wall be located behind the grill that the needed 5 for lid clearance doesn t satisfy the distance required from a combustible surface Protection from...
Страница 25: ...able from your dealer to cover the island venting The following information is important to consider when adhering to your local code requirements LP Propane Gas LP gas is heavier than air and will se...
Страница 26: ...itioned lower on the island cavity for LP gas ALL GAS CONNECTION POINTS SHOULD BE TESTED FOR LEAKS AFTER INSTALLATION PRIOR TO FIRST USE OF THE GAS APPLIANCE S Before installing an appliance in any is...
Страница 27: ...ponding slot in the grill chassis Failure to do so could result in a fire and injury If the outdoor kitchen countertop will overhang the face of the island notching out the two front countertop edges...
Страница 28: ...of non combustible materials If your outdoor kitchen is constructed of combustible materials an insulated jacket is REQUIRED ALL BBQ ISLANDS MUST BE MANUFACTURED FROM NON COMBUSTIBLE MATERIAL Maintain...
Страница 29: ...HANOVER Instructional Book Page 29 Version 1 0 Installation Diagram 5 Gallon LP tank shown Installation Method for Low Pressure Gas Source Natural Gas Regulator shown...
Страница 30: ...tained All packaging has been removed All parts and components are properly in place An installer supplied manual gas shut off valve is fully accessible LP hose is clean and inspected for cuts wear ab...
Страница 31: ...and consult an authorized service technician 7 Upon successful lighting repeat the process on the other burners you wish to light 8 To shut off the burners rotate the knob and turn to OFF It is normal...
Страница 32: ...It may have a tint of yellow and adjustment to the air shutters can be made to obtain a blue flameand proper gas glow see flame adjustment This appliance should be preheated before cooking with the ma...
Страница 33: ...ve the burner from the appliance and loosen the phillips head screw holding the air shutter to the burner If the flame is yellow open the air shutter to make the flame bluer If the flame is lifting of...
Страница 34: ...with the hood closed This allows any food particles or grease drippings to burn away Brush components with a stainless steel bristle brush to remove any remaining charred materials Cast Stainless Stee...
Страница 35: ...er with the flamer tamer reinstalled above the burner Note It is critical that the end of the infrared burner is installed appropriately onto the gas valve to ensure gas flows safely into the burner F...
Страница 36: ...ded from a larger tank permanently installed on location the regulator included with the appliance will only need to be converted for use with LP fuel see NG LP Regulator Conversion below Please be aw...
Страница 37: ...HANOVER Instructional Book Page 37 Version 1 0...
Страница 38: ...ting and have to replace the valve 7 Once the old orifice is removed replace it with the new orifice repeat for all burners When re installing the orifice do not over tighten or you will strip the bra...
Страница 39: ...this or any implied warranty for incidental or consequential damages and HANOVER liability is limited to the purchase price of the appliance only This warranty gives you specific legal rights and you...
Страница 40: ...is Burner XLS 40 041 5 Burner Drip Tray XLS 40 022 Rotis Valve XLS 32 029 Electrode Wire Rear Burner XLS 32 042 Stainless Steel Flame Tamer XLS 32 064 Flashtube XLS 32 058 Stainless Steel Flex line XL...
Страница 41: ...HANOVER Instructional Book Page 41 Version 1 0 HANOVER 4 5 Burner Note Add one burner one flame tamer one heat separator and one grid for the HANOVER 5 Burner...
Страница 42: ...of the Firebox see picture on page 12 You will need this number to properly register your appliance and activate coverage Write this information in the space provided below for your records Appliance...
Страница 43: ...ready if you ever need warranty help Name First Last Email Phone Street Address Address Line 2 City State Province Region Zip Postal Code Country What is the model number of the HANOVER Product purch...