background image

Chapter 7: Applications

34

Using the Workshop4.6

0

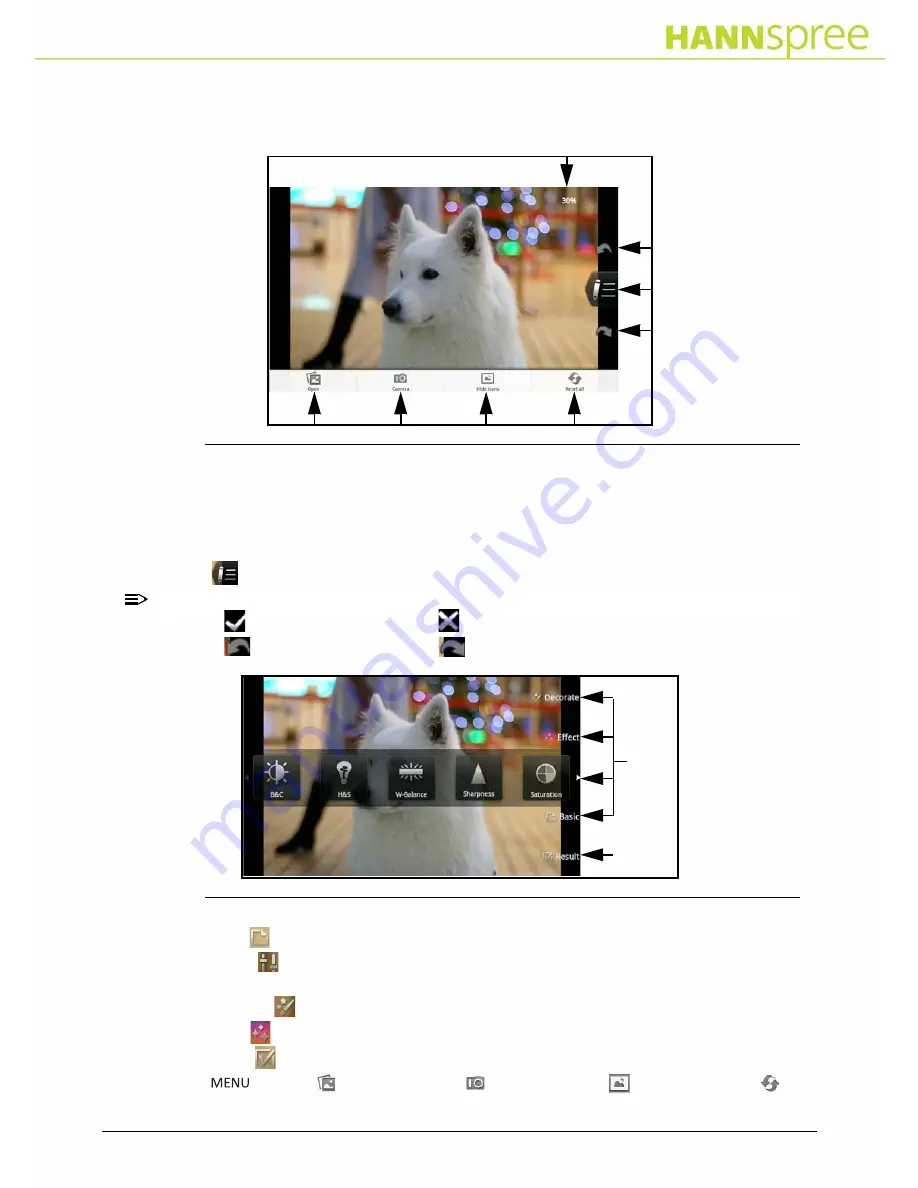
Perform the following for each image you want to edit:

Figure 38.

Workshop

1. Tap on an image file you wish to edit.
2. Information at the upper right corner of the screen shows the displayed size of the original 

image. Using fingers or tools, expand the image to zoom in or shrink the image to zoom 

out.

3. Tap 

 to enter image editing mode.

NOTE:

NOTE

:

Tap   to accept the changes and   to reject the changes.
Tap 

 to Undo the changes and 

 to Redo the changes.

Figure 39.

Image Editing

4. Tap Basic   to Auto fix, Rotate, Crop or Resize the image.
5. Tap Tuning   to adjust Brightness and Contrast (B&C), Highlights and Shadows (H&S), 

W-Balance, Sharpness, Saturation and Red eye.

6. Tap Decorate   to use Frame, Clip art, Bubble text, Draw and Stamp.
7. Tap Effect   to chose Styles, Arts, Mosaic, Raindrop and Fog draw.
8. Tap Result   to Save changes or Share images to other Bluetooth devices.
9. Tap 

 to Open   other image files,   to open Camera,   to Hide icons and   to 

Reset all (Figure 38).

Image editing 

menus

Содержание SN10T2

Страница 1: ......

Страница 2: ...mful interference and 2 this device must accept any interference received including interference that may cause undesired operations Recycling Information 0 We at Hannspree care very much about our en...

Страница 3: ...igation 12 Home Screen 12 Browser Screen 15 Book Screen 16 Chapter 3 Entering Text 18 Text Input Methods 18 Entering Text Using the QWERTY Keypad 18 Using Symbol Numeric Mode 18 Chapter 4 Multimedia 1...

Страница 4: ...ftware Connections 29 Browser 29 Wi Fi 30 Bluetooth 30 Virtual Private Network VPN 30 Chapter 7 Applications 31 Chapter 8 Health and Safety Information 35 Exposure to Radio Frequency RF Signals 35 Spe...

Страница 5: ...ws seen in this user guide may not represent the final product color or configuration 1 Slide the Power switch in the direction shown in Figure 1 The system takes approximately 25 seconds for the syst...

Страница 6: ...r switch 2 Slide and release the Power switch to come out of the Standby Mode Unlocking the Touch Screen 0 1 Slide and release the Power switch 2 Drag the icon up to the green indicator as shown in Fi...

Страница 7: ...Tablet use a MicroUSB AC adapter and perform the following 1 Connect cable A into the Tablet s MicroUSB slot B Figure 1 2 Plug adapter C into a standard power outlet 3 When charging is complete unplug...

Страница 8: ...fied Chinese Russia Japanese Polish Danish Swedish Slovak Hungarian Romanian Dutch Bulgarian Czech and Portuguese System memory 512MB LP DDR type 200MHz Storage eMMC 4 4 8GB 2GB for AndroidTM system 2...

Страница 9: ...os or recording videos 2 Volume key Adjust volume level 3 Back key Returns to previous screen when pressed 4 Menu key Displays options for current screen when pressed 5 Home key Displays Home screen w...

Страница 10: ...Description 1 MicroSD Slot Connection for MicroSD memory card use 2 Headphone Jack Connection for headphones 3 MicroUSB Slot Connection for power adapter or PC 4 Power switch Allows to switch Tablet P...

Страница 11: ...reen as well as perform a GoogleTM Search and edit Settings Back Key 0 Tap once to return to the previous screen Refer to Figure 9 Volume Key 0 Tap once to access the volume menu Refer to Figure 9 Fig...

Страница 12: ...ows you to turn on or off Wi Fi Bluetooth airplane mode automatic data synchronization for the applications and display brightness NOTE NOTE Green line under the icon indicates that the functionality...

Страница 13: ...to the Home screen shortcuts widgets folders and wallpaper 1 Touch and hold your finger on an empty area of the Home screen Wait until Add to Home screen menu appears Figure 15 Add to Home Screen Menu...

Страница 14: ...16 Notification and Status Bar Table 3 describes some of the common icons that appear across the top of the Home screen Table 3 Notification and Status Bar No Icon Description 1 USB Connection Tablet...

Страница 15: ...t connection must be established Figure 17 Browser Screen Access Bookmarked Webpages 0 Tap once on a bookmark to open a selected webpage Adding New Bookmarks 0 Tap to add a new bookmark Deleting Bookm...

Страница 16: ...to create bookmark Drag up to delete bookmark Refer to Figure 19 4 Tap once on Contents icon to review contents of book and bookmark s Tap again to close menu Refer to Figure 19 5 Tap once on Brightn...

Страница 17: ...to review all the shelves sort books by bookshelf name author time and delete books Figure 18 Changing Bookshelf 0 On My bookshelf view hold and drag the selected book to the desired shelf Figure 18 C...

Страница 18: ...E NOTE The characters you have entered appear on top of the keyboard in a strip with suggestions for the word as shown with an arrow in Figure 18 3 Touch to enter characters in upper case Touch again...

Страница 19: ...me 3 Tap on to go to the next song and on to go to the previous NOTE NOTE This function is not active when selecting and playing songs from All songs view Figure 23 4 Slide play progress bar to go for...

Страница 20: ...ibrary list Modifying song files 0 Figure 24 Modifying song files 1 From the Music screen select the All songs library 2 Touch and hold the desired file for approximatly one second 3 A new menu appear...

Страница 21: ...ie 5 Tap on to adjust the volume NOTE NOTE To access control bar while watching a movie tap on the screen once Modifying video files 0 Figure 26 Modifying video files 1 On Video screen touch and hold...

Страница 22: ...s or tools spread the image to zoom in Shrink the image to zoom out Modifying image files 0 1 On the Photo screen tap to open an album 2 Touch and hold the desired image file for approximately one sec...

Страница 23: ...on to start the slide show Tap on to end the slide show Camera 0 Camera allows you to capture photos and shoot videos Using the Camera 0 Figure 29 Camera 1 Tap on Settings screen Camera to open Camer...

Страница 24: ...nd Settings 0 Tap on Sound to view and configure the following functions 1 Tap on Volume to adjust manually Media and Alarm volume Drag the slider to the left to decrease and to the right to increase...

Страница 25: ...o allow installation of non Market applications 2 Tap on Manage applications to manage and remove installed applications You can view the applications that are Downloaded Running All or On SD card 3 T...

Страница 26: ...estions and Auto complete 4 Tap on User dictionary to view the user dictionary Date and Time 0 Tap on Date time to view and configure the following functions 1 Tap on Set date to make adjustments to t...

Страница 27: ...le MicroUSB cable is included to the package Memory Card 0 This section provides step by step instructions on how to install and remove a memory card Figure 30 Memory Card Access Installing a Memory C...

Страница 28: ...SD card and internal storage Unmount SD card 1 Open slot cover C to expose memory slot A Figure 30 2 Press memory card B to release it from slot 3 Pull memory card from slot 4 Lift cover C and press...

Страница 29: ...2 Onscreen keyboard opens Type in the web address you wish you visit and tap Refer to Figure 33 Figure 33 Onscreen Keyboard 3 Tap to go to the previous web page and tap to go to the next web page Ref...

Страница 30: ...a short distance wireless communications technology that allows devices to exchange information Configuring the Bluetooth 0 1 Navigate to Settings screen refer to Chapter 5 Changing settings 2 Tap on...

Страница 31: ...to Using the Clock Email tap to write or read your email refer to Using the Email ES File Explorer tap to manage information refer to Using the ES File Explorer G Sensor_Calibration tap to calibrate...

Страница 32: ...tions and tap Next to finish setup 6 Tap Email on Tablet panel to Refresh view Compose a new message view Folders Inbox Drafts Outbox and Sent access Accounts to add new and view existing email accoun...

Страница 33: ...OTE NOTE Tap Help to view ES File Explorer User Manual Figure 37 ES File Explorer Help 7 Tap to make changes to the arrangement of the icons 8 Tap on Tablet panel to access Operations menu New menu to...

Страница 34: ...ccept the changes and to reject the changes Tap to Undo the changes and to Redo the changes Figure 39 Image Editing 4 Tap Basic to Auto fix Rotate Crop or Resize the image 5 Tap Tuning to adjust Brigh...

Страница 35: ...and your Tablet Specific Absorption Rate SAR Information 0 Specific absorption rate is a measure of rate of radio frequency energy absorption by the human body Your device has been tested for typical...

Страница 36: ...ng the Sound On or Off 2 Make sure the formats of your audio files are supported on HANNSpad Refer to Features of the Tablet Q Why can t I play a video A 0 1 Make sure the formats of your audio files...

Отзывы: