background image

User’s Manual 


10 

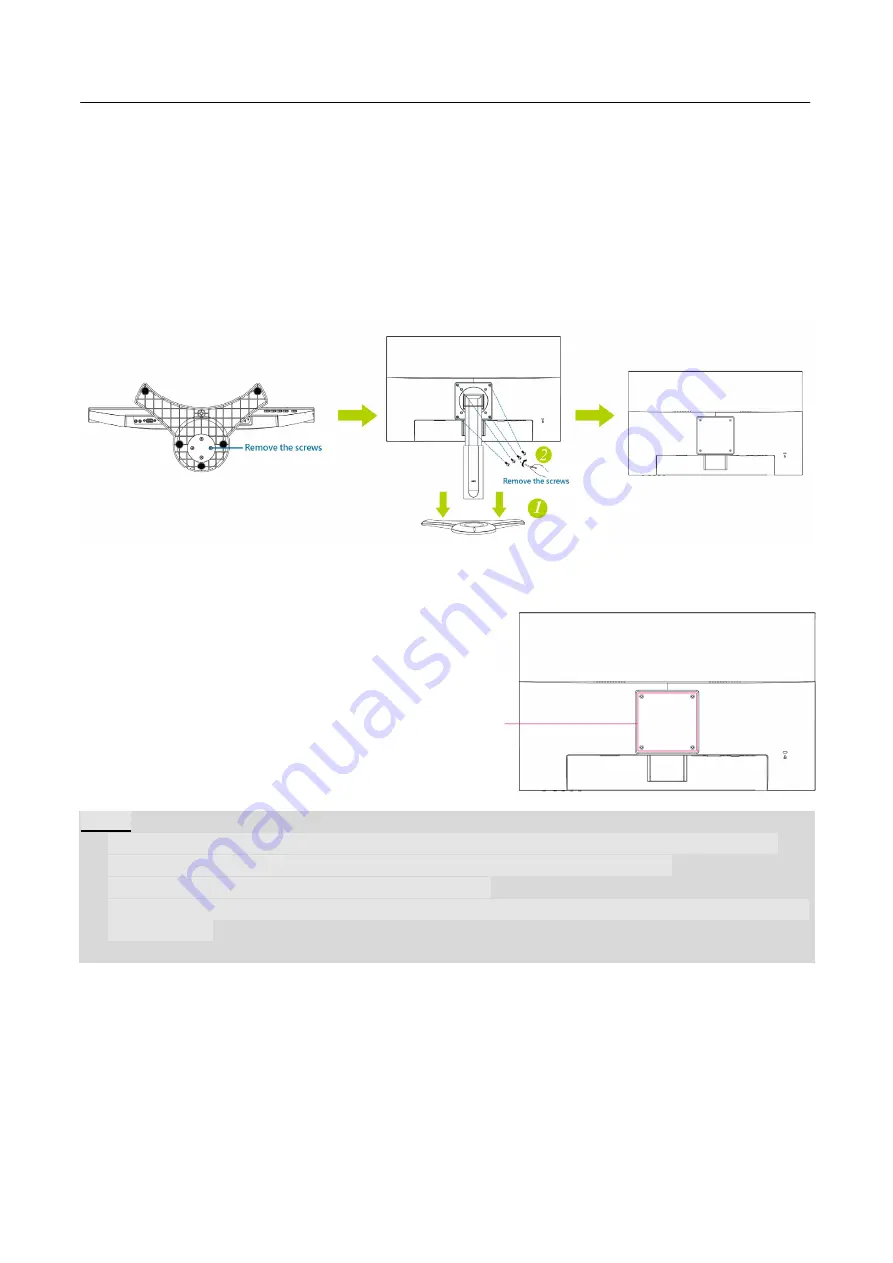
SETTING THE MONITOR ON THE WALL


DISSEMBLING THE STAND BASE: 
 

1.


Disconnect all the cables and cords from the Monitor to prevent breakage. 

2.


Carefully place the Monitor face down on a soft and flat surface (blanket, foam, cloth, etc) to 
prevent any damage to the Monitor. 

3.


Remove the screws so that the stand base can be removed. 

4.


Gently remove the stand base.   


(For reference only) 


WALL MOUNTING THE MONITOR:


1.


Purchase a VESA compatible wall bracket:   
VESA 100×100, 4 holes, M4, 8mm, 8kg.   

2.


Locate your ideal Monitor position on the wall.   

3.


Fix the wall bracket firmly on the wall. 

4.


Secure the Monitor to the bracket using the 4 mount   
holes on the back and center of the Monitor. 


Note:   


Please read the instructions of your specific wall bracket to properly wall mount the Monitor. 


The pitch of the mounting holes is 100mm horizontally and 100mm vertically. 


The screws type required is metric: M4, 8mm length. 


The Monitor stand base can be screwed on a table or a hard surface using the hole on the back of 
the stand base. 


For use only with UL listed wall mount bracket. 


*Installing the LCD Monitor requires special skill that should only be performed by qualified service 
personnel. Customers should not attempt to do the work themselves. HANNspree bears no 
responsibility for improper mounting or mounting that results in accident or injury. You can ask a 
qualified service personnel about using an optional bracket to mount the Monitor to the wall.


Содержание 8HAHP248UJB

Страница 1: ...HP248PJB HSG1370 HP248UJB HSG1370 LCD Monitor...

Страница 2: ...14 30 EU Low Voltage Directive 2014 35 EU and RoHS Directive 2011 65 EU Socket outlet shall be near the equipment and shall be accessible Trademark Notice HANNspree products incorporate High Definitio...

Страница 3: ...more sustainable future Criteria in TCO Certified have a life cycle perspective and balance environmental and social responsibility Conformity is verified by independent and approved verifiers that sp...

Страница 4: ...lthier earth via appropriate treatment and recycling of industrial technology devices at the end of life These devices contain recyclable materials which can be Recycled and re integrated into brand n...

Страница 5: ...ACKAGE 8 INSTALLATION INSTRUCTIONS 9 POWER 9 SETTING THE MONITOR ON THE WALL 10 MAKING CONNECTIONS 11 ADJUSTING THE VIEWING ANGLE 12 OPERATING INSTRUCTIONS 13 GENERAL INSTRUCTIONS 13 FRONT PANEL CONTR...

Страница 6: ...ng kit approved by the manufacturer and follow the kit instructions Slots and openings in the back and bottom of the cabinet are provided for ventilation To ensure reliable operation of the monitor an...

Страница 7: ...ou use The LCD screen has effective pixels of 99 99 or more It may include blemishes of 0 01 or less such as a missing pixel or a pixel lit all of the time Due to the nature of the LCD screen an after...

Страница 8: ...r LCD Monitor Crisp Clear Display Ergonomic Design Space Saving Compact Case Design CHECKING THE CONTENTS OF THE PACKAGE The product package should include the following items LCD Monitor Cables and U...

Страница 9: ...monitor to the base POWER POWER SOURCE 1 Make sure that the power cord is the correct type required in your area 2 This LCD monitor has an Internal universal power supply that allows operation in eit...

Страница 10: ...ng the 4 mount holes on the back and center of the Monitor Note Please read the instructions of your specific wall bracket to properly wall mount the Monitor The pitch of the mounting holes is 100mm h...

Страница 11: ...Connect one end of the DP cable optional to the back of the monitor and connect the other end to the computer s DP port 3 Connect the audio cable between the monitor s audio input and the PC s audio o...

Страница 12: ...topple the monitor when you change the monitor s angle You may adjust the monitor for a viewing angle of 5 to 20 vertically and 360 horizontally and 0 to 90 rotation Figure 3 Monitor Angle NOTES Do n...

Страница 13: ...nging these settings the picture can be adjusted to your personal preferences The power cord should be connected Connect your display cable from the monitor to your devices display input port Press th...

Страница 14: ...tion works only for VGA input The auto adjustment function is used to optimize the horizontal position vertical position clock and phase NOTES Do not install the monitor in a location near heat source...

Страница 15: ...MP IMAGE SETTING H POSITION Select the H position option to shift the screen image to the left or right Enter the option and adjust the level For VGA only V POSITION Select the V position option to sh...

Страница 16: ...ted audio By high volume risk of hearing damage exists AUDIO INPUT While transferring via the HDMI port it is recommended to set AUDIO INPUT to HDMI if no sound is outputted it is recommended to selec...

Страница 17: ...entity and depending on the level of DDC used communicate additional information about its display capabilities The DDC2B is a bidirectional data channel based on the I C protocol The host can request...

Страница 18: ...ure computer is operational by hitting the CAPS LOCK key on the keyboard while observing the CAPS LOCK LED The LED should either turn ON or OFF after hitting the CAPS LOCK key Missing one of the prima...

Страница 19: ...recommended display resolution that is supported by the monitor 3 If the recommended display resolution is not working try the second recommended display resolution 1 2 35 56cm 14 16 9 1366 768 60Hz...

Страница 20: ...809 4 640 480 75Hz 37 500 75 000 5 720 400 70Hz 31 469 70 087 6 800 600 56Hz 35 156 56 250 7 800 600 60Hz 37 879 60 317 8 800 600 72Hz 48 077 72 188 9 800 600 75Hz 46 875 75 000 10 832 624 75Hz 49 72...

Страница 21: ...20 480i 60Hz 3 720 480p 60Hz 4 720 576i 50Hz 5 720 576p 50Hz 6 1280 720p 60Hz 7 1920 1080i 50Hz 8 1920 1080i 60Hz 9 1920 1080p 50Hz 10 1920 1080p 60Hz We ensure that the monitor can be lighted under i...

Страница 22: ...ms Per channel Input Terminal VGA HDMI DP USB Maximum Screen Size Hor 527 04mm Ver 296 46mm Power Source 100 240V 1 0A 50 60Hz Environmental Considerations Operating Temp 5 to 35 C Storage Temp 20 to...

Отзывы: