H&S CHS Скачать руководство пользователя страница 4

Maintenance

Disassemble

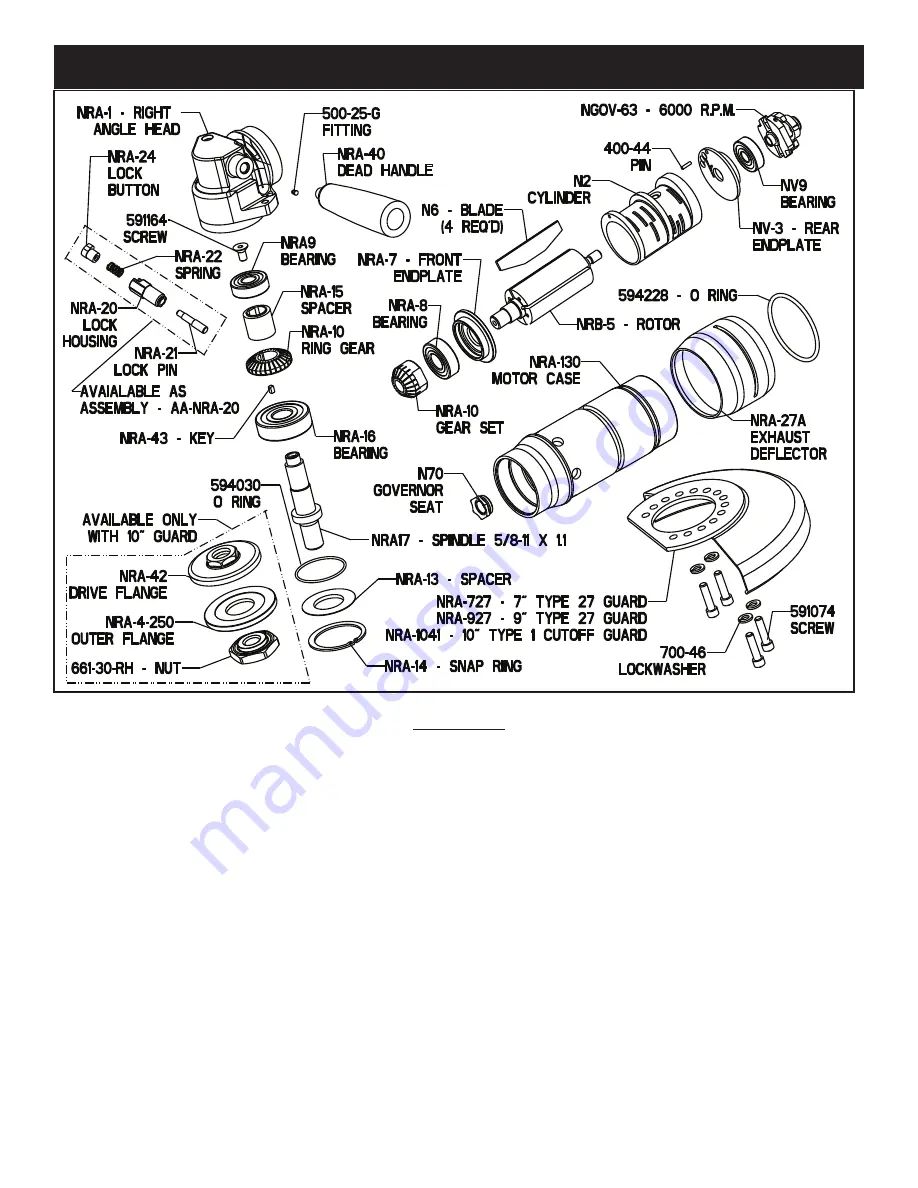
1. Disconnect tool from air supply and remove all wheels or accessories. Remove spindle lock assembly (AA-NRA-20).

2. Secure the tool in vise vertically with the angle head (NRA-1) toward downward direction. Clamp lightly onto dead

handle boss on the side of angle head. Using a wrench on 

ats at base of live handle, unscrew motor housing from angle 

head.  Remove motor from case or angle head (depending on how it came apart). 

The Motor Assembly

3. Place brass jaws on vice. Secure pinion gear (NRA-10) in vise and remove governor (NGOV-XX). (Left-hand thread).

(Governor wrench (1100-832) is available to properly remove the governor with less risk of damage.) Remove assembly 

from vise.

4. Clamp motor assembly into vise with output pointed down. Clamp lightly onto the cylinder (N2) and rear endplate (NV-

3). Place a small punch into the center of the motor spindle (NRB-5) where the governor was removed. Tap lightly on end 

of punch with a small hammer. This will drive the spindle through the rear bearing (NV-9) (Be sure not to damage threads 

on the rear of the spindle.) (Take care not to drop the spindle assembly when it becomes free.) Remove from vise.

5. Remove rear bearing from rear endplate (NV-3) with a small punch or screwdriver. Remove rotor blades (N6) from

rotor/spindle

6. Place brass jaws on vise. Clamp front spindle assembly in vise vertically with output in upward direction. Clamp onto

the large outside diameter of the rotor/spindle. Remove pinion gear (NRA-10) with a wrench. Remove assembly from vise.

7. Press output end of spindle through front bearing (NRA-8) with an arbor press. Remove front bearing support (NRA-8).

The Angle Head

8. Remove snap ring (NRA-14) using snap ring pliers. Remove spacer (NRA-13) and o-ring (594030).  Lift output spindle

assembly from angle head.

9. Place brass jaws on vise. Cla

mp firmly onto threads of output assembl

y. Unscrew and remove screw (591164) from end

of spindle. Remove from vise.

Содержание CHS

Страница 1: ...S Side Safety Lever 6000 R P M 2 0 H P 1500 W Aluminum 8 0 Lb 3 6 Kg 15 inch 381 mm 3 0 Inch 76 2 mm 40 cfm 18 9 L s T2 5 8 11 x 1 1 inch 28mm Capacity 7 Inch 180 mm or 9 Inch 230 mm Type 27 Wheels 10...

Страница 2: ...wheel guard for any signs of wear and that it is properly mounted to the tool Any guard showing signs of wear such as bends chips nicks or cracks should be replaced Always wear eye and hearing protec...

Страница 3: ...zard to the eyes or will ignite the environment 7 Grinders shall not be used in potentially explosive atmospheres 8 Pneumatically driven tools are not generally insulated from coming in contact with e...

Страница 4: ...r spindle NRB 5 where the governor was removed Tap lightly on end of punch with a small hammer This will drive the spindle through the rear bearing NV 9 Be sure not to damage threads on the rear of th...

Страница 5: ...r gouges nicks or dents Thread on and tighten the governor with a wrench Left hand threads Remove assembly from vise 10 Oil governor and inside of motor The Angle Head 11 Support the bearing NRA 16 on...

Страница 6: ...652 47 THROTTLE VALVE ASSY 652 48 INLET BUSHING PART DESCRIPTION 652 49 PIN 652 50 THROTTLE LEVER PIN 652 51 SPRING 652 52 SPRING 652 53 SAFETY BUTTON SPRING 652 54 SNAP RING 652 70 LIVE HANDLE WRAP H...

Страница 7: ...15 SPACER NRA 16 FRONT OUTPUT BEARING ASSEMBLIES AA 652 1K LIVE HANDLE ASSY NRA 17 SPINDLE 5 8 11 X 1 1 LONG NRA 20 SPINDLE LOCK HOUSING AA NRA 20 SPINDLE LOCK ASSY NRA 21C SPINDLE LOCK PIN AA NRA 130...

Страница 8: ...ration 6 Maintain a stress free posture for the entire body Prolonged exposure to vibrations created by vibrating sources may cause health hazards There are gloves handle wraps and other forms of prot...

Страница 9: ...ant that the tool receive internal lubrication on a regular basis Having the connection closer to the tool will promote regular lubrication as the connection is easily accessible Hose whips are often...

Страница 10: ...situation and can result in injury The following list details speci c items one should inspect and be aware of when mounting abrasives The maximum operating speed marked on the wheel must be equal to...

Страница 11: ...ol A loss in performance can result Regulators A regulator adjusts the operating pressure supplied to the tool This device generally is used with a pressure gauge that will indicate the current pressu...

Страница 12: ...ded if maintenance is performed when the rst signs are evident The following list details conditions that may indicate the necessity for service 1 With the tool disconnected from the air supply grasp...

Отзывы: