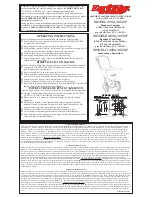
manualshive.com logo in svg
background image

-19-

High Speed


Low Speed

Clean Out

OPERATION

LOADING

In freezing weather, make certain that hydraulic tail gate (if equipped with one) is not frozen to the sides 

or on the floor of the spreader. Make sure the apron chain is not frozen to the spreader floor or any lumps 

of  manure are frozen to the floor. Begin loading the spreader at the front end and work toward the rear 

until loading is completed. Loading this way permits the material to be spread uniformly. Loading front to 

rear is particularly important when the spreader is loaded by a mechanical loader because this type of 

load requires more power to spread than others loads. When hauling extremely heavy materials with a 

large portion of dirt, it may be necessary to reduce the load size to prevent excessive shear bolt breakage. 

Never dump material onto the beater. Do not use extra sideboards. Do not overload spreader. Overloading 

decreases spreading effectiveness. Do not load more than 15 inches above the beater.

SPREADING - 2 SPEED

NOTE: 

Two speed drive mechanism and beater engage/disengage are controlled be one rope leading to

the tractor.

   1.  When ready to unload, make sure beater is in the engaged position and low speed indicator is


visible through low speed hole in panel of spreader. 

   2.  Raise the hydraulic endgate.
   3.  Engage the tractor PTO shaft slowly.
   4.  Increased apron speed, if desired, can be accomplished by steadily pulling on the rope until it 


stops. Speed select indicator should now be visible through the high speed hole. Beater will 


continue to operate and apron speed will be increased.

   5.  When the Manure Spreader is almost empty, the bed can be cleaned by shifting into clean out    


position. Apply a steady pull on the rope until it stops and speed indicator is visible in the clean 


out hole. In this position, the beater will stop and the apron will continue to operate at the same 


speed as in high speed position, thus saving unnecessary driving.

   6. 

When spreader is empty, shut off tractor PTO. Pull control rope until speed select indicator snaps


into low speed. This will re-engage beater for the next load. 

DO NOT SHIFT FROM CLEAN OUT   


TO LOW SPEED WITH THE TRACTOR PTO RUNNING.

   7. 

Do not operate the Manure Spreader with a PTO speed greater than 540 RPMs unless necessary 


sprocket changes have been made.

EMERGENCY SHUTDOWN

If a foreign object becomes lodged in the beater area and shears the shear bolt, disengage the PTO. Stop 

the tractor engine, remove the ignition key, and allow all mechanisms to stop before cleaning or working 

on the spreader.

WARNING: Some photographs used in the following pages show guards or shields

removed for clarification. NEVER operate machine until these guards or shields are in

proper operating position.

Содержание 3243

Страница 1: ...IS MANUAL BEFORE OPERATING THIS EQUIPMENT UNSAFE OPERATION OPERATING THIS EQUIPMENT UNSAFE OPERATION OR MAINTENANCE OF THIS EQUIPMENT CAN RESULT OR MAINTENANCE OF THIS EQUIPMENT CAN RESULT IN SERIOUS...

Страница 2: ...Symbol 9 Explanation of Safety Signs 10 Safety Decals 11 12 Safety Information Warning Owner Must Read and Understand 13 Cap Screw Torque Values 14 Set Up Assembly 15 Transporting 15 Preparing for Ope...

Страница 3: ...ded solely to the original purchaser of the product is terminated upon any subsequent transfer or sale from or by the original purchaser and extends no third party benefits or rights whatsoever The wa...

Страница 4: ...ents to its products at any time without incurring any obligation to make such changes to products previously manufactured Specifications statements and descriptions of Products contained in this publ...

Страница 5: ..._________________________________ Serial Number __________________________________________________ You have received the Operator s Manual for this product Yes _____ No _____ Interested in receiving t...

Страница 6: ...6 Intentionally Left Blank...

Страница 7: ...els See Lubrication Chapter of this manual for details Hoses and fittings if applicable are properly attached and there are no visible leaks All drive chains are adjusted to proper tension See Adjustm...

Страница 8: ...8 Intentionally Left Blank...

Страница 9: ...e delivery inspection was made Explain to the customer all the safety precautions they must exercise when operating this unit Explain recommended loads for different types of materials Explain to cust...

Страница 10: ...10 Intentionally Left Blank...

Страница 11: ...EVER YOUR PERSONAL SAFETY IS INVOLVED TAKE TIME TO BE CAREFUL REMEMBER THE CAREFUL OPERATOR IS THE BEST OPERATOR MOST ACCIDENTS ARE CAUSED BY HUMAN ERROR CERTAIN PRECAUTIONS MUST BE OBSERVED TO PREVEN...

Страница 12: ...NFORMATION OBSERVE MAXIMUM TRANSPORT SPEED The maximum transport speed for this implement is 32 km h 20 mph Some tractors are capable of operating at speeds that exceed the maximum transport speed of...

Страница 13: ...13 SAFETY INFORMATION...

Страница 14: ...14 SAFETY INFORMATION...

Страница 15: ...SONNEL OTHER THAN THE QUALIFIED OPERATOR NEAR THE MACHINE Before starting tractor be sure PTO shields turn freely and PTO is securely locked to tractor DO NOT clean adjust or lubricate the machine whe...

Страница 16: ...Dry Ft Lbs Lube Ft Lbs Inch Lbs Inch Lbs Inch Lbs Inch Lbs 1 4 20 1 4 28 5 5 6 3 4 2 4 7 8 10 6 3 7 2 12 14 9 10 75 2 94 0 78 8 99 0 61 5 77 0 68 6 87 0 5 16 20 5 16 28 11 12 8 9 17 19 13 14 24 27 18...

Страница 17: ...Y Note Determine right and left side of spreader by viewing it from the rear If instructions or parts lists call for hardened bolts refer to Cap Screw Torque Values page to identify PREPARING MANURE S...

Страница 18: ...cure the drawbar so that the hitch pin hole is directly below the power drive line TRACTOR CONNECTIONS If this implement is attached to a tractor with a clevis hitch hammer strap style drawbar the ham...

Страница 19: ...aise the hydraulic endgate 3 Engage the tractor PTO shaft slowly 4 Increased apron speed if desired can be accomplished by steadily pulling on the rope until it stops Speed select indicator should now...

Страница 20: ...spindle to the point where there is no end play and a slight drag on the bearings Replace the cotter key with a new one of the correct size SPREADING WITH OPTIONAL HYDRAULIC DRIVE 1 Engage tractor PTO...

Страница 21: ...nch clearance between clutch jaws E TWO SPEED CLUTCH If clutch control yoke becomes worn it may be necessary to adjust the high speed clutch so it engages and disengages completely Adjustment to compe...

Страница 22: ...on each side so that the apron slats run parallel with the ends of the bed The apron will be damaged if the machine is operated with one end of the apron slats running ahead of the opposite end Do no...

Страница 23: ...rmal apron speeds at 540 RPM are low speed 4 1 2 fpm high speed and clean out position 8 1 2 fpm If the apron is not moving at these speeds especially in high or clean out check and replace the high s...

Страница 24: ...be used with hydraulic endgate 2nd HYDRAULIC ENDGATE CYLINDER 3231 The H S 3231 manure spreader is equipped with brackets to accept an optional second cylinder to raise and lower the hydraulic endgat...

Страница 25: ...wer receptacle per SAEJ560B on your tractor If your tractor is not equipped with the proper receptacle see your tractor dealer for details Make sure lights are functioning properly SAFETY CHAIN Follow...

Страница 26: ...alves cylinders hoses etc PTO ASSEMBLY Keep the male and female shafts of the PTO well lubricated and free sliding Failure to observe this precaution will result in excessive pressure being required t...

Страница 27: ...ighten the castellated nut on the spindle to the point where there is no end play and a slight drag on the bearings Replace the cotter key with a new one of the correct size bend cotter pin over and r...

Страница 28: ...of Beater 111593C 2 Warning Stay Clear of Endgate 12794 2 Warning Do Not Remove Shields 11211176 2 Shear Bolts 311 1 Patent Number 3187 1 Speed Indicator Only on if equipped with hydraulic drive 3494A...

Страница 29: ...6 86259 3231 86263 3237 1494K 12794 DCAMB 71494A UNDER SHIELD 093020 093020 093020 093020 12794 093020 3494A DCRED 093020 111593C 111593A 1494K 111593A 1494J 3494A 66076 72102 S3231 72105 S3237 S3243...

Страница 30: ...4A 71188H TWO SPEED DECAL 3187 HYDRAULIC DRIVE DECAL IF EQUIPPED 86261 3231 86264 3237 311 71188B 84045 1494J 11599 54033 9194B 72203A DCAMB 72097 3231 3237 3243 1494B 66076 82602 9194A 093020 93466 1...

Страница 31: ...31 DECAL LOCATION 1494J 1494H 1494A UNDER SHIELD 093020 093020 111593A 66076 093020 111593A DCRED 093020 72538 11211176 DCRED 1494A 093020 093020 093020 11211176 093020 DCRED DCAMB...

Страница 32: ...PTO Not Turning Engage Tractor PTO Main Drive Shear Bolt Sheared Replace Main Drive Shear Bolt Front Drive Chain Off Broken Replace or Repair Front Drive Chain or Missing Apron Only Drives In Low High...

Страница 33: ...33 SERVICE NOTES...

Страница 34: ...34 SERVICE NOTES...

Страница 35: ......

Страница 36: ...Manufactured by H S MANUFACTURING CO INC 2608 S HUME AVE MARSHFIELD WI 54449 715 387 3414 hsmfgco com H S MFG CO products approved for the FEMA SEAL OF QUALITY...

Отзывы: