background image

6 - 13

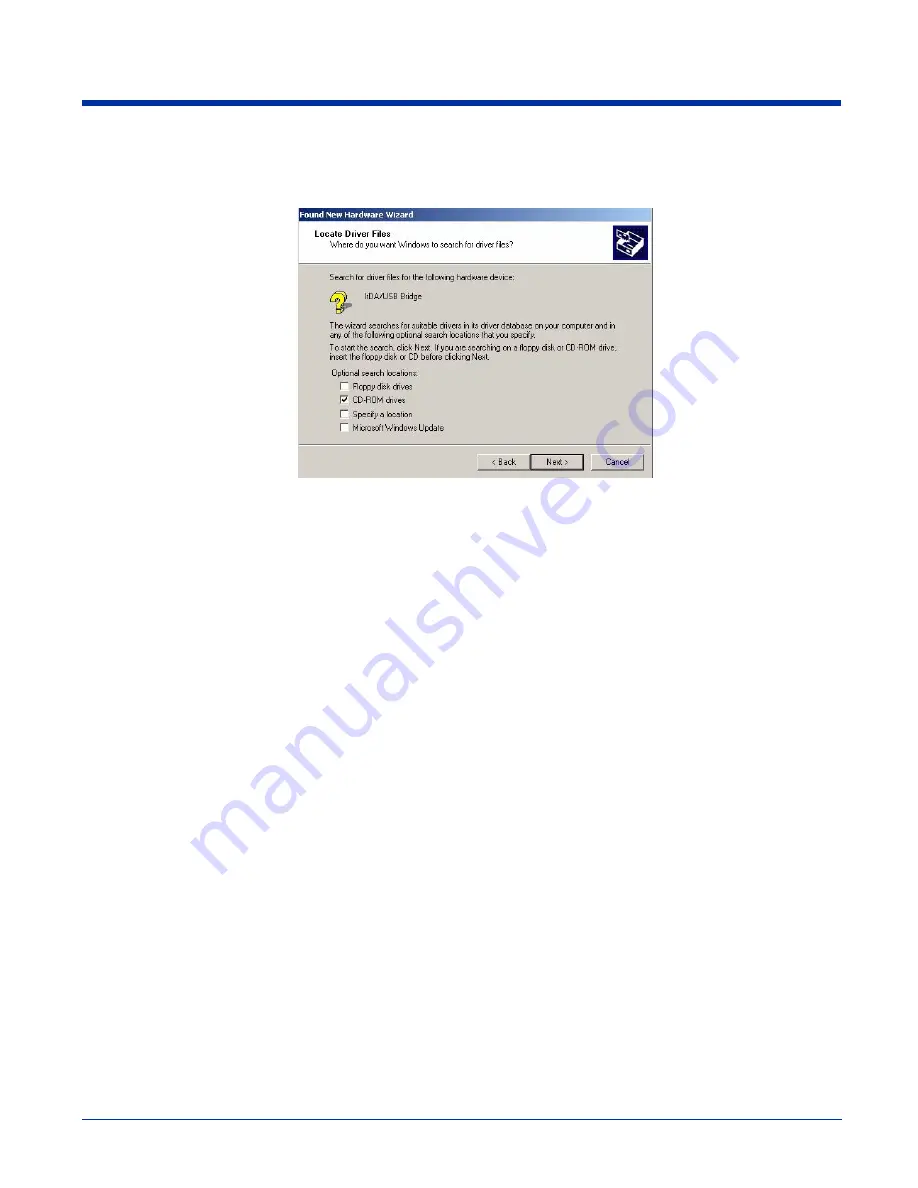
In the "Locate Drive Files" dialog, check the CD-ROM drives check box and insert the driver CD provided into the CD tray on 
your PC. There are sub-directories in this directory for each type of Windows OS supported.  Select stirusb.sys file in the correct 
sub-directory for your PC:

w2k  - Windows® 2000

win98 - Windows® 98

winme - Windows® Me

At this point, the hardware is installed and operating.  You may need to reset your PC to complete the installation process.  You 
can verify that the USB driver is functioning by watching the COMM LED on the USB home base.  It should be flashing red 
approximately every three seconds.

Once the USB HomeBase is installed, you can use ActiveSync to connect to a Dolphin 7400. These instructions assume that 
ActiveSync v3.1 is installed on your PC.

In the ActiveSync connection settings, add check mark to "Allow serial cable or infrared connection to this COM port" and select 
"Infrared Port (IR)" for the COM port as shown below.  Do not check "Allow USB connection with this desktop computer".  It has 
no effect for the USB HomeBase.

Содержание 7400/7450

Страница 1: ... Dolphin 7400 7450 Hand Held Computer User s Guide ...

Страница 2: ...ks of Sun Microsystems Inc in the U S and other countries Other product names mentioned in this manual may be trademarks or registered trademarks of their respective companies and are hereby acknowledged Disclaimer Hand Held Products Inc d b a HHP HHP reserves the right to make changes in specifications and other information con tained in this document without prior notice and the reader should in...

Страница 3: ...ectoidPC_main screen tif 150 dpi 7 graphics Detectoid DetectoidPC_main screen_listening tif 150 dpi 8 graphics Detectoid DetectoidPC_Success tif 150 dpi 10 graphics java_logo_cuponly jpg 300 dpi 1 graphics laserlabel tif 300 dpi 3 graphics laserlabel tif 72 dpi 2 graphics Mobile IntelliBase mobile_intellibase_front_cropped jpg 300 dpi 1 graphics Mobile IntelliBase mobile_intellibase_rear jpg 150 d...

Страница 4: ...SELL SHEETS NEW SELL SHEET GRAPHICS eps 7400RF eps 1 Documents and Settings mbfreitag My Documents PageMaker Files NEW SELL SHEETS NEW SELL SHEET GRAPHICS eps 7450 eps 1 Documents and Settings mbfreitag My Documents PageMaker Files Pictures Pictures intellibase rs232_power JPG 150 dpi 5 Documents and Settings mbfreitag My Documents PageMaker Files Pictures Pictures Win CE logo horizontal jpg 150 d...

Страница 5: ...Models and Options 2 1 Image Engine Options and Bar Code Symbologies Supported 2 2 Laser Engine Options and Symbologies Supported 2 2 Using Dolphin 7400 7450 for the First Time 2 2 Setting the Date Time 2 6 Setting Up Communications with Detectoid 2 7 Installing DetectoidPC 2 7 Using DetectoidPC and DetectoidCE 2 8 DetectoidCE 2 9 Configuring the Modem 2 10 Chapter 3 Dolphin 7400 7450 Overview Sys...

Страница 6: ...ing Battery Power 3 10 Setting Critical and Low Battery Points 3 10 Using the Power Control Panel 3 10 Servicing the Battery Pack 3 11 Charging the Battery Pack 3 12 Storing Batteries 3 12 Chapter 4 Using the Dolphin 7400 7450 Entering Data 4 1 Via the Touch screen Input 4 1 Via the Keyboard 4 1 Using the Image Reader 4 1 Communication 4 3 Communication Media 4 3 Software Communication Programs 4 ...

Страница 7: ...g The Charging Communication Cradle 6 9 Configuring the Dolphin Terminal for Communications 6 10 Setting Up For Communications With The USB HomeBase 6 12 Communicating with the Dolphin Terminal 6 14 Mounting the HomeBase IntelliBase USB HomeBase 6 15 Chapter 7 Dolphin QuadCharger Dolphin QuadCharger Parts and Function 7 1 Top Panel 7 1 Rear Panel 7 2 Charging Batteries In The QuadCharger 7 2 Setti...

Страница 8: ... Chapter 10 Warranty Support and Service Limited Warranty 10 1 How Problems Should Be Handled 10 1 Return Information 10 1 How To Extend Your Warranty 10 3 Application Support 10 3 Chapter 11 Chapter 11 Appendix A Using the Modifier Keys 11 2 43 Key Alpha Numeric Keyboard 11 2 Key Combinations 11 3 35 Key Numeric Alpha 11 4 Key Combinations 11 5 56 Key Full Alpha Numeric 11 5 Key Combinations 11 7...

Страница 9: ...nal compact flash card The Dolphin 7400 7450 terminals are some of the most durable devices available designed to withstand repeated five foot drops onto a concrete floor The terminal also resists extreme temperatures humidity levels and dust conditions The Dolphin s collection of features also includes long lasting Nickel Metal Hydride NiMH batteries a large easy to read 240 x 320 1 4 VGA backlit...

Страница 10: ...llowing safety guidelines are designed to protect both you and others around you Please read them carefully before using your Dolphin terminal Required Safety Labels Batch Terminals The following is the required safety label that appears on the back panel of Dolphin 7400 7450 batch terminals equipped with an imager The following is the required laser safety label that appears on the back panel of ...

Страница 11: ... adoption by the Federal Communications Commission FCC The following is the the required safety label that appears on the back panel of the Dolphin 7400 7450 RF terminals equipped with a Cisco 352 radio and an imager The following is the the required safety label that appears on the back panel of the Dolphin 7400 7450 RF terminals equipped with a Spectrum24 radio and an imager The following is the...

Страница 12: ...dealer or an experienced radio TV technician for help If necessary the user should consult the dealer or an experienced radio television technician for additional suggestions The user may find the following booklet helpful Something About Interference This is available at FCC local regional offices Our company is not responsible for any radio or television interference caused by unauthorized modif...

Страница 13: ...the Class II product requirements specified in the R TTE Directive 1999 5 EC The equipment is intended for use throughout the European Community but it s authorisation for use in France is restricted as follows PAN European Frequency Range 2 402 2 480 GHz Restricted Frequency Range for use in France 2 448 2 480 GHz Parameter Specification U S A Canada Europe Mexico Others FCC Part 15 Class B IEC 0...

Страница 14: ...th a strength of 3V m over a frequency range of 26 to 1000MHz The maximum allowable field strength emitted by the Dolphin is 0 3V m according to Subpart B of Part 1 of the FCC rules Therefore the Dolphin RF will have no effect on medical devices that meet the IEC specification Microwaves The radio in the Dolphin RF terminal operates on the same frequency band as a microwave oven Therefore if you u...

Страница 15: ...y or if the battery is unable to hold an adequate charge If you are not sure the battery or charger is working properly please send it to Hand Hand Products or an authorized HHP service center for inspection The Dolphin hand held computer meets or exceeds all applicable standards and has been manufactured to the highest level of quality Care and Cleaning of the Dolphin When needed clean the image ...

Страница 16: ...1 8 ...

Страница 17: ...mmunication cradle for communicating with devices such as printers and modems without integrated IrDA protocol software includes power adapter Dolphin USB HomeBase for communicating directly with a USB compatible host computer includes power adapter Dolphin IntelliBase for communicating with devices such as printers and modems without integrated IrDA protocol software and for charging and conditio...

Страница 18: ...ional 4 state codes PLANET CODE BPO 4 STATE Canadian 4 State DUTCH POSTAL AUSTRALIAN 4 STATE JAPANESE POSTAL Laser Engine Options and Symbologies Supported Dolphin 7400 7450 terminals may be equipped with an Advanced Long Range ALR laser engine The ALR engine reads 30mil bar codes from 2 75 to 8 ft 0 83 to 2 4 m and 100mil reflective bar codes out to 30 ft 9 1 m making it ideal for use in warehous...

Страница 19: ...he back up battery is required The back up battery maintains the RAM and clock when the NiMH main battery pack is discharged or removed from the terminal Removing the Battery Pack Follow these steps to remove the Dolphin battery pack 1 Hold the Dolphin with the front panel keyboard facing down 2 On the 7400 remove the handstrap by pushing its clip down and forward to unhook it from the terminal mo...

Страница 20: ... actually turned off To conserve power the Dolphin suspends operation or goes into sleep mode when it is inactive for a programmed period of time as defined by your application The screen is blank when the Dolphin is in sleep mode Press the ON SCAN key to wake the Dolphin terminal from sleep mode and you can start working where you left off The Dolphin terminal also goes into sleep mode if you rem...

Страница 21: ...ted to repeat this process for a total of five targets Press the ENTER key when complete in order to save the new calibration settings It may also be necessary to calibrate the screen for the users preference of double tap speed If the Dolphin 7400 7450 does not respond properly to a double tap on the screen open the Stylus folder in the Control Panel directory and choose the Double Tap tab Double...

Страница 22: ...0 7450 mouse utility to navigate through the screens if your terminal does not have a touchscreen For more information about the mouse utility see Navigating the Keyboard in Chapter 4 Note Exit the mouse utility before adjusting the contrast The Dolphin 7400 7450 Demo Program main menu appears after you set the date and time Date Time Properties Screen ...

Страница 23: ...located in the Utilities PC directory on the user s CD that is shipped with the Dolphin terminal Users may run the executable right from the CD ROM or they can copy it to their machine System requirements for installing DetectoidPC on your PC are Operating system Windows 98 2000 or XP Free disk space Less than one megabyte DetectoidPC is included with Dolphin 7400 and 7450 terminals using kernel 2...

Страница 24: ...in terminal Before starting ensure that your Dolphin is connected via serial cable or docked in a working HomeBase or IntelliBase If ActiveSync is detected to be running on the PC when DetectoidPC is started the following message will appear Click OK to continue using DetectoidPC to set up communication settings On starting DetectoidPC will check for the availability of COM ports as well as IrDA U...

Страница 25: ...will start automatically when the terminal is connected via a powered serial cable or docked in a powered HomeBase IntelliBase If you select Do not automatically start ActiveSync you must manually start ActiveSync on the Dolphin terminal to establish communications see Chapter 6 If you want to go back and change the settings later select Start Settings Control Panel Communication Properties and se...

Страница 26: ...h a modem follow these configuration instructions Use the Dolphin 7400 mouse utility to navigate through the configuration process if your terminal does not have a touch screen For more information about the mouse utility see Navigating the Keyboard in Chapter 4 1 From the Start menu select Programs Communication Remote Networking 2 Select Make New Connection Type in the name for the connection Se...

Страница 27: ...ped terminals To take an image 1 Select IMAGE DEMO 2 Press the ON SCAN button and the image you take will appear on the terminal s screen 3 Touch ESCAPE to go back to the main menu To scan a bar code label 1 Select SCAN DEMO 2 Press the ON SCAN button aim the terminal at a bar code and the red SCAN LED will illuminate The green SCAN LED will illuminate and the terminal will beep when a good scan i...

Страница 28: ...rade To perform a cold boot 1 Press and hold the Control CTRL and the Escape ESC keys for about 10 seconds 2 Release the keys and the terminal will reset The red LED will come on and the green LED will blink for approximately 3 seconds 3 The terminal will behave as described in the section about Turning the Dolphin On for the First Time Resetting the Dolphin Warm Boot There are times when you may ...

Страница 29: ...Main Board The memory configuration for the Dolphin 7400 7450 terminals is 32 MB RAM and 32 MB FLASH Compact Flash Card Dolphin 7400 7450 terminals have one Type I compact flash card socket for additional application and data storage capacity Additional modular compact flash upgrades of 64 MB 128 MB and 256 MB are available through an authorized HHP service center The compact flash card socket is ...

Страница 30: ...ront Panel Features This section describes features on the Dolphin 7400 7450 terminal front panel Decode LED Scan LED 1 4 VGA Display Optional Touchscreen Cursor Key ON SCAN Key Keypad with epoxy coated keys ...

Страница 31: ...to automatically turn off after a prescribed amount of time The contrast may be adjusted with the contrast keys The Dolphin 7400 7450 display may be equipped with a touchscreen that can be activated with a stylus or finger ON SCAN Key The ON SCAN key is centrally located for easy use with the right or the left hand On the 7450 terminal the ON SCAN key operates as an On or system wakeup control sca...

Страница 32: ...tant keys allow for easy imaging bar code scanning and application navigation All keyboard versions are suited for right handed and left handed use There are three keyboard options for the Dolphin 7400 7450 terminals 43 key alpha numeric 35 key numeric alpha and 56 key alpha numeric RF Antenna The Dolphin 7400 7450 RF terminal s antenna is a unity gain quarter wave monopole antenna 43 key alpha nu...

Страница 33: ...symbologies With the latest CMOS based technology the engine works like a digital camera and adds functionality and value to the Dolphin 7400 7450 by adding additional capabilities such as digital image capture signature capture and reading OCR characters Digital images taken with the 7400 7450 terminal have a maximum image size of 640 x 480 pixels and may have up to a 256 gray scale image definit...

Страница 34: ...r engine to protect it from dust and dirt Battery Well The Battery well is a recessed area on the back of the Dolphin that holds the 2700 mAh NiMH battery pack Battery Charging Contacts When the Dolphin is placed in the main well of the Dolphin HomeBase the Dolphin s battery pack is charged through these gold plated contacts Hand Strap The 7400 has an integrated elastic hand strap to provide the u...

Страница 35: ...ibed in the previous section with the following exceptions the pistol grip handle with imager scanner trigger and the rubber bumpers All versions of the 7450 terminal have similar bottom covers except for the safety labels specific to how the terminal is equipped Rubber Nose Bumpers Handle Scan Trigger ...

Страница 36: ...surface details for improved handle grip comfort and shock absorption Communication Micro DB9 RS 232 Port The industry standard RS 232 port allows the user to connect with peripherals such as printers serial modems and desktop computers for serial communication to the Dolphin 7400 7450 terminal The maximum speed is 115kbps with seven baud rate settings IrDA Port The IrDA Infrared Communications Po...

Страница 37: ... charging cycle it is recommended that the terminal be charged for approximately 8 hours to allow adequate charging time for the back up battery Not doing so may result in the terminal becoming unstable should the unit lose power and the backup battery is required If the backup battery becomes discharged of power after the initial charge cycle it will require a minimum of 5 hours of charging time ...

Страница 38: ...e is very low This warning will be posted every 3 minutes until the situation is corrected LowBatt dword 19 This sets the Low battery point to 25 percent 19 hex 25 decimal The low battery setting is the point at which the user is alerted that the battery is low The user is notified only once for a low battery These are the default values Developers can set these parameters from 0 no warning at all...

Страница 39: ...ycle a battery in the Dolphin 7400 7450 terminal The discharge charge cycle minimizes battery memory effects and ensures the battery data is correct A complete discharge charge cycle may take up to 15 hours for a fully charged battery The actual cycle time will vary depending on the battery state when the cycle was initiated Follow these instructions to use the Battery Conditioning Utility to deep...

Страница 40: ...when storing them Avoid storing batteries outside the specified range of 4 to 104 F 20 to 40 C or in extremely high humidity For prolonged storage do not keep batteries stored in a charger that is connected to a power source During long term storage battery deactivation may tend to occur which may cause charging to stop early during recharging after storage This issue can be handled by charging an...

Страница 41: ...een See Appendix A for a list of keyboard shortcuts for navigating the keyboard A mouse utility is also available to help with navigating around the Dolphin 7400 7450 terminal screen Exit the mouse utility prior to adjusting the contrast Using the Image Reader Dolphin 7400 7450 terminals equipped an image reader can read 1D and 2D bar codes OCR characters and can capture images such as signatures ...

Страница 42: ... be oriented in line with the bar code to achieve the quickest read A range of 4 10 inches 10 25 cm is recommended 2 Center the aiming beam over the bar code The red SCAN LED illuminates when the user presses the ON KEY key and the green DECODE LED illuminates when a bar code is successfully decoded and the terminal beeps Scan LED Decode LED Linear bar code 2D Matrix symbol ...

Страница 43: ...ly at the target 2 Pull the Scan Trigger to take the image Use the live video image on the terminal screen as a guide for positioning and aiming the terminal at the target You may find it helpful to start by moving the terminal further away and then in closer to the target The active screen image will have a slightly degraded appearance compared to the captured image This is normal 3 Release the S...

Страница 44: ...ction or WAN link RAS is fully supported and allows the use of PPP or SLIP connections for network connectivity Using the Keyboard Using the Special Keys The Dolphin 7400 and 7450 keyboards have special keys and key combinations that you use to type characters or perform functions See the chart in Appendix A for key combinations for keyboard functions and special characters that use these keys Dol...

Страница 45: ...use of these keys can vary depending on the application Cursor Keys To Use This Cursor Key Press Description Arrow up Moves cursor up one row or line Arrow down Moves cursor down one row or line Arrow right Moves cursor one character to the right Arrow left Moves cursor one character to the left ...

Страница 46: ...et mode and back Caps Lock may also be toggled by pressing the red modifier key followed by the Shift key or by double tapping the Shift key When Caps Lock is toggled on the Shift key makes characters lower case when it is toggled off the Shift key makes keys upper case Enter ENT The Enter key confirms data entry Escape ESC The Escape key performs a cancel action Tab The Tab key moves the cursor t...

Страница 47: ... and the mouse pointer will disappear Use the cursor keys to navigate around the screen For a left mouse click press either one of the ENT keys Use a left mouse click to select an item or launch a program For a right mouse click use the TAB key When you use a right mouse click a menu of items pops up and tells you what actions you can perform and shows you shortcuts To open files or applications w...

Страница 48: ...he modem remove the rubber plug from the phone jack and connect the analog phone line Note The rubber plug should be inserted in the phone jack when it is not in use to protect the integrity of the connector If you have not already configured the modem refer to Configuring the Modem in Chapter 2 To make a connection 1 From the Control Panel select Start Programs Communication Remote Networking 2 E...

Страница 49: ... rate of up to 11 megabits per second The security of wireless networks is greatly enhanced with the use of LEAP Dynamic WEP an industry leading centralized security solution developed by Cisco LEAP combines several innovations including dynamic per user per session WEP and integrated network logon to promote secure hassle free enterprise deployment The radio may also provide up to 128 bit Wired E...

Страница 50: ...he following utilities are available for configuring the Cisco 802 11b radio Client Utility ACU Configures the radio for use in a wireless network Client Encryption Manager CEM Configures a Wired Equivalent Privacy WEP key for the radio Cisco Link Status CLS Enables you to view the current status of the client adapter Client Statistics Utility CSU Enables you to view statistics that indicate how d...

Страница 51: ... displays To configure the radio card 1 Enter the SSID wireless LAN identifier for the network If you do not know the SSID contact your system administrator 2 Enter other radio specific information 3 Click OK to save any changes you have made and to exit utility For more information the radio settings go to Start Programs Cisco Cisco Setup or see the document entitled Using the Client Utilities fo...

Страница 52: ... Click Advanced to customize Mobile Unit MicroAP Encryption and WLAN Adapter options 3 Click OK to return to the previous menu 4 Click OK to exit the Spectrum24 Easy Setup Utility For more information on specific radio settings click on Help to access the on line help file or see the Spectrum24 User s Guide included on the HHP Dolphin Documentation CD Customizing the ActiveSync Remote Icon The fol...

Страница 53: ...inal emulation using industry standard TCP IP protocol Another option is a three tier client server solution or thin client implementation for 3270 5250 and VT100 220 terminal emulation that uses a Universal Gateway The Gateway establishes communication to a host such as an AS400 and maintains communication to both the Dolphin RF terminal and the host See Chapter 10 of the PowerNet Twin Client Ref...

Страница 54: ...5 6 ...

Страница 55: ...cations The infrared or Ir communications port on the HomeBase IntelliBase and IntelliBase connects with the IrDA port on the Dolphin terminal With no pins or contacts to break Ir will work reliably for years Reliable data communications at speeds of up to 115k baud can be transmitted by the HomeBase IntelliBase and IntelliBase data transmission rates with the USB HomeBase up to 4Mbps are possible...

Страница 56: ...1 Dock LED Turns solid green when the Dolphin Terminal is properly seated into the Dolphin HomeBase 2 COMM LED Indicates the status of data transfer between the Host Device and the Dolphin Terminal as described below Front View of HomeBase IntelliBase USB HomeBase Comm LED Description Red LED Data is being sent from the Host Device to the Dolphin HomeBase Green LED Data is being sent from the Dolp...

Страница 57: ...Dolphin Terminal is properly seated into the Dolphin HomeBase 2 AUX Battery Indicates charging calibration status of battery as described below Front View of IntelliBase AUX Battery LED Description Orange LED Solid indicates that battery pack is being charged Flashing indicates battery is being conditioned Red LED Indicates faulty battery Green LED Indicates battery charged and ready for use Termi...

Страница 58: ...ply to the HomeBase The power supply provides 5V DC input for communications and battery charging RS 232 Communications Port Use a standard serial cable to connect this port to a host RS 232 device Comm LED Description Red LED Data is being sent from the Host Device to IntelliBase Green LED Data is being sent from the IntelliBase to the Host Device Orange LED Data is being sent at high data rates ...

Страница 59: ...ns Port Use a standard serial cable to connect this port to a host RS 232 device Auxiliary Battery Well Insert a battery into the well to charge or condition and calibrate a battery pack Condition Button Press and release the button to service the battery in the auxiliary battery well Rear View of Dolphin IntelliBase Power Supply Connector RS 232 Connector Auxiliary Battery Well Condition Button ...

Страница 60: ...am USB Host or Hub The USB HomeBase is USB 1 3 compliant Bottom Panel of HomeBase IntelliBase IntelliBase A Baud Rate switch used to select the communication baud rate is located on the bottom of the HomeBase IntelliBase and IntelliBase The Baud Rate Switch on the HomeBase is a three position switch four position on the IntelliBase and IntelliBase Switch position and the corresponding baud rates a...

Страница 61: ... Settings Baud Rate Switch 1 Switch 2 Switch 3 115200 OFF OFF OFF 57600 ON OFF OFF 38400 OFF OFF ON 19200 OFF ON OFF 9600 ON ON OFF 4800 ON OFF ON 2400 OFF ON ON Baud Rate Switch 1 Switch 2 Switch 3 Switch 4 115200 OFF ON ON N A 57600 ON OFF OFF N A 38400 ON OFF ON N A 19200 ON ON OFF N A 9600 ON ON ON N A Baud Rate Switch ...

Страница 62: ...elliBase is the only Dolphin charging communication cradle with deep cycling capabilities Since the Dolphin HomeBase Intellibase and USB HomeBase do not have deep cycling capabilities it is recommended that you use the Battery Conditioning Utility software when using those peripherals or use the Dolphin Quad Battery Charger To deep cycle a battery using the IntelliBase insert the battery into the ...

Страница 63: ...ght through RS 232 cable To communicate with a DCE device use either a null modem adapter in line with a standard RS 232 cable or a null modem serial cable You can make your own cables by following the pin configuration in the chart below To do so you must determine if your host RS 232 device is 9 pin or 25 pin and whether it is configured as a DCE or DTE device The HomeBase IntelliBase IntelliBas...

Страница 64: ...Control Panel Communications Properties 2 Select the PC Connection tab 3 Select Change Connection and choose the desired option for connecting to the desktop computer Choose Direct if you are using a serial connection choose Infrared for a HomeBase connection and IrDA for IntelliBase IntelliBase connection or USB HomeBase IrDA connection and click OK 4 Place the Dolphin in the cradle 5 On the Dolp...

Страница 65: ...11 6 In the ActiveSync connection settings add check mark to Allow serial cable or infrared connection to this COM port and select Infrared Port IR for the COM port as shown below Change Connection Screen ...

Страница 66: ...ndows NT To install the USB HomeBase follow these steps 1 Plug in the power supply and connect it to the back of the USB HomeBase 2 Plug the USB cable into the back of the USB home base 3 Plug the other end of the USB cable into your PC At this point a dialog box appears on your PC instructing you that the system has detected new hardware and it is searching for the HHP USB IrDA driver Unless you ...

Страница 67: ...complete the installation process You can verify that the USB driver is functioning by watching the COMM LED on the USB home base It should be flashing red approximately every three seconds Once the USB HomeBase is installed you can use ActiveSync to connect to a Dolphin 7400 These instructions assume that ActiveSync v3 1 is installed on your PC In the ActiveSync connection settings add check mark...

Страница 68: ...lluminate If the Dolphin does not turn on or the LED does not light up make sure that it is properly seated in the terminal well and that the power supply is properly connected to the cradle and plugged into a functioning AC outlet 3 Start your application on the Dolphin terminal or the host computer Data can then begin transmitting between the terminal and the devices connected to the Dolphin cra...

Страница 69: ...wed for accessibility to the auxiliary battery well Desk Mounting Dolphin charging communication cradles have a DIN rail 7 5 X 35 mm slot on the bottom to allow for secure desk attachment of the unit if desired Wall Mounting The HomeBase IntelliBase USB HomeBase also has two DIN rail 7 5 X 35mm slots on the back to allow for secure wall mounting of the unit if desired The IntelliBase may not be wa...

Страница 70: ...ed that the rails be mounted to the wall using a 25mm 1 in spacer to allow for appropriate strain relief of the cables In either case after wall mounting it is recommended that the cables be secured to the DIN rail through use of a wire tie to prevent damage to the HomeBase IntelliBase USB HomeBase unit in case accidental or excessive force is applied to the cables ...

Страница 71: ...o accurately show battery status on the Dolphin display The QuadCharger conditions and calibrates batteries for longer more consistent performance Dolphin QuadCharger Parts and Function Top Panel Charging Pocket The QuadCharger has four charging pockets for charging and or conditioning batteries for Dolphin 7400 7450 terminals Power Switch Press and hold the Power Switch for approximately one seco...

Страница 72: ...ype of operation Supplying Power To The QuadCharger CAUTION Using a non HHP power cord voids your warranty and could result in serious damage to the Dolphin QuadCharger s circuitry Locate the AC power cord that came with the Dolphin QuadCharger Plug the cord into the power supply connector on the back of the unit and then plug the power cord into a wall socket Press and hold the Power Switch for a...

Страница 73: ...describes the Status LEDs during the Condition and Calibrate cycle Storing Batteries To maintain top performance from batteries follow the guidelines below when storing them Avoid storing batteries outside of the specified temperature range of 4 to 104 F 20 to 40 C or in extremely high humidity For prolonged storage do not keep batteries stored in a charger that is connected to a power source Duri...

Страница 74: ...battery pack is properly seated The red status LED comes on during charging Try to charge the battery in one of the other charging pockets If the red Status LED comes on again then the problem is associated with the battery pack If the red status stays with the charging pocket the problem is associated with the charging circuity The red status LED remains on without a battery in the charging pocke...

Страница 75: ...ng communication cradles provide power to the Dolphin terminal to enable the terminal to charge its battery Ir IrDA Optical Communications The infrared or Ir communications port on the cradles connect with the IrDA port on the Dolphin terminal With no pins or contacts to break Ir will work reliably for years Reliable data communications at speeds of up to 115k baud can be transmitted by the both v...

Страница 76: ...ase and Mobile Base Parts and Functions Front Panel The front panel of the Mobile IntelliBase and the Mobile Base has one slot Front Panel of Dolphin Mobile IntelliBase Terminal Well DOCK LED COMM LED Spring Arm Assembly ...

Страница 77: ...rly seated into the Dolphin Mobile IntelliBase 2 COMM LED Indicates the status of data transfer between the Host Device and the Dolphin terminal as described below Front Panel of Dolphin Mobile Base Comm LED Description Red LED Data is being sent from the Host Device to the Dolphin Mobile IntelliBase Mobile Base Green LED Data is being sent from the Dolphin Mobile IntelliBase Mobile Base to the Ho...

Страница 78: ...8 4 Rear Panel Rear Panel of Dolphin Mobile IntelliBase RS 232 Communications Port Power Supply Connector Mounting Bracket ...

Страница 79: ...or to attach a power supply to the charging communications cradle The power supply provides power for communications and battery charging RS 232 communications port Use a standard serial cable to connect this port to a host RS 232 device Rear Panel of Dolphin Mobile Base Power Supply Connector RS 232 Communications Port Locking Lever ...

Страница 80: ...al may be stored indefinitely in the Mobile IntelliBase Mobile Base without damage to the terminal the battery pack or the Mobile IntelliBase Mobile Base To charge a Dolphin terminal follow these steps 1 Insert a battery pack into the Dolphin terminal 2 Place the terminal imager engine window up and the LCD visible in the terminal well of the Mobile IntelliBase Mobile Base 3 Let it glide down into...

Страница 81: ...half duplex serial protocol This allows any full or half duplex RS 232 device to communicate through the IntelliBase with no IrDA protocol software See Tables 2 or 3 for the baud rate switch settings Installing The Dolphin Mobile IntelliBase Mounting the Mobile IntelliBase Spring Arm Assembly The adjustable mounting bracket holds the terminal securely in place and gives the user a variety of optio...

Страница 82: ...er mobile applications that allow the Mobile Base to be mounted according to specific needs The spring arm assembly holds the terminal securely in place To attach the bracket 1 Loosen the turnscrew located on the side of the bracket 2 Attach the bracket to the ball joint on the back of the Mobile IntelliBase and tighten the turnscrew Ball joint Turnscrew ...

Страница 83: ...an make your own cables by following the pin configuration in the chart below To do so you must determine if your host RS 232 device is 9 pin or 25 pin and whether it is configured as a DCE or DTE device Supplying Power to the Dolphin Mobile IntelliBase and Mobile Base The Mobile IntelliBase and Mobile Base can both be powered from either a 12 48 volt DC source Power is connected to the input powe...

Страница 84: ...ase To set Communications Properties 1 Select Start Settings Control Panel Communication Settings 2 Select the PC Connection tab 3 Select the desired option for connecting to the desktop computer Choose IrDA for Mobile IntelliBase IrDA connection and click OK 4 Place the Dolphin in the Mobile IntelliBase 5 On the Dolphin 7400 desktop double tap on ActiveSync Communications Properties ...

Страница 85: ...zation also is not supported as the Dolphin 7400 7450 terminal is not designed for use as a single target The Dolphin 7400 7450 terminal can be easily programmed with Microsoft eMbedded Visual Tools contains CE versions of Visual C and Visual Basic or Java Dolphin 7400 7450 supports Insignia Solutions Jeode Java Virtual Machine to run Java based applications on the terminal Windows CE also runs SQ...

Страница 86: ...9 2 ...

Страница 87: ...D OF THE POSSIBILITY OF SUCH INJURIES LOSSES OR DAMAGES SOME STATES PROVINCES OR COUNTRIES DO NOT ALLOW THE EXCLUSION OR LIMITATIONS OF INCIDENTAL OR CONSEQUENTIAL DAMAGES SO THE ABOVE LIMITATION OR EXCLUSION MAY NOT APPLY TO YOU All provisions of this Limited Warranty are separate and severable which means that if any provision is held invalid and unenforceable such determination shall not affect...

Страница 88: ...372 You must have an RMA number to receive service from any of HHP s repair facilities Failure to obtain an RMA number before shipping your product to this repair facility can delay the processing of your repair request When calling for service at any of our repair facilities please be prepared to give the following information Product s type and serial number Brief description of problem Dated Pr...

Страница 89: ... plans on our hardware products These agreements offer continued coverage for your equipment after the initial warranty expires For more information contact your HHP sales representative customer account representative or the Product Service Marketing Manager or your Authorized Reseller Application Support If you have a question or problem with your Dolphin terminal or Dolphin peripheral you can g...

Страница 90: ...and Africa TEL Int 31 40 242 4486 9 a m 5 p m Central European Time Monday through Friday euro_support hhp com The United Kingdom TEL 44 1925 240055 9 a m 5 30 p m UK Time Monday through Friday euro_support hhp com Asia TEL Int 852 2511 3050 or 2511 3132 asia_support hhp com Latin America TEL 239 263 7600 la_support hhp com ...

Страница 91: ...10 5 ...

Страница 92: ...10 6 ...

Страница 93: ...10 7 ...

Страница 94: ...10 8 ...

Страница 95: ...e the insertion point to the beginning of the previous paragraph SHIFT with any of the arrow keys Select more than one item in a window or on the desktop or select text within a document CTRL A Select all ALT ENTER View properties for the selected item ALT TAB Switch between open items ALT ESC Cycle through items in the order they were opened ALT Tap on Touch screen Right click CTRL ESC Display th...

Страница 96: ...ou wish to modify to the Blue or Red case Use these keys in combination with other keys to type the corresponding color coded characters and functions See the charts below for key combinations that access the functions and special characters using these keys 43 Key Alpha Numeric Keyboard Blue Key Functions Characters For 43 Key Alpha Numeric Keyboard Key Combination Function Special Character Doub...

Страница 97: ... F4 Red key U F5 Red key V F6 Red key W F7 Red key X F8 Red key Y START Red key Z INS insert Red key SP BKSP backspace Red key BACKLIGHT KEY DEL delete Key Combinations Using NUM SFT Keys Key Key Combination Function Special Character NUM SFT A NUM SFT B NUM SFT C NUM SFT E NUM SFT F NUM SFT G NUM SFT I NUM SFT J NUM SFT K NUM SFT M NUM SFT N NUM SFT O Red Key Functions Characters For 43 Key Alpha...

Страница 98: ...inations Function Special Characters NUM ALT 3 9 NUM ALT 3 4 Hold the ALT key down as you type in the numbers Blue Key Functions Characters For 35 Key Numeric Alpha Keyboard Key Combination Function Special Character Double tap Blue key Activate Deactivate Mouse Utility Blue key Blue key Blue key F1 Blue key F2 Blue key F3 Blue key F4 Blue key SP _ Blue key DEL Blue key 0 zero ...

Страница 99: ...pecial Character ALPHA SFT 1 ALPHA SFT 2 ALPHA SFT 3 ALPHA SFT 4 ALPHA SFT 5 ALPHA SFT 6 ALPHA SFT 7 ALPHA SFT 8 ALPHA SFT 9 ALPHA SFT 0 ALPHA SFT period ALPHA SFT comma Miscellaneous Key Combinations Key Key Combinations Function Special Characters ALT 3 9 ALT 3 4 Hold the ALT key down as you type in the numbers Blue Key Functions Characters For 56 Key Full Alpha Numeric Keyboard Key Combination ...

Страница 100: ...ey ESC Lightens Contrast Red key TAB Darkens Contrast Red key SFT Toggles on Caps Lock Red key A F1 Red key B F2 Red key C F3 Red key D F4 Red key E F5 Red key F F6 Red key G F7 Red key H F8 Red key I F9 Red key J F10 Red key K F11 Red key L F12 Red key M F13 Red key N F14 Red key O F15 Blue Key Functions Characters For 56 Key Full Alpha Numeric Keyboard Key Combination Function Special Character ...

Страница 101: ...Dolphin keyboard Red key P F16 Red key Q F17 Red key R F18 Red key S F19 Red key T F20 Red key U F21 Red key V F22 Red key W F23 Red key X F24 Red key Y Z Key Combinations Using SFT Number Keys Key Key Combination Function Special Character SFT 1 SFT 2 SFT 3 SFT 4 SFT 5 SFT 6 SFT 7 SFT 8 SFT 9 SFT 0 SFT period SFT comma Red Key Functions Characters for 56 Key Full Alpha Numeric Keyboard Key Combin...

Страница 102: ...11 8 Miscellaneous Key Combinations Key Key Combinations Function Special Characters ALT 3 9 ALT 3 4 Hold the ALT key down as you type in the numbers ...

Страница 103: ...12 1 Appendix B Dolphin 7400 7450 Scan Maps ...

Страница 104: ...12 2 ...

Страница 105: ...12 3 ...

Страница 106: ...12 4 ...

Страница 107: ... 7400 UG Rev L ...

Отзывы: