background image

C H A P T E R   1     G E T T I N G   S T A R T E D  
 

 19

19

19

19  

After deep cycling the battery, you may charge the battery using one of these methods: 

• 

Place the battery in the auxiliary battery well on the Dolphin HomeBase™.  

Time to Charge:  3 hours 

• 

Place the battery in the 10-slot Dolphin multiple battery charger.  Time to 

Charge:  3 hours 

• 

Install the battery in the Dolphin, place the Dolphin in the HomeBase and 

connect the HomeBase to an external power source.  Time to Charge:  5 ½  

hours 

For help, see the chapter on the Dolphin.  To learn more about managing the 

terminal’s battery power, see 

“Maintaining the Dolphin’s Batteries”

 in Chapter 2. 


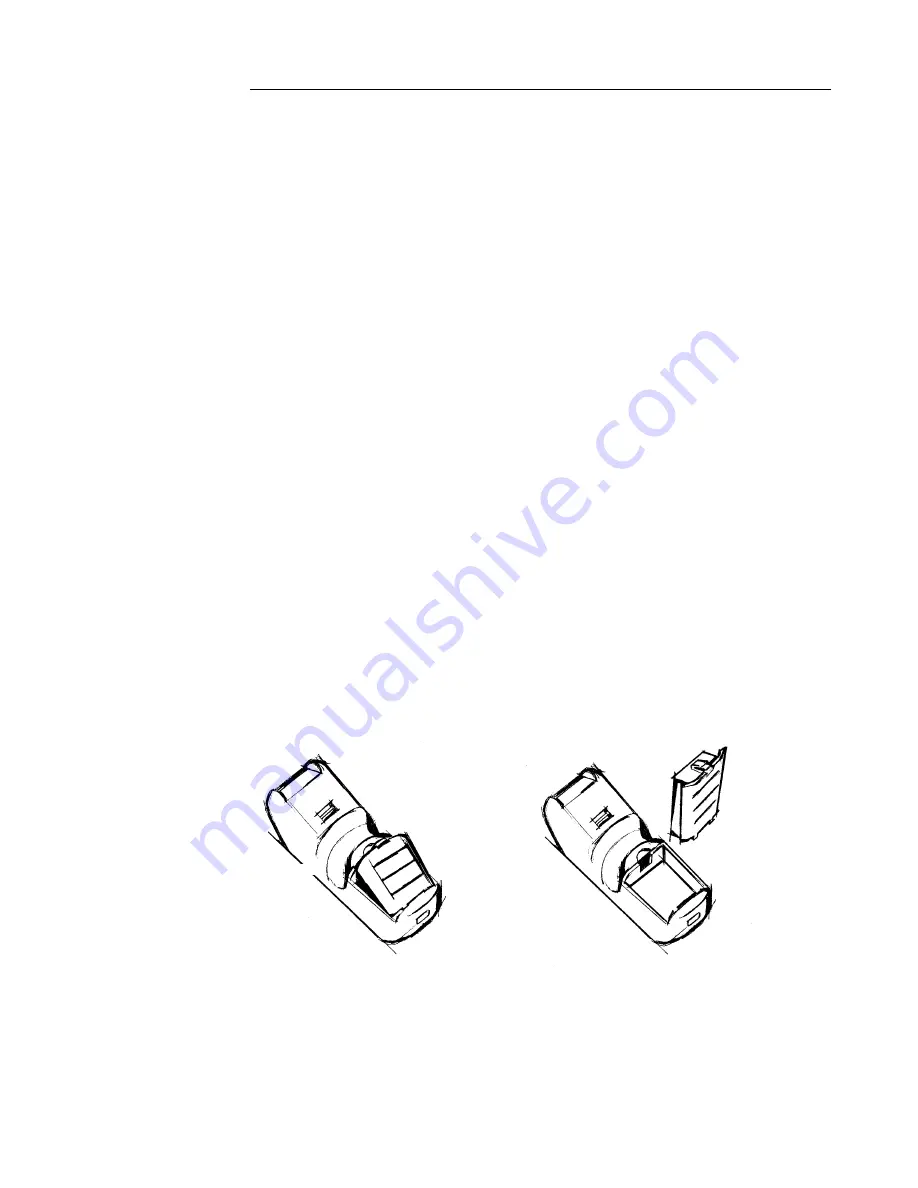
Inserting the Battery Pack 

1.  Hold the Dolphin with the front panel (keypad) facing down. 

2.  Insert the end without the locking tab into the bottom of the battery opening and 

snap the battery into place with a hinging motion. The battery case serves as the 

back cover of the Dolphin. 

Removing the Battery Pack 

1.  Hold the Dolphin with the front panel (keypad) facing down. 

2.  Push the locking tab on the battery pack down and pull the battery out from the 

Dolphin terminal with a hinging motion. 


Figure 2  Inserting and Removing the Battery


Œ

Œ

Œ

Œ


Œ

Œ

Œ

Œ


Содержание 7200/UG

Страница 1: ...H A N D H E L D P R O D U C T S Dolphin 7200 Handheld Computer and HomeBase User s Guide 7200 UG Rev C ...

Страница 2: ...in Dolphin RF and HomeBase are trademarks or registered trademarks of Hand Held Products Patents are pending for Spreadsheet Simplicity iButton is a trademark of Dallas Semiconductor Other product names mentioned in this document may be trademarks or registered trademarks of their respective companies and are hereby acknowledged Printed in U S A Contacting Hand Held Products Contacting Hand Held P...

Страница 3: ...hin 7200 Models and Options 16 Bar Code Symbologies Supported 17 Using Dolphin for the First Time 18 1 Checking Your Package 18 2 Charging the Battery 18 3 Turning the Dolphin On And Off 20 4 Setting the Date and Time 20 Chapter 2 Dolphin Basics 22 System Features 23 CPU 23 Disk Drives 23 Front Panel Physical Features 23 Light Emitting Diodes LED 23 Liquid Crystal Display LCD 24 Speaker 24 RF Ante...

Страница 4: ...n 59 Working with iButtons 60 IButtons supported by Dolphin with iButton Reader 60 Developing Applications with Dolphin with iButton Reader 61 Chapter 5 Dolphin 7200 with Image Capture Handheld Computer 62 About Dolphin 7200 with Image Capture Handheld Computer 63 Capturing Images 63 Lighting Conditions 65 Dolphin Image Capture Demo Software 65 Installing the Dolphin Image Capture Demo Software on...

Страница 5: ... with the Dolphin Terminal 119 Chapter 9 Learning About the Dolphin OS and Development System Software 120 Dolphin OS and Development System 121 Installation 121 Help File Document and Utility Icons 123 Dolphin HHP Demo Program 124 Scanning A Barcode 128 Dolphin Utilities 129 Dolphin Application Development 134 Compiling Applications for the Dolphin 134 Sample Applications 135 Building the Samples...

Страница 6: ...s Not Covered By The Warranty 153 How Problems Should Be Handled 153 Return Information 153 How To Extend Your Warranty 155 Technical Support 155 Appendix A Dolphin 7200 Terminal Specifications 156 Appendix B Bar Code Samples 168 Appendix C GS DOS Commands 169 Appendix D Declarations of Conformity 178 ...

Страница 7: ...character backlit display that can display text or graphics a natural scan and viewing angle and two keypad options The multiple configurations available for the Dolphin 7200 make it one of the most versatile terminals in the automatic data collection industry The terminal may be equipped with a scan engine capable of reading all standard bar code symbologies Dolphin 7200 is also available with th...

Страница 8: ...ct both you and others around you Please read them carefully before using your Dolphin Required Safety Labels Dolphin 7200 handheld computer uses a low power Visible Laser to scan bar codes Short term exposure to CDRH Class II laser light is not known to be harmful As with any bright light source such as the sun you should avoid direct eye exposure The following are required safety labels as they ...

Страница 9: ...9 9 9 9 Figure 2 Safety Labels for Dolphin 7200 RF terminals Figure 3 Safety Labels for Dolphin 7200 2D terminals Label for 802 11b radio equipped terminals Label for WLIF radio equipped terminals ...

Страница 10: ...his equipment has been tested and found to comply with the limits for a Class B digital device pursuant to part 15 of the FCC Rules These limits are designed to provide reasonable protection against harmful interference in a residential installation This equipment generates uses and can radiate radio frequency energy and if not installed and used in accordance with the instructions may cause harmf...

Страница 11: ...at 670 nanometers and continuous wave EN 60825 1 Laser Safety Statement This product is classified as a CLASS 2 LASER PRODUCT with a maximum output of 9 0 mW at 670 nanometers per EN 60825 1 1994 Issue 2 June 1997 R TTE Directive The Dolphin 7200 RF is in conformity with all essential requirements of the R TTE Directive 1999 5 EC This equipment has been assessed to the following standards ETS 300 ...

Страница 12: ... Held Products UK Ltd 1st Floor Dallam Court Dallam Lane Warrington Cheshire WA2 7LT England Hand Held Products shall not be liable for use of our product with equipment i e power supplies personal computers etc that is not CE marked and does not comply with the Low Voltage Directive Interference Pacemakers Hearing Aids and Other Electrically Powered Devices Most manufacturers of medical devices a...

Страница 13: ...should be recycled according to local guidelines Don t short circuit a battery or throw it into a fire It can explode and cause severe personal injury Excessive discharge damages a battery Recharge the battery when your Dolphin indicates low battery power Although your battery can be recharged many times it will eventually be depleted Replace it after the recommended usage period about 500 charge ...

Страница 14: ...14 14 14 14 Chapter 1 Getting Started SummarizestheDolphin sfeatures functionsandaccessoriesandgettingit startedforthefirsttime ...

Страница 15: ...n station includes power adapter Dolphin HomeBase power adapter Replacement power adapter for Dolphin HomeBase Note Use only power adapters approved for use by Hand Held Products Failure to do so may result in improper operation or damage to the unit 10 Slot Battery Charger for Dolphin Charges and reconditions 10 batteries in under four hours Supports 90 264V VehicleBase Vehicle Kit for Dolphin Ba...

Страница 16: ... integrates the basic functionality of the Batch terminal with a 2 4GHz RF interface that allows the terminal to communicate with a host computer via a wireless local area network WLAN There are two options for this terminal an 802 11b direct sequence spread spectrum radio or a WLIF frequency hopping spread spectrum radio The Dolphin 7200 with Image Capture terminal incorporates a low power high r...

Страница 17: ...emory No scan engine manual entry only No scan engine manual entry only iButton reader Terminal emulation software and keypad overlays for IBM 3270 IBM 5250 and DEC VT220 emulation Integrated digital CMOS camera 802 11b direct sequence spread spectrum radio or WLIF frequency hopping spread spectrum radio Integrated image engine Bar Code Symbologies Supported 1D linear codes Code 3 of 9 Interleaved...

Страница 18: ...Use only 3 6V battery packs provided by Hand Held Products The use of any other battery pack in the Dolphin terminal will void your warranty and may result in damage to the Dolphin terminal or battery The terminal s NiMH battery is shipped discharged of all power so you must charge it before using for the first time For maximum battery life Hand Held Products recommends that you deep cycle the bat...

Страница 19: ...e the chapter on the Dolphin To learn more about managing the terminal s battery power see Maintaining the Dolphin s Batteries in Chapter 2 Inserting the Battery Pack 1 Hold the Dolphin with the front panel keypad facing down 2 Insert the end without the locking tab into the bottom of the battery opening and snap the battery into place with a hinging motion The battery case serves as the back cove...

Страница 20: ...s up Don t worry the terminal is OK This simply means that the internal back up battery needs to be recharged and the date and time need to be reset To recharge the internal backup battery and reset the date and time insert a fully charged battery in the Dolphin and then use the DOS date and time function to set the correct date and time The internal back up battery requires a minimum of 5 hours o...

Страница 21: ...ATE at the Dolphin s DOS prompt See the section called Using the Numeric Keypad in Chapter 2 for more information 3 Press SHIFT to put the Dolphin back in numeric mode 4 Enter the new date mm dd yy 5 Press ENTER To enter the new time enter TIME at the Dolphin s DOS prompt instead of DATE and follow the directions for the Dolphin model you are using ...

Страница 22: ...22 22 22 22 Chapter 2 Dolphin Basics DescribessystemfeaturesandexplainshowtousetheDolphin skeypad display batteries drivesandscanner ...

Страница 23: ...If you add the expanded memory module to your Dolphin Batch terminal it will appear as Drive D Up to 8MB of additional FLASH memory can be added via the FLASH expansion module Note This option is not available for the Dolphin RF Front Panel Physical Features This section describes features on the Dolphin s front panel The alphanumeric and numeric Dolphins have identical back panels Light Emitting ...

Страница 24: ...ht conditions To conserve power the backlight is automatically turned off after 30 seconds The on off function and contrast is software programmable Note The ninth row is used for system icons and application defined icons Speaker The Dolphin Batch terminal s internal speaker emits a sound level of 80dB at 10 cm The sound level for the Dolphin RF terminal s external speaker is 90dB at 10 cm RF Ant...

Страница 25: ...ode Its position also allows convenient one handed bar code scanning The ENTER key confirms data entry The SHIFT key toggles the Dolphin from alpha to numeric mode and back and in combination with other keys allows you to enter special characters The NUM LOCK key toggles between the alphabetic and numeric modes The BKSP key moves you to move the cursor back one space each time the key is pressed T...

Страница 26: ...hin keypad Key Combination Function Special Character ESC SHIFT BKSP The ESC function performs a cancel action SPC SHIFT U The SPC function moves the cursor forward one space at a time CLR SHIFT A The CLR function erases the line of data just entered if the ENTER key has not yet been pressed SHIFT F SHIFT K SHIFT P SHIFT V SHIFT W SHIFT X SHIFT Y SHIFT Z SHIFT E SHIFT J SHIFT LIGHT Changes Contras...

Страница 27: ...een numeric and alpha modes or to use special characters Figure 5 Dolphin Numeric Keypad The Dolphin s ON SCAN key wakes the terminal from sleep mode Its position also allows convenient one handed bar code scanning The ENTER key confirms data entry The SHIFT key toggles the Dolphin from numeric to alpha mode and back You can also enter special characters The BKSP key moves the cursor back one spac...

Страница 28: ...he F1 and F2 keys to adjust the contrast up or down When finished press the BKSP key CALC This function is undefined However it can be programmed by a custom application to load a calculator utility Figure 6 Key Combinations and What They Do Numeric Keypad Entering Alpha and Special Characters 1 Press the SHIFT key to switch the numeric keypad to alpha mode This is indicated by the ABC symbol indi...

Страница 29: ...omeBase Located in lower left hand corner of the LCD Battery charging symbol shown above switches from a blinking arrow to a blinking check when the unit has completed charging in the HomeBase Indicates charge level of the Dolphin terminal s main battery when the terminal is in use The charge symbol decreases in size as the charge level drops Located in lower left hand corner of the LCD When this ...

Страница 30: ...C H A P T E R 2 D O L P H I N B A S I C S 30 30 30 30 Alpha mode alphabetic characters are active Numeric mode numeric characters are active ...

Страница 31: ...ction describes features on the Dolphin s back panel The alphanumeric and numeric Dolphins have identical back panels Laser Engine Lanyard Eyelet not available on Dolphin RF Reset Switch Battery Well Battery Charging Contacts Infrared Communications Port Figure 7 Dolphin Back Panel ...

Страница 32: ...red around the wrist or hooked on to a belt Not available on the Dolphin 7200 RF Dolphin 7200 with Image Capture or the Dolphin 7200 2D terminals Battery Well The Battery Well is a recessed area on the back of the Dolphin that holds the 3 6V battery pack Reset Switch The Reset Switch is located inside the Dolphin terminal and is accessible through a small opening within the battery well To reset t...

Страница 33: ...ttery pack is removed If the internal back up battery becomes discharged of power it requires a minimum of 5 hours of charging time in order to perform and maintain the system as described above The internal backup battery is charged by the Dolphin s main battery pack If the terminal is left without the main battery pack for more than 30 minutes the internal backup battery needs to be recharged No...

Страница 34: ...d battery in the terminal Servicing the Battery Pack For maximum battery life Hand Held Products recommends that you deep cycle the battery twice before initial use It is also recommended that you service or calibrate the battery once per month To deep cycle insert the battery into the HomeBase auxiliary battery well Then push and hold the Service Aux Batt button for at least 4 seconds For more in...

Страница 35: ...do not keep batteries stored in the terminal During long term storage battery deactivation may tend to occur which may cause charging to stop early during recharging after storage This issue can be handled by charging and discharging the battery several times Also the first charging after prolonged storage may yield a lower than normal capacity While this will vary depending on the storage conditi...

Страница 36: ...36 36 36 36 Chapter 3 Dolphin 7200 RF Handheld Computer ...

Страница 37: ...ration of the Dolphin terminal and accessories available 802 11b Compliant Dolphin 7200 RF Terminal The 802 11b compliant Dolphin 7200 RF incorporates a Cisco 802 11b Micro ISA radio The radio uses direct sequence spread spectrum DSSS technology which spreads its signal continuously over a wide frequency band and provides an Ethernet like data rate of up to 11 megabits per second The radio may als...

Страница 38: ...m provides basic functions required to prepare your terminals for use The program also includes a Scan Demo Help and an Inventory Control demo When you cold boot or reset the terminal the title screen shown below appears Press the ENTER key to continue Dolphin 7200 RF Title Screen Main Menu The Dolphin 7200 RF Main Menu shown appears after the title screen Dolphin 7200 RF Main Menu ...

Страница 39: ...ad linear barcodes Follow the directions on the screen to set up which bar codes you want the terminal to read Once the terminal is configured press ESC and then the ON SCAN Button to scan a bar code F2 Help F2 Help Menu This option is an online help file with general information about using the Dolphin 7200 RF terminal battery maintenance contacting Hand Held Products specifications and navigatin...

Страница 40: ...C H A P T E R 3 D O L P H I N 7 2 0 0 R F H A N D H E L D C O M P U T E R 40 40 40 40 F3 HHP Demo F3 HHP Demo The HHP Demo is a sample inventory control program F4 Utilities Menu F4 Utility Menu ...

Страница 41: ...r more information on sending or receiving files with the Dolphin 7200 HomeBase see the section on Setting Up For Communications in Chapter 7 See Chapter 8 for more information on communications with the Dolphin 7200 Compact HomeBase F2 System Menu F2 System Menu This option allows you to view system information such as version and serial numbers about specific Dolphin 7200 RF terminals You may al...

Страница 42: ... H E L D C O M P U T E R 42 42 42 42 F3 DOS Prompt Press F3 to exit to the DOS prompt F4 RF Menu Press F4 and the menu below will appear Use options from this menu to configure the Dolphin 7200 RF for use in your wireless local area network F4 RF Menu ...

Страница 43: ...rk use this address to locate specific ports in the network and to create and update routing tables and data structures F1 SET SSID Press F1 to set the SSID This value is case sensitive Enter a value for the SSID option and press ENTER Once the SSID is written the Dolphin 7200 RF terminal must be reset to activate the new SSID The SSID Service Set Identifier is a unique case sensitive identifier t...

Страница 44: ...ing TCP IP An IP address belongs to one of five classes A B C D or E and is written as four octets separated by periods dotted decimal format Each address consists of a network number an optional sub network number and a host number F4 R W SUBNET MASK Press F4 to enter the Subnet Mask Enter a value for the Subnet Mask option and press ENTER Once the Subnet Mask Address is written the Dolphin 7200 ...

Страница 45: ... wep bat file uses three files wepdos exe an executable file that configures WEP values for the Cisco radio keys exe an executable file that calls the functions for setting WEP values cscpkt ini a configuration file for the Cisco radio All four files are located in the Dolphin c rf directory that is part of the stackcsc exe file If the user will be setting WEP keys using the batch mode the user mu...

Страница 46: ... radio WEP keys using ASCII characters entered via the keyboard STATUS Displays encryption level and key lengths SELECTKEY Selects operating key used during operation with access point CLEARKEY Clears operating key OPEN Disables WEP operation even if keys have been set no encryption WEPSHARED Sets WEP mode to WEPSHARED In this mode the Access Point sends a plain text shared key query to any device...

Страница 47: ...y code HEX xxxxxxxxxxxxxxxxxxxxxxxxxx xxxxxxxxxxxxxxxxxxxxxxxxxx xxxxxxxxxxxxxxxxxxxxxxxxxx xxxxxxxxxxxxxxxxxxxxxxxxxx xxxxxxxxxxxxxxxxxxxxxxxxxx After creating the keys txt file copy it to the c rf directory and enter C WEP BATCH Result The WEPOPEN operating mode is automatically set the WEP mode can be changed using commands shown later in this document One of the following messages will display...

Страница 48: ...it WEP will be used The terminal will display one of the following screens Error s Retry if an error occurred writing to radio card or Done if keys successfully set Example 3 To configure WEP using a HEX string via the Dolphin terminal keyboard enter C WEP HEX 11111111111111111111111111 X X X There are four WEP keys to set To skip a key code enter X for each blank entry In the example above only k...

Страница 49: ... the radio not the encryption level Example 5 To select the key to be used during operation with the access point enter C WEP SELECTKEY 2 Result The terminal will display the following Setting transmit key index to 2 Key2 Selected Example 6 To clear the active key enter C WEP CLEARKEY 2 Result The terminal will display the following Clearing DefaultKey 2 Key2 Cleared Example 7 To enable the WEP WE...

Страница 50: ... is broadcast on only one frequency The transmission remains on each frequency for only a short period up to 0 4 second before moving to the next frequency Dolphin 7200 RF is interoperable with all WLIF compliant products to allow network expansion as needed It can be connected to other devices such as printers and PCs via PC card adapters Configuring Your WLIF Compliant Dolphin 7200 RF Terminal T...

Страница 51: ...reen will appear F4 Utility Menu The F1 F2 and F3 functions on the Utility menu for WLIF compliant terminals are the same as the 802 11b compliant terminals For more information refer to the section on the Utility Menu in the configuring 802 11b terminals section F4 RF Menu Press F4 and the menu shown below will appear F4 RF Menu ...

Страница 52: ...same network F2 R W RADIO DOMAIN Press F2 to enter the Radio Domain Once the Radio Domain is written the Dolphin 7200 RF terminal must be reset to activate the new Radio Domain The Domain is the area within a LAN that defines a region administered by an access point It is a software filter that does not affect the actual radio frequency or the frequency hopping sequence The Domain is a number betw...

Страница 53: ...rks using Dolphin 7200 RF terminals include PC cards access points and antennas Peripherals available for 802 11b Direct Sequence radio networks are Wi Fi certified peripherals for Frequency Hopping radio networks are OpenAir compliant PC Cards PC cards provide devices such has laptop and desktop computers with wireless connectivity to the RF network Access Points Access Points link a wired networ...

Страница 54: ...communication to a host such as an AS400 and maintains communication to both the Dolphin 7200 RF terminal and the host Thick Client Terminal Emulation PowerNet TN Client telnet client software allows the Dolphin 7200 RF terminal to communicate directly with applications running on AS 400 ES 9000 HP 6000 or other hosts connected to an Ethernet backbone and that support TCP IP The TNVT TN3270 and TN...

Страница 55: ... as AS 400 ES 9000 and HP 6000 via Ethernet and communicates to the application via Ethernet for 3270 5250 or telnet for DEC VT220 terminal emulation environments 3270 or 5250 Terminal Emulation Host Universal Gateway Controller Ethernet Access Point Dolphin RF AS400 ES 9000 RS 8000 HP9000 Telnet VT220 TN3270 or TN5250 Terminal Emulation with Universal Gateway Controller Host Universal Gateway Con...

Страница 56: ...E L D C O M P U T E R 56 56 56 56 Terminal Emulation Keyboard Overlays There are host specific keyboard overlays supporting all necessary program keys character sets and control and display functions Alphanumeric 3270 Alphanumeric 5250 Alphanumeric VT220 ...

Страница 57: ...C H A P T E R 3 D O L P H I N 7 2 0 0 R F H A N D H E L D C O M P U T E R 57 57 57 57 Numeric 3270 Numeric 5250 Numeric VT220 ...

Страница 58: ...58 58 58 58 Chapter 4 Dolphin 7200 with iButton Reader Handheld Computer DescribestheiButtonreaderandhowtouseit ...

Страница 59: ... Mb of flash memory and will support all scan engine versions available for the Dolphin platform Refer to Chapters 1 and 2 in this manual for more on basic operation of the Dolphin terminal and accessories available What is an iButton iButton technology was developed by Dallas Semiconductor The iButton is a 16mm computer chip housed in a stainless steel can The iButton can be worn by a person or a...

Страница 60: ...Dolphin iButton reader Make sure that both the iButton and the iButton reader are clean and dry Touch the iButton reader against the iButton you want to communicate with The reader and the iButton must have full surface to surface contact for data transfer to be completed Keep the iButton reader touched against the iButton until the application generates a beep or displays a message on the Dolphin...

Страница 61: ... include DS 1990A Serial number iButton DS 1920 Temperature iButton Compatible read write iButtons that the Dolphin iButton reader can read include DS 198X EPROM devices Developing Applications with Dolphin with iButton Reader Hand Held Products has a Software Developer s Kit SDK that includes the following 1 API for iButton functions that support the most commonly used iButton types and concern f...

Страница 62: ...62 62 62 62 Chapter 5 Dolphin 7200 with Image Capture Handheld Computer ...

Страница 63: ...hite only information Images can be downloaded via HomeBase or VehicleBase communication cradles and then transmitted via one of many wired or wireless options The device is equipped to capture images in total darkness with its own lighting source The CMOS camera is a function and feature extension of the Dolphin platform Like the batch version Dolphin Image Capture can be equipped with up to 10 M...

Страница 64: ...ease the ON SCAN button to capture the image when the desired image is displayed on the terminal screen Hold the Dolphin terminal as still as possible when capturing the image The image quality and related file size is determined by the data compression method used by your software application For highest quality take grayscale images When saved the image will be saved in JPEG file format The size...

Страница 65: ...ftware allows you to collect images with the Dolphin Image Capture terminal transfer image files to a PC based host and view the collected images The software consists of the following componenets For the Host 1 Dolphin Image Capture Server ICDserver EXE Communication and viewer module The module allows you to receive images from the Dolphin and display the transmitted image Once an image is trans...

Страница 66: ... is shipped with the Dolphin Image Capture terminal System requirements for the Dolphin ICDS host componenets are Operating system Windows 95 Windows 98 or Windows NT Free disk space 1 2 MB To load the program on your PC 1 Follow the instructions on the diskette label and software installation program 2 After successful installation run the program by selecting the icon Before transmitting images ...

Страница 67: ...rk with the F2 IMAGE CAPTURE option of the Dolphin Image Capture client demonstration program The Image Capture Server software must be running on your PC before taking any images If the program is not open when you put the terminal in the HomeBase the Dolphin cannot transfer the file to the host After transmission from Dolphin to the host the image and its file size is displayed in the window as ...

Страница 68: ...to configure the HomeBase for communications and select the COM port on your computer To transfer images taken with Dolphin Image Capture terminal the HomeBase must be configured at 57600 baud rate Communications Settings Dialog Box Follow these steps to configure HomeBase 1 In Comm Port dialog box select the Com port to which the HomeBase is connected 2 Select 57600 Baud Rate 3 Click Configure Ho...

Страница 69: ... 69 4 Follow the directions in the dialog box and then click OK 5 The HomeBase configuration process will begin When finished click OK and the Communications Settings dialog box will close About When you click the About option on the menu the following box will appear to show the version number of your software ...

Страница 70: ...s Select this button to open the Dolphin IC Saved Image Viewer program to view saved images Save Image Select this button to save an image to the Saved Image Viewer Print Select this button to print an image You do not have to save an image to print it Exit Select this button to exit the program Save image before exiting the program ...

Страница 71: ...Capture Viewer program opens The program allows you to view images saved in the HHP Dolphin Image Capture Server Application Navigate the scroll bar to find the image you want to view Select the Print button to print the image To delete images from the viewer 2 Open Windows Explorer 3 Go to and open ICDemo folder on host C drive 4 Open the Save subfolder This is where image files are saved 5 Highl...

Страница 72: ...phin client software After files have been downloaded from the terminal via HomeBase the application window displays the tracking numbers scanned and images taken during the demo If you have taken several images move the navigation bar on the right side of the window up and down as needed to view the images Delete All Select this option to delete all images taken during the demonstration Barcode i...

Страница 73: ...ation software If the demonstration program has been removed from your terminal follow these steps to install 1 Check to make sure that HomeBase is set at 57600 baud rate on the PC 2 Click Windows Start button and go to Programs 3 Select the Dolphin Image Capture Program Group 4 Select Upload ICD Client Com 1 or Upload ICD Client Com 2 5 Place the Dolphin terminal in the HomeBase 6 On the Dolphin ...

Страница 74: ...This demo allows the user to practice aiming only with the Dolphin with Image Capture terminal Press F1 and follow the directions on the screen This option does not store images on the terminal s disk F1 Aiming Demo Screen F2 IMAGE CAPTURE This option allows the user to select the image file type take an image and transmit it to from the Dolphin terminal to the host computer ...

Страница 75: ...umber of pixels the image contains and therefore decreases the final image file size F2 B W Select this option to take uncropped black and white images Using this option yields a larger image with more informative content than what you see on the Dolphin display The pixel size of the image is 310 x 236 pixels F3 GRAY Crop Select this option to take cropped grayscale images The image size acquired ...

Страница 76: ...l beep the screen will go blank momentarily and the image taken will appear on the screen If the image is acceptable press the ENTER key to save the image and proceed to the next step If the image is not satisfactory press the ON SCAN key to take a new image Repeat as necessary to acquire the desired image and proceed to the next step 2 The following screen will appear 3 Place the terminal in the ...

Страница 77: ...n Image Capture terminal is ready to take another image Note Be sure that the Dolphin Image Capture Server program is running on your PC before taking any images If the program is not running when you put the terminal in the HomeBase Dolphin cannot transfer the file to the host and you will see the following screen To begin the process leave the Dolphin terminal in the HomeBase and open the Dolphi...

Страница 78: ...ications These dual functions link the signature with the barcode information for real proof of delivery Note By default images taken with this demonstration will be black and white with cropping If you want to use another file type follow these steps 1 Select F2 Image Capture from the Dolphin Image Capture main menu 2 Select the image type 3 Press SHIFT BKSP to return to the Dolphin Image Capture...

Страница 79: ... when the desired image is displayed on the Dolphin terminal s screen The terminal will beep the screen will go blank momentarily and the image taken will appear on the screen If the image is acceptable press the ENTER key to save the image and proceed to the next step If the image is not satisfactory press the ON SCAN key to take a new image Repeat as necessary to acquire the desired image and pr...

Страница 80: ...C via the Host Download Software Program After the files are downloaded the terminal returns to the Dolphin Image Capture demo program s main menu 6 On your PC select the Dolphin Image Capture Application window Note Be sure that the Dolphin Image Capture Server program is running on your PC before taking any images If the program is not running when you put the terminal in the HomeBase the Dolphi...

Страница 81: ...81 81 81 81 Chapter 6 Dolphin 7200 2D Terminal 222567 22 ...

Страница 82: ...o has image lift capabilities for signature capture and proof of delivery applications Images taken with the unit can be compressed and stored using industry standard data compression technologies The device provides the flexibility to store either images that contain grayscale information or black and white only information Images can be downloaded via HomeBase or VehicleBase communication cradle...

Страница 83: ...ing beam over the barcode The red SCAN LED illuminates when the user presses the ON KEY key and the green DECODE LED illuminates when a bar code is successfully decoded The aiming beam can be positioned in any direction for a good read Linear bar code 2D Matrix symbol The aiming beam is smaller when the terminal is held closer to the code and larger when it is farther from the code Symbologies wit...

Страница 84: ...t You may find it helpful to start by moving the terminal further away and then in closer to the target The active screen image will have a slightly degraded appearance compared to the captured image This is normal 3 Release the ON SCAN button to capture the image when the desired image is displayed on the terminal screen Hold the Dolphin terminal as still as possible when capturing the image The ...

Страница 85: ...uter demonstration software see the sections on Installing the Dolphin Image Capture Demo Software on the Host and the HHP Dolphin Image Capture Server Application in Chapter 5 of this manual Installing the Dolphin 7200 2D Demo Software on the Dolphin Terminal The Dolphin 7200 2D terminal is shipped loaded with client demonstration software If the demonstration program has been removed from your t...

Страница 86: ...emo allows the user to practice aiming only with the Dolphin 7200 2D terminal Press F1 and follow the directions on the screen This option does not store images on the terminal s disk F1 Aiming Demo Screen F2 IMAGE CAPTURE This option allows the user to select the image file type take an image and transmit it to from the Dolphin terminal to the host computer ...

Страница 87: ...on to take uncropped black and white images Using this option yields a larger image with more informative content than what you see on the Dolphin display The pixel size of the image is 310 x 236 pixels F3 GRAY Crop Select this option to take cropped grayscale images The image size acquired is what you see on the terminal screen Grayscale images have larger file sizes than black and white images a...

Страница 88: ...ey to save the image and proceed to the next step If the image is not satisfactory press the ON SCAN key to take a new image Repeat as necessary to acquire the desired image and proceed to the next step 2 The following screen will appear 3 Place the terminal in the HomeBase to begin transferring the file to your host computer Note You must put the terminal into the HomeBase within 15 seconds of ta...

Страница 89: ...ing when you put the terminal in the HomeBase Dolphin cannot transfer the file to the host and you will see the following screen To begin the process leave the Dolphin terminal in the HomeBase and open the Dolphin Image Capture Server program The file transfer process will occur as described in Steps 4 and 5 above F3 SCAN LABELS This option only demonstrates how the terminal scans bar codes Press ...

Страница 90: ...ging main menu F4 Package Delivery Demonstration Scan Tracking Number Follow these steps to use the package delivery demonstration 1 Press the ON SCAN button to scan a barcode The terminal beeps to signal a successful scan You can also manually enter a tracking number using the keypad Press ENTER and the terminal will beep to indicate that you have successfully entered the tracking number 2 The sc...

Страница 91: ...H A P T E R 6 D O L P H I N 7 2 0 0 2 D H A N D H E L D C O M P U T E R 91 91 91 91 Scan Screen 3 After you have saved the image the following screen will appear on the Dolphin display Saving Image Screen ...

Страница 92: ...in 7200 2D terminal into the HomeBase After the files are downloaded the terminal returns to the Dolphin Image Capture demo program s main menu 6 On your PC select the Dolphin Image Capture Application window Note Be sure that the Dolphin Image Capture Server program is running on your PC before taking any images If the program is not running when you put the terminal in the HomeBase the Dolphin c...

Страница 93: ...93 93 93 93 Chapter 7 Using the Dolphin 7200 HomeBase Summarizesthefeaturesof theDolphin7200HomeBaseandexplainshow touseit ...

Страница 94: ...hod protects the battery from damage caused by overcharging IrDA Optical Communications The IR communications port on the HomeBase connects with the IrDA port on the Dolphin Reliable data communications at speeds of up to 115 baud can be transmitted by the HomeBase With no pins or contacts to break IrDA will work reliably for years The Dolphin 7200 HomeBase can be networked together for mass progr...

Страница 95: ... COMM LED Indicates the status of data transfer between the Host Device and the Dolphin Terminal as described below Comm LED Description Red LED Data is being sent from the Host Device to the Dolphin HomeBase Green LED Data is being sent from the Dolphin HomeBase to the Host Device Orange LED Data is being sent at high data rates Figure 9 Data Transfer States 3 Charging Aux Batt LED Indicates the ...

Страница 96: ...igure 10 Battery Charging States Back Panel There is an auxiliary battery well two configuration switches a discharge button and a power supply connector Auxiliary battery well Insert a battery into the well to charge a second battery and you will always have a spare The auxiliary battery well can also service your battery pack Aux Battery Well Configuration Switches Service Aux Batt Switch Power ...

Страница 97: ...ower supply provides 12V DC input for communications and battery charging Side Panels There is a main communications port on one side and a multi HomeBase port on the other side Main Communications Port Use a standard serial cable to connect this port to a host RS 232 device if the Dolphin HomeBase is the first unit of HomeBase network Otherwise the main communications port connects to another Dol...

Страница 98: ...y pack at full capacity You do not need to discharge the battery pack before recharging because this method protects the battery from damage caused by overcharging A dead battery will charge to full capacity in approximately three hours The Dolphin Terminal can be stored indefinitely in the HomeBase without damage to the terminal battery packs or the HomeBase Keep the HomeBase plugged in so that t...

Страница 99: ...eBase you can use the CHARGING AUXBATT LED to monitor the charging progress See Figure 10 for a summary of each charging state Deep cycling the Battery For maximum battery life Hand Held Products recommends that you deep cycle service the battery twice before initial use and then once a month thereafter To deep cycle insert the battery into the HomeBase auxiliary battery well Then push and hold th...

Страница 100: ...em or any standard RS 232 device using a standard serial cable and communications software Follow these steps to set up the Dolphin HomeBase and Dolphin Terminal for communications 1 Set up the Dolphin HomeBase 2 Set up the Dolphin Terminal 3 Follow the data transfer sequence as described by your application Setting up the Dolphin HomeBase Set the Dolphin HomeBase on any dry stable surface such as...

Страница 101: ...20 7 RTS 7 4 5 8 CTS 8 5 4 Figure 16 Pin Configuration With the Dolphin 7200 HomeBase use the appropriate cable to connect each device to the Main Comm Port for a single Dolphin HomeBase or to the Multi HomeBase Port if you are creating a Dolphin HomeBase network Connect the power supply to the Dolphin HomeBase Plug the AC transformer into the Dolphin HomeBase 12 Volt DC power supply connector The...

Страница 102: ...Dolphin HomeBase network is in this mode Go into Command Mode by entering an escape sequence that informs the HomeBase network that it will be receiving commands from the host device or application The escape string is ESC HHP where ESC is an ASCII 27 character The escape string should be surrounded by a 100 millisecond period of line silence When sending commands the escape string must precede th...

Страница 103: ...ixed at 57600 2 PROGRAM UP Baud rate can be programmed Figure 17 Configuration Switch Settings on HomeBase for Single HomeBase To ensure communications leave Switch 2 in the FIXED BPS position and configure your communications software for 57600 baud When Switch 2 is in the PROGRAM position the baud rate can be changed using the following procedure or you may use the HomeBase Configuration Utility...

Страница 104: ...g methods Align adjacent units so that the MULTI HOMEBASE PORT of one unit will mate with the MAIN COMM PORT of the next unit until all HomeBases in the network are connected OR Use a RS 232 cable to connect the Multi HomeBase Port on one terminal to the MAIN COMM PORT on the next terminal Repeat this step to include each additional terminal in the chain Connect the last terminal to the host compu...

Страница 105: ...d to Hex when sent to the Dolphin HomeBase For example typing the command from the keyboard ESC HHPCI1 would instruct the network to set up ID numbers for each Dolphin HomeBase starting with the ASCII number 1 The first unit in the network would actually receive the number 31 Hex since ASCII 1 is equal to 31 Hex as the starting ID number Each unit in the network would sequentially add one to this ...

Страница 106: ...ate for the network to 19200 No response will be transmitted back to the host after executing this function ASCII Value of n Selected Baud Rate ASCII Value of n Selected Baud Rate 0 38400 6 19200 1 38400 7 38400 2 1200 8 57600 3 2400 9 115200 5 9600 Figure 20 Baud Rate per Value of n Device Selection Use this command to enable the host device to select a specific Dolphin HomeBase in the network fo...

Страница 107: ...another unit in the network is selected For example the string ESC HHPS3 would select the unit with ID number 3 for communications That unit would then send back an ACK 3 A selected unit in the Dolphin HomeBase network will assert the DSR signal of the HomeBase when a Dolphin terminal is present The DSR signal can be used by the host application to determine if a Dolphin terminal is present and se...

Страница 108: ...ED does not light up make sure that it is properly seated in the terminal well and that the power supply is properly connected to the HomeBase and plugged into a functioning AC outlet 3 Start your application on the Dolphin terminal or the host computer Data can then begin transmitting between the terminal and the devices connected to the Dolphin HomeBase When data transfer begins the COMM LED on ...

Страница 109: ...109 109 109 109 Chapter 8 Using the Dolphin 7200 Compact HomeBase Summarizesthefeaturesof theDolphin7200CompactHomeBaseand explainshowtouseit ...

Страница 110: ...not need to be discharged before recharging because this method protects the battery from damage caused by overcharging The Dolphin 7200 Compact HomeBase provides power to the Dolphin terminal to enable the terminal to charge its battery IrDA Optical Communications The IR communications port on the Compact HomeBase connects with the IrDA port on the Dolphin Reliable data communications at speeds o...

Страница 111: ...charge the Dolphin s batteries LEDs There are two LEDs on the front panel of the HomeBase 1 DOCK LED Turns solid green when the Dolphin Terminal is properly seated into the Dolphin HomeBase 2 COMM LED Indicates the status of data transfer between the Host Device and the Dolphin Terminal as described below Comm LED Description Red LED Data is being sent from the Host Device to the Dolphin HomeBase ...

Страница 112: ...nications Port Use a standard serial cable to connect this port to a host RS 232 device Bottom Panel A Baud Rate DIP switch is located on the bottom of the HomeBase The three position DIP switch is used to select the communication baud rate Switch position and the corresponding baud rates are shown in the chart below Figure 17 HomeBase Back Panel Figure 18 HomeBase Bottom Panel Baud Rate Switch Po...

Страница 113: ...age to the terminal or the HomeBase Keep the HomeBase plugged in so that the Dolphin terminal s battery pack stays fully charged Charging A Dolphin Terminal The HomeBase supplies charging power to the Dolphin terminal so that the terminal can monitor the charging of its battery pack This charging method protects the battery from being damaged by overcharging Therefore the Dolphin terminal may be s...

Страница 114: ...le service the battery twice before initial use and then once a month thereafter Since the Dolphin 7200 Compact HomeBase does not have deep cycling capabilities it is recommended that you use the Dolphin 7200 Multicharger or the Dolphin 7200 HomeBase The deep cycling process using the Multicharger takes approximately 9 5 hours For more information see the Dolphin 7200 Multicharger User s Guide Fig...

Страница 115: ...be desk or wall mounted for convenience and storage Desk Mounting The Compact HomeBase has a DIN rail 7 5 X 35 mm slot on the bottom to allow for secure desk attachment of the unit if desired see figure 21 Figure 21 Wall Mounting The Compact HomeBase also has two DIN rail 7 5 X 35mm slots on the back to allow for secure wall mounting of the unit if desired see figure 22 Figure 22 ...

Страница 116: ...onnector cables it is recommended that the rails be mounted to the wall using a 25mm 1 in spacer to allow for appropriate strain relief of the cables see figure 23 In either case after wall mounting it is recommended that the cables be secured to the DIN rail through use of a wire tie to prevent damage to the Compact HomeBase unit in case accidental or excessive force is applied to the cables see ...

Страница 117: ... described by your application Setting up the Dolphin Compact HomeBase Set the Dolphin Compact HomeBase on any dry stable surface such as a desktop Before mounting the Compact HomeBase check to ensure that all AC wall transformers have a nearby electrical outlet Be sure to provide enough workspace with good lighting for the user to view and operate the Dolphin Terminal while it is in the HomeBase ...

Страница 118: ...5 7 7 4 DTR 4 20 6 6 DSR 6 6 20 7 RTS 7 4 5 8 CTS 8 5 4 Figure 16 Pin Configuration With the Dolphin 7200 Compact HomeBase connect each device to the RS 232 Communications Port on the back of the HomeBase The Compact HomeBase cannot be networked Connect the power supply to the Compact HomeBase Plug the AC transformer into the Dolphin HomeBase 12 Volt DC power supply connector The AC wall transform...

Страница 119: ...on or the LED does not light up make sure that it is properly seated in the terminal well and that the power supply is properly connected to the HomeBase and plugged into a functioning AC outlet 3 Start your application on the Dolphin terminal or the host computer Data can then begin transmitting between the terminal and the devices connected to the Dolphin HomeBase When data transfer begins the C...

Страница 120: ...120 120 120 120 Chapter 9 Learning About the Dolphin OS and Development System Software ExplainshowtouseandmanagethesoftwareaccompanyingtheDolphin 7200terminal ...

Страница 121: ...ith a set of diskettes containing the Dolphin OS and Development System The Dolphin OS and Development System includes the following Dolphin Development Tools and Libraries API Sample Programs with source code Dolphin Utilities including Communication and Upgrade Wizard Electronic Help Boot Loader ROM Image Installation The Dolphin OS and Development System installs easily using a standard Windows...

Страница 122: ... Dolphin Upgrade Wizard c dolphin hhpdemo HHP Dolphin Batch Demo Program c dolphin romimage Backup of Dolphin ROM Image c dolphin utils Dolphin Utilities YX EXE DCOMM EXE BMP2LCD EXE c dolphin devtools samples rfdemo server Host Server application c dolphin devtools samples rfdemo client Client application for Dolphin RF Note All future references to directories assume that the user has accepted t...

Страница 123: ...on provides information on contacting HHP by Phone Fax Email WWW and BBS The OS and Development System Icon provides additional information on the Dolphin OS and Development System The Development Library Help file provides information on the Dolphin API and Sample applications Electronic Users Guide for the Dolphin terminal A Windows drag and drop communication utility supporting Xmodem and Ymode...

Страница 124: ...mo copy all the files located in the c dolphin hhpdemo directory to your Dolphin terminal s C drive or run the Dolphin Upgrade Wizard Main Menu The HHP Demo Program is loaded automatically when the Dolphin terminal is turned on To turn the Dolphin terminal on press the ON SCAN key When you first turn the Dolphin terminal on an HHP logo and a dolphin graphic are displayed Press any key and the foll...

Страница 125: ...ed on the Dolphin OS and Development System disk HHP Scan Demo Screen F2 Help Menu Press F2 to access the Help Menu The Help Menu contains information about the Dolphin terminal Specifications and contacting Hand Held Products HHP Help Menu HHP SCAN TEST Press F1 for Setup Esc to quit Label Type Dolphin Help Menu A General B Battery Maint C Contacting HHP D Specifications H Using Help ESC Exit ...

Страница 126: ... scan data If the item number is found the item description is displayed If the item number is not found the program will ask the user if the item should be added The date is automatically entered F1 Enter Data Screen F2 Transfer Data Press F2 to transfer the collected data to a desktop computer The data is transferred using standard Xmodem protocol F3 Receive Lookup Press F3 to initiate Xmodem re...

Страница 127: ...tem PC via the Ymodem protocol at 57600 baud rate Press F2 to Receive File sent from a host system via the Ymodem protocol at 57600 baud rate F2 System Menu Gives version of operating system serial number of your Dolphin and access to miscellaneous utilities F3 DOS Prompt Press F3 to exit the HHP demo and return to the DOS prompt F4 RF Menu For Dolphin RF only Press F4 to access the RF menu Press ...

Страница 128: ...inal approximately 2 inches away from the sample barcode Press the ON SCAN key to begin scanning Move the Dolphin terminal back and forward until the unit gets a good read The Dolphin terminal will beep and the laser will turn off when a good read is obtained The decode LED will turn green The Dolphin terminal will show a translation of the sample barcode on the LCD window which should appear simi...

Страница 129: ...olphin s Boot Loader The Boot Loader is an Xmodem communications utility used by the Dolphin OS to load or update the BIOS and Operating System ROM image To load or reload the Dolphin s Boot Loader 1 Transfer BURN EXE and BOOTLDR BIN to the Dolphin s FLASH Drive C 2 Execute BURN EXE The OS Boot Loader is updated and the files BURN EXE and BOOTLDR BIN are deleted N O T E See the Development API ele...

Страница 130: ...ename to transfer supports multiple file names and wildcards dat Example dcomm c1 b57600 y filename dat If you do not specify command line arguments DCOMM EXE will open a dialog that allows you to receive files or configure the default serial communications port baud rate communications protocol and download path An Auto Execute command line can also be specified in the configuration screen The sp...

Страница 131: ...e the baud rate setting for the Dolphin HomeBase HBCFG EXE supports the following command line arguments Usage hbcfg c I b Where c Specifies COM port where 1 4 b Specifies Baud Rate where 9600 19200 38400 or 57600 I Forces HBCFG EXE to display Please wait Dialog Example hbcfg c1 b57600 I If no command line arguments are specified or an error is detected HBCFG EXE will open a dialog that allows the...

Страница 132: ...load the Dolphin terminal s ROM Image LOADER EXE supports the following command line arguments Usage loader filename p b Where filename refers to file name to load p Specifies new COM port 1 2 b Specifies new BAUD rate 300 38400 Example LOADER C DOLPHIN BIOS ROM262 BIN p1 b57600 STL EXE STL EXE is a DOS command line utility for Dolphin that turns the 9th line status indicators on or off Usage STL ...

Страница 133: ...b57600 autoexec bat yx yx m yx c2 The default baud rate for the YX EXE utility is 57600 For your convenience batch files are included on the Dolphin terminal to make sending data at a higher baud rate easier To send at 38400 enter YF instead of YX b38400 To send at 57600 enter YFF instead of YX b57600 ZZZ EXE ZZZ EXE is a DOS command line utility for Dolphin that places the terminal into sleep mod...

Страница 134: ...ically loaded when the terminal boots Dolphin Application Development Compiling Applications for the Dolphin Dolphin application development is straightforward Since Dolphin is DOS compatible most of the application can be tested on a desktop computer Although Dolphin is DOS compatible it provides many unique features that are not built into most PCs For example it has an integrated bar code scann...

Страница 135: ...nning SIO Performs serial I O Displays characters received and sends key strokes SOUND Runs through the frequency range of the Dolphin s speaker NI Sample programs for the Numeric Dolphin This sample is located in the C DOLPHIN DEVTOOLS NUMERIC BORLAND or C DOLPHIN DEVTOOLS NUMERIC MSVC EVSDEMO Demonstrates graphics changing fonts turning the status line on and off adding new icons to the status l...

Страница 136: ... to the memory model Click the Add button The Include Files Path must be modified so the compiler will search for include files in c dolphin devtools include Borland For an application to use Dolphin s unique features you must add a Dolphin library must be added to the application s project There are five libraries are located in c dolphin devtools lib orland directory They are named dolphinx lib ...

Страница 137: ...name com port Where filename refers to file name to send if not specified YX will receive a file b Specifies new BAUD rate 300 57600 m Run YX in menu driven mode c Specifies COM ports 1 9 Examples yx b57600 autoexec bat yx yx m yx c2 The default baud rate for the YX EXE utility is 57600 For your convenience batch files are included on the Dolphin terminal to make sending data at a higher baud rate...

Страница 138: ...s of the file transfer on the Dolphin screen and Dolphin File Transfer program window Sending a File From Dolphin to Your PC 1 Double click on the Dolphin File Transfer shortcut to open the program 2 Open the Configuration dialog box Check to make ensure the baud rate is set at 57600 3 At the Dolphin s C prompt enter YX Filename 4 Click on the Receive File button 5 Press ENTER on the Dolphin termi...

Страница 139: ... the default for YX EXE 2 Enter YX M at the Dolphin terminal s DOS prompt 3 Press ENTER and the menu below will appear on your Dolphin terminal s screen 4 In Windows Explorer select the file to be transferred and while holding down the left mouse button drag and drop the file on the Dolphin File Transfer shortcut on the desktop This opens the Dolphin File Transfer program 5 Press F2 to begin the f...

Страница 140: ...primary interface between an application and BIOS graphics functions The EVS engine consists of three basic parts 1 A TSR EVS EXE that traps standard video BIOS INT 10H calls and overlays hardware specific support for the Dolphin LCD 2 A set of API routines that allow easy access to the EVS specific routines These functions have been merged into the standard Dolphin Development API and are documen...

Страница 141: ...C H A P T E R 9 D O L P H I N O S A N D D E V E L O P M E N T S Y S T E M 141 141 141 141 ...

Страница 142: ...d that allows the developer to upgrade or reload the ROM IMAGE Follow these steps to manually reload the ROM IMAGE and Operating System from DOS 1 Verify that Configuration Switch 2 on the back of the Dolphin HomeBase is set to Fixed BPS and Switch 1 is set to Single Power must be turned off and then on to accept the new dip switch settings 2 Make sure the serial cable is properly installed and po...

Страница 143: ...ded with the Dolphin OS and Development System just in case The Boot Loader image is installed in the c dolphin BooTLDR directory on your PC To load or reload Dolphin s Boot Loader 1 Transfer BURN EXE and BOOTLDR BIN to Dolphin s FLASH Drive C 2 Execute BURN EXE The OS Boot Loader is updated and the files BURN EXE and BOOTLDR BIN are deleted W A R N I N G Only install the most recent release of th...

Страница 144: ...4 144 144 Chapter 10 Troubleshooting and Warranty Information Dolphin 7200 Terminal Describestroubleshootingtips solutionsforproblemsyoumayencounterwiththe Dolphin7200terminalorHomeBaseandwarrantyinformation ...

Страница 145: ... or Dolphin HomeBase If you need further assistance with troubleshooting your terminal contact your HHP Authorized Reseller If You Have This Problem Symptom Try This The display is blank the Dolphin terminal will not turn on Is the battery is low Recharge or replace it with a known good battery Reset the Dolphin terminal When booting up the Dolphin I see the message CMOS MEM size wrong for a secon...

Страница 146: ...be required To increase the run time of the Dolphin terminal try to limit the use of the speaker scan engine and backlight The Dolphin terminal is not communicating with the host computer Make sure the HomeBase is connected to a power source Make sure the Dolphin terminal is inserted properly into the HomeBase The CHARGING MAINBATT LED should be solid green If not remove the Dolphin terminal and r...

Страница 147: ...aced Insert a new battery pack into the Dolphin HomeBase s auxiliary battery well The CHARGING MAIN BATT LED is on but the Dolphin terminal will not communicate Check the cable connections to other devices If you are connecting to another DCE device be sure you re using a null modem cable Try a previously tested cable if you suspect a bad cable Check your communications program in both the Dolphin...

Страница 148: ... 148 148 148 Troubleshooting with Dolphin 7200 with Image Capture If You Have This Problem Symptom Try This Image not readable or too dark Black White Image Grayscale Image Move to an area with more light to take image Image not readable distorted Black White Image Grayscale Image Hold Dolphin with Image Capture terminal at 90 degree angle ...

Страница 149: ...149 149 If You Have This Problem Symptom Try This Image not readable cut off Black and White Image Grayscale Image You are holding terminal too close to subject Hold the terminal at a 90 degree angle and move it further away from the subject Image not readable dirty lens Black and White Image Grayscale Image Wipe lens with clean lint free cloth ...

Страница 150: ...m Symptom Try This Image not readable too small Black and White Image Grayscale Image You are holding the terminal too far away from the subject Hold the terminal at a 90 degree angle and move it closer to the subject Image not readable due to reflection Black and White Image Grayscale Image Adjust the angle at which you are holding the Dolphin terminal to avoid a reflection ...

Страница 151: ...at the same time 2 Press the Reset Switch The reset switch is located in the battery compartment of the Dolphin terminal Use the tip of an unfolded paper clip or other similar blunt object to gently press the reset switch Note The recess hole for the reset switch may be covered with a small plastic cover This cover must be removed and placed back in position after accessing the reset switch 3 Remo...

Страница 152: ...year Dolphin 7200 Batch 2 D 2 years Standard HomeBase 1 year Compact HomeBase 1 year What s Covered By The Warranty This warranty covers the Dolphin terminal and HomeBase and warrants them to be free from defects in materials and workmanship under normal use and service for a period of one year two years for 2 D terminal from date of purchase by the first end user THIS LIMITED WARRANTY IS IN LIEU ...

Страница 153: ...orized Hand Held Products Reseller contact the Reseller with the unit s serial number Your Reseller will contact Hand Held on your behalf to arrange for the unit to be serviced If you purchased the product directly from Hand Held or have been instructed by your Reseller to contact Hand Held directly call the Customer Services Department in your area to request a Repair Maintenance Authorization RM...

Страница 154: ...a Asia Pacific Rim Hand Held Products Product Service Department 7510 East Independence Blvd 100 Charlotte NC 28227 9411 RMA Number __________________________ Europe Middle East and Africa HHP Product Service Department Hondsruglaan 87D 5628 DB Eindhoven The Netherlands The United Kingdom HHP Product Service Department 1st Floor Dallam Court Dallam Lane Warrington Cheshire WA2 7LT United Kingdom I...

Страница 155: ...riety of extended service plans on our hardware products These agreements offer continued coverage for your equipment after the initial warranty expires For more information contact HHP or your Authorized Reseller Technical Support If you have a question or problem with your Dolphin terminal or Dolphin HomeBase you can get technical assistance from Hand Held s Technical Support department Technica...

Страница 156: ...Depth at handle 1 62 in 4 cm Depth at front 1 83 in 5 cm Length 6 85 in without antenna 17 cm Width 2 63 in 7 cm Depth at handle 1 62 in 4 cm Depth at front 2 25 in 5 cm Length 6 85 in 174 mm Width 2 63 in 7 cm Depth at handle 1 62 in 41 mm Depth at front 2 25 in 5 cm Length 7 1 in Width 2 63 in 7 cm Depth at handle 1 62 in 4 cm Depth at front 1 83 in 5 cm Length 6 85 in 17 cm Width 2 63 in 7 cm D...

Страница 157: ...ines of 20 characters per line 119 x 73 graphics pixels Alpha Numeric scrollable Application software controllable pixel graphics 6 x 8 pixel matrix Electroluminescent Backlight Same Same Same Same Keypad Alphanumeric keypad 36 keys Numeric keyboard 20 keys with shifted alpha keys Alphanumeric keypad 36 keys Numeric keyboard 20 keys with shifted alpha keys Terminal emulation keypad overlays for IB...

Страница 158: ... application software controllable speaker emits sound level of 80 dB at 10 cm External application software controllable speaker emits sound level of 90 dB at 10 cm Same as Dolphin 7200 RF Same as Dolphin 7200 Same as Dolphin 7200 RF Power Specifications Primary Rechargeable 3 6V 3 cell battery pack 1 500 mAh Length 2 2 in 5 6 cm Width 1 8 in 4 6 cm Depth 0 8 2 cm Same Same Same Same Backup Inter...

Страница 159: ... 2D Processing Specifications CPU AMD ELAN SC310 386SX microprocessor Same Same Same Same Memory 2 MB RAM with 2 MB non volatile FLASH memory expandable to 4 6 or 10 MB 2 MB RAM with 2 MB non volatile FLASH memory or 2 MB RAM with 8 MB non volatile FLASH memory No expansion FLASH with radio Same as Dolphin 7200 Same as Dolphin 7200 2 MB RAM with 2 MB non volatile FLASH memory expandable to 8 MB no...

Страница 160: ...ndard x86 development tools Microsoft C C libraries provided for non PC standard functions scan engine support communication power management Same Same Same GS DOS architecture programmable with standard x86 development tools Microsoft C C libraries provided for non PC standard functions image engine support communication power management Environmental Specifications Operating Temperature 10 to 50...

Страница 161: ...cations Structural Integrity Survives multiple 5 ft 1 5 m drops to concrete Independently certified to meet IP 64 standards for moisture particle resistance Same Same Same Same Electrical Static Discharge 15KV Same Same Same Same Fire Retardant Rating UL 94 VO Same Same Same Same 2 4 GHz Specifications WLIF 802 11b Radio Integrated WLIF OpenAIR Integrated Cisco 802 11b Frequency 2 4 to 2 4835 GHz ...

Страница 162: ...with iButton Reader Dolphin 7200 2D 2 4 Ghz Specifications con t WLIF 802 11b Data Rate 1 6 Mbps per channel in high speed mode 800 Kbps in back off mode 1 2 5 5 and 11 Mbps Modulation 4FSK BFSK in back off mode DBPSK at 1 Mbps DQPSK at 2Mbps CCK at 5 5 and 11 Mbps Typical Range 500 ft 150 m in offices 1000 ft 300 m in open spaces 1500 ft 460 m open environme nt 300 ft 90 m office ...

Страница 163: ...ton Reader Dolphin 7200 2D 2 4 Ghz Specifications con t WLIF 802 11b Technology Frequency Hopping Spread Spectrum Direct Sequence Spread Spectrum Channels 15 independent 3 non overlapping Network Information WLIF 802 11b Drivers ODI supports major network operating systems NDIS2 NDIS3 NDIS4 NDIS5 ODI and Packet Media Access Protocol Optimized CSMA CA Same Software Standard TCP IP Stack Same ...

Страница 164: ...ndard scan engine Symbol SE 1200 I000A scans 2 36 5 91cm Same Same Same Optional scan engines Symbol SE1200LR scans 15 ft 4 6 m with reflective labels Symbol SE 1200VHD scans bar codes 2 mil Symbol SE 1200HV improved aiming beam visibility in high ambient light No Scan Engine available with no scan engine Same Same Same Bar code symbol types Code 3 of 9 Interleaved 2 of 5 EAN Codabar Code 128 Ples...

Страница 165: ... 2kbps Product Dolphin 7200 Dolphin 7200 RF Dolphin 7200 with Image Capture Dolphin 7200 with iButton Reader Dolphin 7200 2D Digital Camera CMOS Camera CMOS Sensor 320 x 240 Pixel 3 to 12 in 15 to 30 5 cm operating range 256 level gray scale image Operates in range of light from outdoors to total darkness CMOS Sensor 640 x 480 Pixel 2 to 9 in 5 to 23 cm operating range 256 level gray scale image O...

Страница 166: ...200 with iButton Reader Dolphin 7200 2D 4250 Image Engine Image Engine Options Standard scans 2 to 9 in 5 to 23cm High Density scans 2 to 4 in 5 to 12cm Bar code and Auto ID symbol types 1D linear codes Code 3 of 9 Interleaved 2 of 5 Code 11 IATA 2 of 5 MSI UPC A UPC EO UPC EI EAN EAN13 Codabar Code 128 Code 93 2D codes PDF417 microPDF Maxicode Datamatrix Aztec QR Code Code 49 ...

Страница 167: ...mage Capture Dolphin 7200 with iButton Reader Dolphin 7200 2D 4250 Image Engine Image Engine Options continued Composite codes RSS 14 CODABLOCK AZTEC MESA OCR codes Optical Character Recognition OCR A and OCR B Postal Codes Postnet and most international 4 state codes PLANET CODE BPO 4 STATE CANADIAN 4 STATE DUTCH POSTAL AUSTRALIAN 4 STATE JAPANESE POSTAL ...

Страница 168: ...les With the HHP Demo program the Dolphin terminal is programmed to read these codes Practice scanning each of the bar codes and notice the LCD window after you scan each code Code 39 Code 3 of 9 EAN UPC variation UPC Interleave 2 of 5 I2of5 ...

Страница 169: ...OS HELP BREAK CALL CD CHDIR CLS COPY CTTY DATE DEL ERASE DELAY DIR ECHO EXIT FOR GOTO IFMD MKDIR PATH PAUSE PROMPT RD RMDIR REM REBOOT REN SHIFT SET SWITCH SYNC TIME TRUENAME TYPE VER VERIFY VOL The following section describe the internal GS DOS commands in detail Warning The command line functions are intended for developers only Some commands may produce undesirable results or may not function a...

Страница 170: ...L command executes a pre recorded list of commands as a subroutine Syntax Call d pathname parameter1 parameter2 CD CHDIR The CD command displays the current directory of the specified drive or can change the current directory of the specified drive If no drive is specified then the default drive is used Syntax CD drive pathname CLS The CLS command clears the terminal s screen and resets the cursor...

Страница 171: ... If the specified path is a directory all files in that directory will be deleted If the path contains wildcards then all files that match the wildcard specification will be deleted Syntax DEL drive pathname DELAY The DELAY command delays a batch file for a specified amount of time Syntax DELAY seconds DIR The DIR command displays the files and sub directories in a directory on the specified drive...

Страница 172: ...iately following the word ECHO no intervening space causes a blank line to be echoed Syntax ECHO ONlOFFlstring EXIT The EXIT command terminates the current command shell and reverts control to the previous shell provided that the current command shell is not the first one loaded in the system The very first shell cannot be terminated with EXIT If executed from a batch file EXIT will terminate the ...

Страница 173: ...rent path is displayed If a pathlist parameter is specified then the path will be changed to the one specified Syntax PATH pathl path2 path3 PAUSE The PAUSE command is typically used in batch files to suspend execution of the batch file print a message on the screen and wait for the user to press a key after some action has been performed PAUSE displays the following message on the screen before a...

Страница 174: ...e form comment in a batch file The line starting with REM has no effect on the execution of the batch file Syntax REM any comment REBOOT The REBOOT command will reset the terminal Syntax REBOOT REN The REN command renames a file or group of files Files cannot be moved in the directory structure with this command instead only their filenames are altered within the directory in which they reside Wil...

Страница 175: ...ET command simply displays all of the environment variables in the environment space If a variable name and an equal sign is given but no string is specified then the variable name is removed from the environment space If the string is specified then the previous definition of the variable is deleted and the new one is installed in the environment Syntax SET keyword string SHIFT Displays or change...

Страница 176: ...he new system time If the user just presses the ENTER key the system time is not changed If the user enters a new time then the system s real time clock is updated Syntax TIME hh mm ss hh TRUENAME The TRUENAME command displays the true name and path of a file Syntax TRUENAME file TYPE The TYPE command copies the contents of the specified file to standard output usually the screen If the drive lett...

Страница 177: ... driver cache If VERIFY is OFF then GS DOS caches writes to files and defers the actual writing to disk enabling multiple writes to the same sectors to be served much faster The cache is automatically written to disk in the background during dead time when the disk is not busy This is accomplished with the multitasking threads and semaphores that the GS DOS kernel supports Syntax VERIFY ONIOFF VOL...

Страница 178: ...e numbers ITE Emissions EN 55022 Generic Immunity for Res Comm Lt Ind EN 50082 1 Electrostatic Discharge Immunity IEC 1000 4 2 Radiated EMI Field Immunity IEC 801 3 IEC 1000 4 3 Fast Transient Burst Immunity IEC 1000 4 4 5 Test report Name number ITE Emissions 45889 Generic Immunity for Res Comm Lt Industrial 45889 Electrostatic Discharge Immunity 45889 Radiated EMI Field Immunity IEC 801 3 45889 ...

Страница 179: ... product is in conformity to all the essential requirements of Directive 1999 5 EC The conformity assessment procedure referred to in Article 10 5 and detailed in Annex IV of Directive 1999 5 EC has been followed with the involvement of the following Notified Body ies BABT Claremont House 34 Molesey Road Walton on Thames KT12 4RQ name and address of Notified Body Identification mark 0168 The equip...

Страница 180: ...ngary 1705 2 99 Greece CEPT RLAN GR YME TA 164 Ireland IRL TRA 24 5 242 1 Spain E D G Tel 08 99 0221 France 980321PPO 3 Declaration We mentioned at point 2 declare on our own full responsibility that the product mentioned at point 1 complies with the directive 89 336 EEC and 73 23 EEC as amended by 93 68 EEC This based upon testing of a sample of the product mentioned at point 1 performed by the t...

Страница 181: ...181 181 181 181 ...

Отзывы: