background image

 
ITX-D255R Mini-ITX Mother Board Manual 

14 / 31


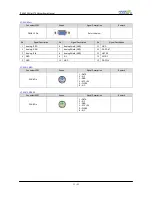
2.6.9 Parallel Port Connector (JLPT) 

Connector SPEC 

Shape 

Signal Description 

Remark


26-Pin 2.0 Pitch 

Refer to below 


No 

Signal Description 

No

Signal Description


1 STB# 

14

AFD# 

2 SPD0 

15

ERROR# 

3 SPD1 

16

PINIT# 

4 SPD2 

17

SLIN# 

5 SPD3 

18

GND 

6 SPD4 

19

GND 

7 SPD5 

20

GND 

8 SPD6 

21

GND 

9 SPD7 

22

GND 

10 ACK# 

23

GND 

11 BUSY 

24

GND 

12 PE 

25

GND 

13 SLCT 


NOTE] This is an interface for print port cable that allows convenient connection of printer devices. 


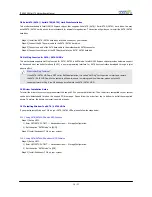
2.6.10 COM Port Connector (COM4/5/6) 

Connector SPEC 

Shape 

Signal Description 

Remark


10-Pin 2.0 Pitch 


Refer to below 


No 

Signal Description 

No

Signal Description


COM Port Power (5V or 12V) 

2

N.C 

3 RTS 

4

CTS 

5 GND 

6

DSR 

7 TXD 

8

DTR 

9 DCD 

10

RXD 

NOTE] COM port headers support the serial port modules. 


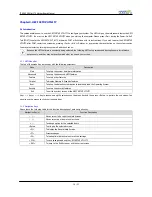
2.6.11 Internal AMP Speaker Connector 

Connector SPEC 

Shape 

Signal Description 

Remark


4-Pin 2.5 Pitch 


1 : AMP L (+) 
2 : AMP L (-) 
3 : AMP R (+) 
4 : AMP R (-) 


Содержание ITX-D255R

Страница 1: ...ITX D255R Mini ITX Mother Board Manual 1 31 Mini ITX Mother Board ITX D255R User Manual Version 1 0 Published Feb 2014 Copyright 2014 Hanasis Ruide All rights reserved ...

Страница 2: ...ding but not limited to the implied warranties or conditions of merchantability or fitness for a particular purpose In no event shall Hanasis Ruide its directors officers employees or agents be liable for any indirect special incidental or consequential damages including damages for loss of profits loss of business loss of data interruption of business and the like even if Hanasis Ruide has been a...

Страница 3: ...r Setup 10 2 6 Onboard Header and Connectors 11 2 7 I O Connectors 16 2 8 SerialATA SATA SerialATA2 SATA2 Hard Disks Installation 18 2 9 Hot Plug Function for SATA SATA2 HDDs 18 2 10 Driver Installation Guide 18 2 11 installing Window7 on SATA SATA2 18 3 Chapter3 UEFI SETUP UTILITY 19 3 1 Introduction 19 3 2 Main Screen 20 3 3 Advanced Screen 20 3 4 Feature Screen 27 3 5 Chipset Screen 28 3 6 Boot...

Страница 4: ... be updated the content of this manual will be subject to change without notice In case any modifications of this manual occur the updated version will be available on Hanasis Ruide website without further notice If you require technical support related to this motherboard please visit our website for specific information about the model Safety rules 1 Please read this manual before use the mother...

Страница 5: ...resolution 1366x768 Dual Channel 24bits up to 1920 x 1200 Multi Display Yes Ethernet Interface 10 100 1000 Mbps Controller GbE LAN 2 x Realtek RTL8111E VL Connector RJ 45 x 2 SATA Data Trans Rate SATA2 3 0Gb S Rear I O VGA D SUB15 x 1 Ethernet 2 EA USB 4 EA USB 2 0 compliant Audio 2 EA Mic In Line Out Serial COM 1 EA RS 232 422 485 2 EA RS232 PS 2 2 EA On Board Connector USB 4 EA USB 2 0 compliant...

Страница 6: ...ITX D255R Mini ITX Mother Board Manual 6 31 1 2 System Block Diagram ...

Страница 7: ...Connector 6 FAN System Connector 16 Front Panel Connector 7 ATX 12V Power 17 DIO AMP Box Header Connector 8 DDR 3 SO DIMM Memory Socket 18 USB5 6 USB7 8 Connector 9 SATA Power Connector 19 miniPCIe mSATA Socket 10 SATA 2 Connector 20 AMP Internal Speaker Connector 2 LVDS 1 VGA Header 3 Panel Power Jumper 4 Inverter B L 5 FAN CPU 6 FAN SYS 7 ATX 12V Power 8 DDR 3 RAM Socket 9 SATA Power 10 SATA 11 ...

Страница 8: ...B9P Port 6 AUDIO LINE OUT JACK Green 12 PS 2 KBD Port DIN 6P Purple 1 4 1 LAN Port LED Indications There are two LED next to the LAN port Please refer to the table below for the LAN port LED indications Activity Link LED SPEED LED LAN JACK Status Description Status Description Off No Link Off 10Mbps Connection Blinking Data Activity Orange 100Mbps Connection On Link Green 1Gbps Connection 1 PS 2 M...

Страница 9: ...enever you uninstall any component place it on a grounded antistatic pad or in the bag that comes with the component Before you install or remove any component ensure that the power is switched off or the power cord is detached from the power supply Failure to do so may cause severe damage to the motherboard peripherals and or components 2 3 Installation of Memory Modules SO DIMM ITX D255R motherb...

Страница 10: ...hose pin1 and pin2 are Short when jumper cap is placed on these 2 pins 2 5 1 Clear CMOS Jumper JCMOS Connector SPEC Shape Jumper Description Remark 3 Pin 2 54 Pitch 1 2 Normal 2 3 Clear CMOS Default is Normal NOTE JCMOS allows you to clear the data in CMOS To clear and reset the system parameters to default setup please turn off the computer and unplug the power cord from the power supply After wa...

Страница 11: ...12V 3 12V 4 12V 5 12V 6 GND 7 VCC 3 3V 8 GND 9 LVDS Panel PWR 10 LVDS Panel PWR 11 DDC CLK 12 DDC DAT 13 Back Light Adjust 14 LVDS Power Enable 15 Back Light Enable 16 GND 17 LVDS 1 D0 18 LVDS 1 D0 19 LVDS 1 D1 20 LVDS 1 D1 21 LVDS 1 D2 22 LVDS 1 D2 23 LVDS 1 CLK 24 LVDS 1 CLK 25 LVDS 1 D3 26 LVDS 1 D3 27 GND 28 GND 29 LVDS 2 D0 30 LVDS 2 D0 31 LVDS 2 D1 32 LVDS 2 D1 33 LVDS 2 D2 34 LVDS 2 D2 35 L...

Страница 12: ... SYS FAN Connector SPEC Shape Signal Description Remark 3 Pin 2 5 Pitch 1 GND 2 12V 3 FAN Speed Sense NOTE Please connect the CPU fan cable to the connector and match the black wire to the ground pin 2 6 5 ATX 12V Power Connector ATX12V Connector SPEC Shape Signal Description Remark 4 Pin 4 5 Pitch 1 12V 2 12V 3 GND 4 GND NOTE Please connect a power supply to this connector 2 6 6 SATA Power Connec...

Страница 13: ...RSTBTN Reset Button Switch Connect to the reset switch on the chassis front panel Press the reset switch to restart the computer if the computer freezes and fails to perform a normal restart PWRLED System Power LED Connect to the power status indicator on the chassis front panel The LED is on when the system is operating The LED keeps blinking when the sys tem is in S1 S3 sleep state The LED is of...

Страница 14: ... 24 GND 12 PE 25 GND 13 SLCT NOTE This is an interface for print port cable that allows convenient connection of printer devices 2 6 10 COM Port Connector COM4 5 6 Connector SPEC Shape Signal Description Remark 10 Pin 2 0 Pitch Refer to below No Signal Description No Signal Description 1 COM Port Power 5V or 12V 2 N C 3 RTS 4 CTS 5 GND 6 DSR 7 TXD 8 DTR 9 DCD 10 RXD NOTE COM port headers support t...

Страница 15: ... Signal Description Remark 9 Pin 2 54 Pitch Refer to below No Signal Description No Signal Description 1 VUSB 5 0V 2 VUSB 5 0V 3 USB DM 4 USB DM 5 USB DP 6 USB DP 7 GND 8 GND 9 N C 10 NOTE Besides four default USB 2 0 ports on the I O panel there are two USB 2 0 headers on this motherboard Each USB 2 0 header can support two USB 2 0 ports 2 6 15 VGA Connector Connector SPEC Shape Signal Descriptio...

Страница 16: ...M 1 port support 3 types interface RS 232 RS 422 RS 485 The Interface is changed by BIOS 2 7 2 COM 2 COM 3 Port Connector SPEC Shape Signal Description Remark DSUB 9Pin Refer to below No Signal Description No Signal Description 1 DCD 6 DSR 2 RXD 7 RTS 3 TXD 8 CTS 4 DTR 9 COM Power 5V or 12V 5 GND 10 NOTE COM Power Voltage is selected by BIOS 2 7 3 LAN Port Connector SPEC Shape Signal Description R...

Страница 17: ... 1 Analog RED 6 Analog Shield GND 11 GND 2 Analog GRN 7 Analog Shield GND 12 DDC DAT 3 Analog BLU 8 Analog Shield GND 13 HSYNC 4 GND 9 N C 14 VSYNC 5 GND 10 GND 15 DDC CLK 2 7 5 PS 2 KBD Connector SPEC Shape Signal Description Remark DIN 6 Pin 1 DATA 2 N C 3 GND 4 VCC 5V 5 CLOCK 6 N C 2 7 6 PS 2 MOUSE Connector SPEC Shape Signal Description Remark DIN 6 Pin 1 DATA 2 N C 3 GND 4 VCC 5V 5 CLOCK 6 N ...

Страница 18: ... the SATA SATA2 HDDs are NOT set for RAID configuration it is called Hot Plug for the action to insert and remove the SATA SATA2 HDDs while the system is still power on and in working condition However please note that it cannot perform Hot Plug if the OS has been installed into the SATA SATA2 HDD 2 10 Driver Installation Guide To install the drivers to your system please insert the support CD to ...

Страница 19: ...enu bar with the following selections Menu Description Main To set up the system time date information Advanced To set up the advanced UEFI features Feature To set up other features Chipset To display Memory Graphics features Boot To set up the default system device to locate and load the Operating System Security To set up the security features Exit To exit the current screen or the UEFI SETUP UT...

Страница 20: ...erview 3 3 Advanced Screen In this section you may set the configurations for the following items PCI Subsystem Settings ACPI Settings CPU Configuration IDE Configuration Info Report Configuration USB Configuration IT8786 Super IO Configuration IT8786 HW Monitor PPM Configuration Setting wrong values in this section may cause the system to malfunction ...

Страница 21: ... Enable Hibernation Use this to enable or disable system ability to hibernate OS S4 Sleep State This option may be not effective with some OS 3 3 2 2 ACPI Sleep State Use this to select the highest ACPI sleep state The system will enter when the SUSPEND button is pressed The default value is Enabled 3 3 2 3 Lock Legacy Resources Use this to enable disable Lock of Legacy Resources The default value...

Страница 22: ...system This functionality allows the processor to classify areas in memory by where application code can execute and where it cannot When a malicious worm attempts to insert code in the buffer the processor disables code execution preventing damage or worm propagation 3 3 3 3 Limit CPUID Maximum The Max CPUID Value Limit BIOS feature allows you to circumvent problems with older operating systems t...

Страница 23: ...e the SATA 3 3 4 2 Configuration SATA as Use this to select SATA2 mode Configuration options IDE Mode AHCI Mode The default value is IDE Mode AHCI Advanced Host Controller Interface supports NCQ and other new features that will improve SATA disk performance but IDE mode does not have these advantages 3 3 5 Info Report Configuration ...

Страница 24: ...and UEFI setup when Disabled is selected If you have USB compatibility issue it is recommended to select Disabled to enter OS 3 3 6 2 EHCI Hand Off This is a workaround for OS without EHCI Hand Off support The EHCI ownership change should be claimed by EHCI driver 3 3 6 3 USB Transfer Time out This is a time out value for Control Bulk and interrupt transfers 3 3 6 4 Device Reset Time out This is a...

Страница 25: ...OM2 COM2 support the serial port voltage to 5V or 12V by BIOS 3 3 7 3 Serial Port3 Configuration Use this to set parameters of COM3 COM3 support the serial port voltage to 5V or 12V by BIOS 3 3 7 4 Serial Port4 Configuration Use this to set parameters of COM4 3 3 7 5 Serial Port5 Configuration Use this to set parameters of COM5 3 3 7 6 Serial Port6 Configuration Use this to set parameters of COM6 ...

Страница 26: ... 3 8 1 CPU Smart FAN Mode This allows you to set CPU FAN s mode Configuration options Thermal Mode and Manual Mode 3 3 8 2 CPU FAN PWM This setting allows users to control the system fan speed The value is 0 127 3 3 8 3 CPU Warning Temperature This allows the user to define a CPU warning temperature When this temperature reaches the pre defined threshold the function is enabled 3 3 9 PPM Configura...

Страница 27: ...ature 3 4 6 Restore AC Power Loss This allows you to set the power state after an unexpected AC power loss If Power Off is selected the AC power remains off when the power recovers If Power On is selected the AC power resumes and the system starts to boot up when the power recovers 3 4 7 Wake up by PCI Devices Use this item to enable or disable PCI devices to turn on the system from the power soft...

Страница 28: ... 3 LCD Panel Type Use this to select panel type Resolution Color Bit and Channel 3 5 4 Backlight Control Use this to adjust panel backlight brightness 3 5 5 LVDS Backlight Use this to adjust panel backlight brightness level The default value is Level10 3 5 6 Active LFP Use this to select the active LFP configuration Configuration options No LVDS LVDS and EDP The default value is LVDS 3 5 7 IGD Clo...

Страница 29: ...up activation key 65535 0XFFFF means indefinite waiting 3 6 2 Bootup NumLock State If this item is set to On it will automatically activate the Numeric Lock function after boot up 3 6 3 Fast Boot Use this item to enable or disable boot with initialization of a minimal set of devices required to launch active boot option There is no effect for BBS boot option 3 7 Security Screen In this section you...

Страница 30: ...P UTILITY 3 8 2 Discard Changes and Reset When you select this option it will pop out the following message Reset without saving Select YES to exit the UEFI SETUP UTILITY without saving any changes 3 8 3 Restore Defaults Load UEFI default values for all the setup questions F9 key can be used for this operation 3 7 4 UEFI Built In EFI Shell Attempts to Launch EFI Shell application Shell64 efi from ...

Страница 31: ...otherboard s features 4 2 1 Running The Support CD To begin using the support CD insert the CD into your CD ROM drive The CD automatically displays the Main Menu if AUTORUN is enabled in your computer If the Main Menu did not appear automatically locate and double click on the file SETUP EXE from in the Support CD to display the menus 4 2 2 Drivers Menu The Drivers Menu shows the available device ...

Отзывы: