background image

MIDI              

19

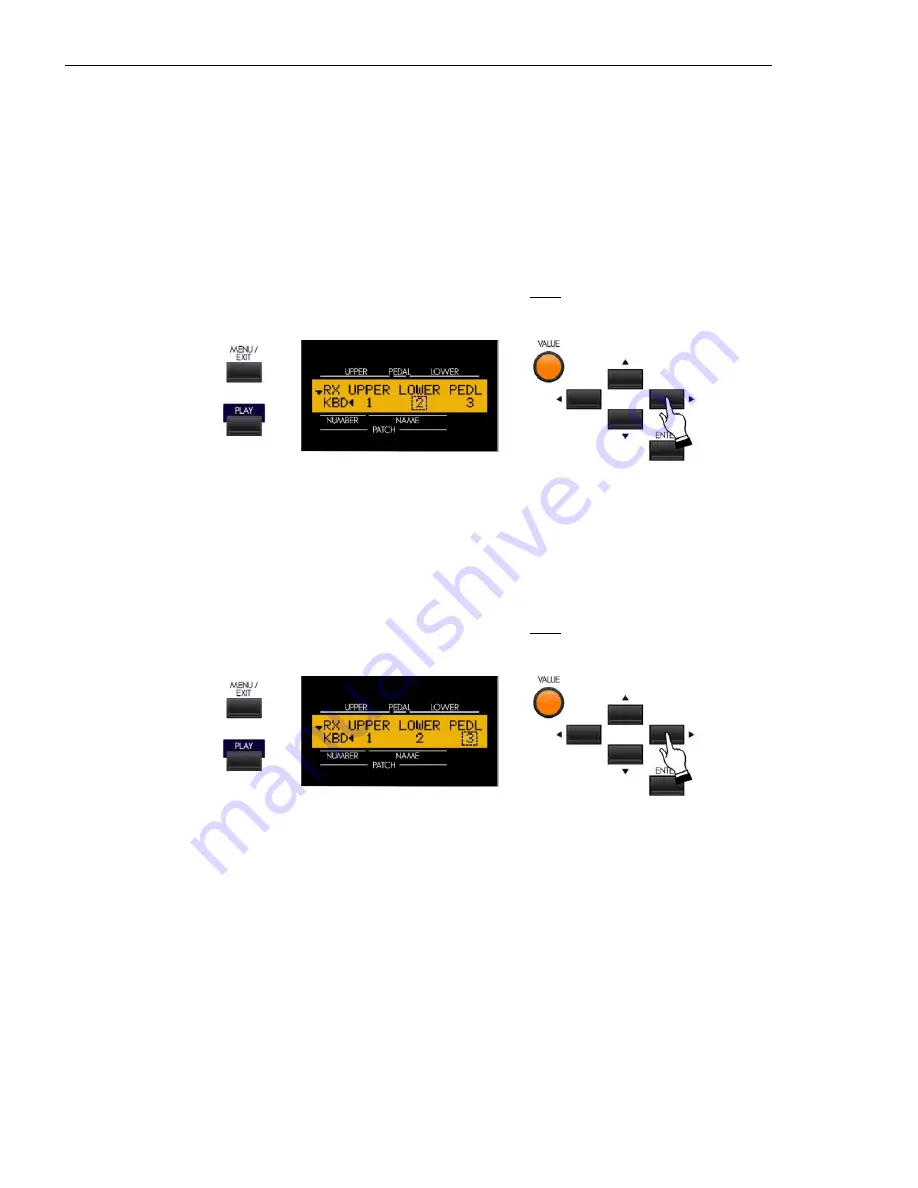
From the previous screen, touch the PAGE RIGHT Touch Button once.  The Information Center Display should now
look like this:

LOWER Receive

This Advanced Feature Menu Page allows you to select on which MIDI Channel the LOWER Keyboard Channel will
receive.  You can select from “1" through “16" as well as “OFF.”

Turn the VALUE Rotary Control to make your selection.

From the previous screen, touch the PAGE RIGHT Touch Button once.  The Information Center Display should now
look like this:

PEDAL Receive

This Advanced Feature Menu Page allows you to select on which MIDI Channel the PEDAL Keyboard Channel will
receive.  You can select from “1" through “16" as well as “OFF.”

Turn the VALUE Rotary Control to make your selection.

Содержание Sk Series

Страница 1: ... 73 88 MIDI ...

Страница 2: ......

Страница 3: ...T MIDI IN is for receiving MIDI data from another instrument while MIDI OUT is for sending MIDI data out to another instrument In the example above the keyboard s of the sending or transmitting instrument MIDI OUT are being used to control the sound generators of the receiving instrument MIDI IN When a key is played on the sending instrument the corresponding note will play on the receiving instru...

Страница 4: ...mple the MIDI data goes from the master instrument MIDI OUT to the slave instrument MIDI IN which receives the data and passes it along to a third instrument via the MIDI THRU connection IMPORTANT NOTE If you reverse the MIDI IN and MIDI OUT connections you can play the other instrument from the synthesizer just as easily Ë Audio and MIDI Connections Example A sound module Note that the LINE OUT o...

Страница 5: ...e times You will see D displayed in the extreme upper left corner of the Information Center Display The word ZONES in the upper left corner of the Information Center Display will be blinking 3 Touch the PAGE RIGHT Touch Button once The word MIDI in the lower left corner of the display will now blink 4 Touch the ENTER Touch Button You are now in the MIDI Edit Menu You may now use the PAGE NAVIGATIO...

Страница 6: ...eive MIDI IN data and are therefore used when recording and playing back sequences NOTE The Upper Keyboard Channel in addition to Note On Note Off and Velocity also is used for transmitting Controller data EXTERNAL ZONE CHANNELS The External Zone Channels allow you to use the SK as a MIDI Master Keyboard These allow you to play additional sounds from another MIDI instrument such as a sound module ...

Страница 7: ...s called a MIDI Template This Advanced Feature Menu Page allows you to select the MIDI Template you want to use Use the PAGE RIGHT and PAGE LEFT Touch Buttons to see the various Template settings When you have made your selection touch the ENTER Touch Button The MIDI parameters will be set according to the Template you selected IMPORTANT NOTE The Sk1 and Sk2 have different Template settings For a ...

Страница 8: ...MIDI 6 MIDI Templates Sk1 Sk1 73 Sk1 88 ...

Страница 9: ...MIDI 7 MIDI Templates Sk2 ...

Страница 10: ... allows you to set how incoming MIDI data external MIDI device connected via the MIDI IN port is handled The options are The data chart below shows the options you may select MIDI IN jack options Description Function LOW ER Incoming MIDI data plays the LOW ER part and is retransmitted on MIDI Channel 13 PEDAL Incoming MIDI data plays the PEDAL part and is retransmitted on MIDI Channel 14 LOW PED I...

Страница 11: ...n Center Display should now look like this MIDI NRPN This Advanced Feature allows you to turn ON or OFF NRPN What Is NPRN NRPN or Non Registered Parameter Number is an expanded control change message each function of which is implemented differently by different manufacturers The Hammond Sk series instrument uses NRPN to allow you to control such parameters as Percussion 2nd and 3rd Harmonic ON OF...

Страница 12: ... Leslie Parameters will be sent out as normal NRPN codes 21 The Leslie Parameters will be sent out as Leslie 21 series NRPN codes NOTE For a listing of the Leslie 21 NRPN codes please consult the MIDI Implenetation Chart in the Leslie 21 series Owner s Guide models 2101 2103 2101 Mark II and 2103 Mark II Turn the VALUE Rotary Control to make your selection NOTE W hen a Cabinet Number is selected i...

Страница 13: ... GM standard it is now easier for someone to connect two or more brands of MIDI devices and use them As an example before General MIDI different manufacturers assigned different program numbers to different sounds If for example Program Number 4 is Strings on a brand X MIDI device and Program Number 4 is Trumpet on a brand Y device and you sent MIDI Program Number 4 from a keyboard you were playin...

Страница 14: ...pani 80 Ocarina 112 Shanai 17 Drawbar 49 Strings 1 81 Square Lead 113 Tinkle Bell 18 Percussive 50 Strings 2 82 Sawtooth 114 Agogo Bells 19 Rock Organ 51 Synth Strings 83 Calliope 115 Steel Drum 20 Church Organ 52 Synth Strings 84 Chiff Lead 116 W ood Block 21 Reed Organ 53 Choir Aahs 85 Charanga 117 Taiko Drum 22 French 54 Choir Oohs 86 Voice Lead 118 Melodic Tom 23 Harmonica 55 Synth Choir 87 Fi...

Страница 15: ...nected MIDI device When this switch is OFF Drawbar Data will not be transmitted Turn the VALUE Rotary Control to make your selection From the previous screen touch the PAGE RIGHT Touch Button once The Information Center Display should now look like this MIDI External Zone This Advanced Feature allows you to decide whether you want to transmit External Zone data to a connected MIDI device When this...

Страница 16: ...System Exclusive messages What Is a Device ID In order to facilitate communication between MIDI devices from different manufacturers the MIDI Manufacturer s Association MMA assigns each maker of MIDI devices a unique ID number This ID number is treated as part of the System Exclusive information and is embedded in the firmware of each device from a particular manufacturer This allows different MID...

Страница 17: ...make your selection IMPORTANT NOTE If you attempt a Data Dump to the Sk series instrument when OFF is displayed the Information Center Display will flash Data Protect This ensures that you do not accidentally overwrite data From the previous screen touch the PAGE RIGHT Touch Button once The Information Center Display should now look like this Temporary Dump Send This Advanced Feature allows you to...

Страница 18: ...of the settings to a connected MIDI recorder To transmit your settings do the following 1 Make sure that the MIDI recorder is ready to receive data RECORD 2 Touch the ENTER Touch Button to start the data dump to the MIDI Data recorder The Information Center Display will show Transmitting When all information has been sent the Information Center Display will flash Data completed ...

Страница 19: ...eature Menu Page allows you to select on which MIDI Channel the UPPER Keyboard Channel will transmit You can select from 1 through 16 as well as OFF Turn the VALUE Rotary Control to make your selection From the previous screen touch the PAGE RIGHT Touch Button once The Information Center Display should now look like this LOWER Transmit This Advanced Feature Menu Page allows you to select on which ...

Страница 20: ...election From the previous screen touch the PAGE RIGHT Touch Button once The Information Center Display should now look like this Screen 6 MIDI Receive Keyboard Channels This Advanced Feature Menu screen contains 3 different functions Use the PAGE LEFT and PAGE RIGHT Touch Buttons to move back and forth among the functions UPPER Receive This Advanced Feature Menu Page allows you to select on which...

Страница 21: ...ive You can select from 1 through 16 as well as OFF Turn the VALUE Rotary Control to make your selection From the previous screen touch the PAGE RIGHT Touch Button once The Information Center Display should now look like this PEDAL Receive This Advanced Feature Menu Page allows you to select on which MIDI Channel the PEDAL Keyboard Channel will receive You can select from 1 through 16 as well as O...

Страница 22: ...hree times You will see D displayed in the extreme upper left corner of the Information Center Display The word ZONES in the upper left corner of the Information Center Display will be blinking Sk1 Sk1 73 Sk1 88 3 Touch the ENTER Touch Button once The Information Center Display should now look like this Sk2 3 Touch the ENTER Touch Button once The Information Center Display should now look like thi...

Страница 23: ...he lowest note selected if multiple notes are played CHRD The keyboard is scanned for Chord Root and Chord Type and plays an appropriate bass note For example if the notes G C and E are played it will be interpreted as a C major chord and the bass note will sound the note C POLY The bass tone will sound on all notes NOTE On the Sk1 Sk1 73 and Sk1 88 both the MANUAL BASS and SPLIT features must be ...

Страница 24: ...urn the VALUE Rotary Control to the right to locate the Manual Bass Split Point higher on the manual Turn the VALUE Rotary Control to the left to locate the Manual Bass Split Point lower on the manual From the previous screen touch the PAGE RIGHT Touch Button once The Information Center Display should now look like this The legend underneath the word SPLIT should be blinking Sk1 Sk1 73 Sk1 88 Keyb...

Страница 25: ...ing Sk2 Lower to Pedal Split Point This Advanced Feature Menu allows you to set the highest note that will sound the Lower Manual registration when the LOWER TO PEDAL Touch Tab is ON You can select from 1C the lowest note on the manual to 3C the third C on the manual which also is Middle C Turn the VALUE Rotary Control to the right to locate the note range higher Turn the VALUE Rotary Control to t...

Страница 26: ... will play The data chart below shows the options you may select UPPER Octave Options Description Function 2 The sound is two octaves below the regular pitch 1 The sound is one octave below the regular pitch 0 The sound is at normal pitch 1 The sound is one octave above the regular pitch 2 The sound is two octaves above the regular pitch Turn the VALUE Rotary Control to the right to raise the Octa...

Страница 27: ...ntrol to the right to raise the Octave Turn the VALUE Rotary Control to the left to lower the Octave From the previous screen touch the PAGE RIGHT Touch Button once The Information Center Display should now look like this Lower Octave Setting Real This Advanced Feature allows you to set the octave for the Lower Manual of the Sk2 or a connected MIDI keyboard used as a Lower Manual of an Sk1 The dat...

Страница 28: ...for the sake of brevity only XZ1 screens will be shown and described External Zone Page 1 ON OFF and Channel Selection External Zone Switch This Advanced Feature allows you to turn the selected External Zone ON MIDI information will be transmitted or OFF no MIDI information will be sent Turn the VALUE Rotary Control to make your selection From the previous screen touch the PAGE RIGHT Touch Button ...

Страница 29: ...connected MIDI keyboard as a Lower Manual on any of the Sk1 instruments PEDAL Use this setting if you are using a connected MIDI pedalboard with either an Sk1 instrument or an Sk2 OFF Use this setting if you have external MIDI instruments connected and you do not wish to send Note messages Note On Note Off and Note Velocity but you still want to transmit MIDI Program Changes or Controller Changes ...

Страница 30: ... the VALUE Rotary Control to the right to locate the note range higher Turn the VALUE Rotary Control to the left to locate the note range lower NOTE The Upper Limit number can not be lower than the Lower Limit number Setting the External Zone Note Limits Using the Shortcut You can also set the Upper and Lower Note Limits for the selected External Zone by touching the RECORD Touch Button while pres...

Страница 31: ...The GS standard is fully compatible with General MIDI however instead of only 128 sounds it provides the means to have up to 16 384 different sounds This is accomplished by providing up to 128 banks of voices for each of the 128 Program Numbers in General MIDI 128 128 16 384 It should be noted that this is a theoretical limit the actual number is typically much less anywhere from 300 900 sounds an...

Страница 32: ... value for Controller 32 Least Significant Bit Turn the VALUE Rotary Control to make your selection From the previous screen touch the PAGE RIGHT Touch Button once The Information Center Display should now look like this External Zone Program Number This Advanced Feature allows you to select from which Manual will control the selected External Zone Turn the VALUE Rotary Control to make your select...

Страница 33: ...below the regular pitch 0 The sound is at normal pitch 1 The sound is one octave above the regular pitch 2 The sound is two octaves above the regular pitch Turn the VALUE Rotary Control to the right to raise the Octave Turn the VALUE Rotary Control to the left to lower the Octave From the previous screen touch the PAGE RIGHT Touch Button once The Information Center Display should now look like thi...

Страница 34: ...UE Rotary Control to make your selection NOTE In order to hear the effect of this Advanced Feature the sound controlled from the External Zone must be connected vis Stereo both Left and Right channel outputs From the previous screen touch the PAGE RIGHT Touch Button once The Information Center Display should now look like this External Zone Velocity This Advanced Feature allows you to sets the cha...

Страница 35: ...GE RIGHT Touch Button once The Information Center Display should now look like this External Zone Maximum Volume This Advanced Feature allows you to adjust the volume level when the Expression Pedal is all the way open or set at maximum You can select from 64 through 127 At 0 no sound will be heard Turn the VALUE Rotary Control to make your selection From the previous screen touch the PAGE RIGHT T...

Страница 36: ...t Menu should now display The legend just underneath the word DAMPER should now blink External Zone Damper This Advanced Feature allows you to select whether you want to send Damper Controller 64 information as part of the selected External Zone Turn the VALUE Rotary Control to make your selection MIDI All Notes Off and Parameter Reload MIDI Panic MIDI plays notes from an external instrument by se...

Отзывы: