HammerSmith Paint Blast Скачать руководство пользователя страница 39

38

39

•  Move the device smoothly, from top to bottom or 

side to side, depending on the mode.

NOTE: Keep your wrist straight and parallel to the 

surface for smooth work. If you bend your wrist or 

arm while spraying, the spray angle can cause paint 

spatter in some areas, leading to an uneven result.

Tips

•  Avoid spraying surfaces where the device requires 

a spray angle greater than 45°.

•  Never tilt the device upwards at an angle of more 

than 45°. Material could enter the turbine and 

damage the spraying device.

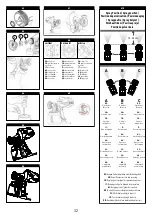
Spray position (see Figure #10)

•  Uneven area - Flat area - Uneven area

•  Do not bend your wrist while spraying.

For outdoor use:

IMPORTANT: When using the device outdoors, be 

aware of the wind direction and wear appropriate 

eye and respiratory protection and clothing. The 

desired surface must be clean and dust-free, so that 

no unwanted material comes into contact with the 

painted surface.

NOTE: Follow all applicable environmental 

guidelines in your country when spraying outdoors. 

Respect the environment and properly dispose of 

unconsumed materials.

LED LIGHT (see Figure #11)

The LED light ensures more precise work in hard-

to-reach or poorly lit corners. The LED light stays 

illuminated while you use the device.

CLEANING THE PRODUCT

Proper cleaning is required for trouble-free 

operation of the device. Improper cleaning or failure 

to clean will void the warranty.

IMPORTANT:

•  Do not clean the device with flammable solvents.

•  Always clean the device and the container with a 

suitable cleaning solution (soapy water for latex 

materials, alcohols and solvents for oil-based 

materials).

•  Do not use cleaning agents, thinners or lubricants 

containing silicone as these are not compatible 

with the spray gun of the device.

•  Do not use materials that contain bleach or chlorine.

•  Never immerse the device in water.

•  Always clean the device in a safe area.

IMPORTANT: Never clean the air filters or nozzle air 

inlets with sharp metal objects. Do not use silicone-

based solvents or lubricants.

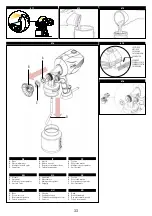
CLEANING INSTRUCTIONS  

(see Figures #12 + #13)

1.  Turn off the device, unplug the power cord and 

press the trigger to remove excess material from 

inside.

2.  Unscrew the container. Empty the remaining 

paint into the original container. 

NOTE: Do not return diluted paint to its original 

container; dispose of it in a proper manner or 

keep it in a separate sealed container. (see 

Figure #12)

3.  Pour a small amount of a suitable cleaning 

solution into the paint spray tank. 

4.  Clean the container and dispose of the cleaning 

solution in a proper manner.

5.  Fill the container with a small amount of NEW 

cleaning solution. (see Figure #13) 

6.  Put the container back on the device, plug in the 

device and switch it on.

7.  In a safe area, spray the solution into an empty 

can for 2 seconds. Release the trigger and spray 

again for another 2 seconds. Repeat this process 

until the cleaning solution comes out of the 

device without any traces of paint.

8.  Unscrew the union nut, multi-position regulator 

and nozzle to clean them.

9.  Remove the suction tube, and clean it with a 

suitable solution. 

10. Check the container for leaks, and clean it with 

water if necessary. (see Figure #14)

After use

Reassemble the parts after you have finished 

cleaning. Clean the suction tube air hose with a 

cleaning brush. Clean the spray nozzle with an 

appropriate cleaning solution.

IMPORTANT: It is advisable to check whether the 

motor air filter is dirty. Never operate the device 

without an air filter. Dirt can enter the device and 

impair its function. (see Figure #15)

AIR FILTER

Note: If paint enters the air hose, remove the multi-

position regulator and clean the inside with a damp 

cloth.

IMPORTANT: The air hose and multi-position 

regulator are only partially resistant to solvents. 

Never immerse them in solvents, only lightly clean 

them. (see Figure #16)

Содержание Paint Blast

Страница 1: ...oi 40 IMPORTANTI INFORMAZIONI SULLA SICUREZZA 11 Manuale di utilizzazione 44 BELANGRIJKE VEILIGHEIDSINFORMATIE 14 Gebruiksaanwijzing 47 FONTOS BIZTONS GI INFORM CI 17 Haszn lati utas t s 51 D LE IT BE...

Страница 2: ...verticaal of heel precies sproeien zodat u zelfs ontoegankelijke gebieden kunt bereiken Hoeken kunnen bereiken Volg de instructies in deze gebruiksaanwijzing en bewaar deze voor toekomstig gebruik Di...

Страница 3: ...onsgef hrdeten Bereichen wie in der N he von entz ndbaren Fl ssigkeiten Gasen D mpfen oder Staub Das Ger t kann Funken erzeugen die Staub oder D mpfe entz nden k nnen Halten Sie Kinder und Zuschauer f...

Страница 4: ...um die Bildung von brennbaren D mpfen zu vermeiden Brennbare D mpfe sind oft schwerer als Luft und k nnen sich am Boden ansammeln Halten Sie den Anwendungsbereich sauber gut beleuchtet und frei von B...

Страница 5: ...igt sind um die Funktionsweise des Ger ts zu beeintr chtigen Falls das Ger t besch digt ist m ssen Sie es im autorisierten Fachhandel reparieren lassen Benutzen Sie das Ger t und Zubeh r in bereinstim...

Страница 6: ...er the plug Do not expose your Hammersmith Paint Blast to rain or moisture When operating the Hammersmith Paint Blast outdoors use an extension cord suitable for outdoor use If it is unavoidable to us...

Страница 7: ...he spray material supplier Contact the spray material supplier about the compatibility of this material with aluminium Do not use cleaning solvents thinners or lubricants that contain silicone because...

Страница 8: ...nts of the manufacturer s safety devices Never spray without the protection of the nozzle Keep the electric cable plug and the trigger of the spray gun free of paint and other liquids Be careful when...

Страница 9: ...c ble lectrique doit tre branch un circuit mis la terre Utilisez des rallonges mises la terre V rifiez que tous les r cipients et syst mes de collecte sont mis la terre afin d viter tout risque li l l...

Страница 10: ...ne carilsne sontpascompatiblesavecleHammersmithPaint Blast ATTENTION Pourr duireles risquesdeblessurescorporellesou d inhalationdevapeurstoxiques Les peintures solvants insecticides et autres mat riau...

Страница 11: ...e probl me qui pourrait affecter son fonctionnement Utilisez le Hammersmith Paint Blast les accessoires et les outils d application conform ment aux instructions d utilisation en tenant compte des con...

Страница 12: ...tuo Hammersmith Paint Blast a pioggia o umidit Quando si utilizza l Hammersmith Paint Blast all aperto utilizzare una prolunga adatta per uso all aperto Se inevitabile utilizzare lo spruzzatore in un...

Страница 13: ...a 21 C 70 F Il punto di infiammabilit di un materiale volatile la temperatura minima alla quale vaporizza per formare una miscela infiammabile nell aria consultare il fornitore del materiale spray Co...

Страница 14: ...asi parte rotta o se c qualche altro problema che potrebbe influenzare il suo funzionamento Utilizzare Hammersmith Paint Blast gli accessori e gli strumenti di applicazione secondo le istruzioni per l...

Страница 15: ...altijd de stekker uit het stopcontact voordat u reinigingswerkzaamheden uitvoert Dompel de elektrische onderdelen nooit in water Vermijd lichaamscontact met geaarde oppervlakken zoals buizen radiator...

Страница 16: ...rvanhet verstuifmateriaaloverdecompabiliteitvandit materiaalmetaluminium Gebruikgeenreinigendeoplosmiddelen verdunnersofsmeermiddelendiesilicone bevatten wantdezezijnnietcompatibelmetde HammersmithPai...

Страница 17: ...accessoires en toepassingstools volgens de gebruiksinstructies en houdt hierbij rekening met de condities van het gebied dat wordt geverfd en het uit te voeren werk Gebruik uitsluitend onderdelen die...

Страница 18: ...zert Tiszt t s el tt mindig h zza ki a k sz l ket a t pforr sb l Soha ne mer tse v zbe az elektromos alkatr szeket Ker lje test nek rintkez s t f ldelt fel letekkel mint amilyenek a cs vek radi torok...

Страница 19: ...ban spontja az a legalacsonyabb h m rs klet amelyen elp rologva a leveg ben gy l kony kever ket k pez k rje ki a permetez anyag sz ll t j nak v lem ny t L pjen kapcsolatba a permetez anyag sz ll t j v...

Страница 20: ...vagy van e m s probl ma amely befoly solhatja a m k d s t A Hammersmith Paint Blast et tartoz kait s a felhord eszk z ket a haszn lati utas t snak megfelel en haszn lja figyelembe v ve a festeni k v n...

Страница 21: ...ch povrch nap klad potrub radi tor spor k a chladni ek V p pad uzemn n va eho t la hroz vysok riziko razu elektrick m proudem Elektrick kabel mus b t p ipojen k uzamn n mu obvodu Pou vejte uzemn n pr...

Страница 22: ...to e nejsou se za zen m Hammersmith Paint Blast kompatibiln POZOR Abyste sn ili riziko zran n v d sledku toxick ch par Barvy rozpou t dla insekticidy a podobn materi ly mohou b t p i vdechnut nebo dot...

Страница 23: ...hov vejte bez zbytk barvy a jin ch kapalin P i i t n nebo se izov n trysky postupujte opatrn Pokud se tryska b hem sprejov n zanese i te se pokyny k i t n kter jsou sou st tohoto manu lu P ed zapojen...

Страница 24: ...y boli uzemnen Nepou vajte adapt ry umo uj ce pou itie 3 kol kov ch z str iek s 2 kol kov mi z suvkami UPOZORNENIE Aby ste zn ili riziko v buchu alebo po iaru Pary rozp adiel farieb m u explodova aleb...

Страница 25: ...p sobi nevo nos mdloby otravu alebo dokonca smr Pri striekan alebo manipul cii s chemik liami v dy pou vajte ochranu o rukavice ochrann odev a respir tor alebo tv rov masku Aby ste zn ili riziko zrane...

Страница 26: ...tole chr te pred u pinen m farbami a in mi tekutinami Pri isten alebo nastavovan trysky bu te opatrn Ak sa tryska po as striekania upch vy istite ju v s lade s pokynmi na istenie uveden mi v tomto n v...

Страница 27: ...ricitatea static Nu utiliza i adaptoare 3 la 2 poli prong ATEN IE Pentru a reduce riscul de explozie sau foc Vaporii de solvent vopsea pot exploda sau lua foc Ar putea deteriora bunuri materiale i sau...

Страница 28: ...anevra i substan e chimice Pentru a reduce pericolul de v t mare personal n anumite condi ii trebuie purtat echipamentul de protec ie precum nc l minte antiderapant casc bocanci cu v rf de o el i prot...

Страница 29: ...nform instruc iunilor de utilizare lu nd n considerare condi iile din zona unde are loc zugr virea i lucrarea de executat Utiliza i numai componente autorizate de c tre produc tor Utilizatorul i asum...

Страница 30: ...FF switch 4 Intensity setting intensity controller 5 Container 6 Union nut 7 Multi position regulator 8 Nozzle 9 Air hose 10 Air filter 11 Sealing ring 12 Suction tube 13 Viscosity funnel 14 Cleaning...

Страница 31: ...m t gy r 12 Sz v cs 13 Viszkozit si t lcs r 14 Tiszt t t Tov bbi cserealkatr szek 15 L gsz r 16 F v ka 17 T m t s CZ Obsah balen vyobrazen a vysv tlen d l 1 1 x Hammersmith Paint Blast 1 Sp na 2 LED s...

Страница 32: ...a FR Surface droite IT Area diritta NL Recht bereik HU Egyenes tartom ny CZ Rovn oblast SK Rovn povrch RO Suprafa dreapt C DE Unebener Bereich EN Uneven area FR Surface irr guli re IT Area non piana N...

Страница 33: ...e FR A Buse B crou raccord C Bouton multiposition D Tube d aspiration IT A Ugello B Dado a risvolto C Regolatore multiposizione D Tubo di aspirazione NL A Spuitstuk B Wartelmoer C Multipositieregelaar...

Страница 34: ...in Sekunden Farbe auf Wasserbasis Emulsionen 25 50 Glanzlacke Farblacke mit L sungsmitteln oder l slich in Wasser 45 50 Lacke Unverd nnt Grundierungen 45 50 Impr gniermittel f r Holz ohne verd nnende...

Страница 35: ...IONSPUNKT Pr zisionspunkt Modus f r die Detailarbeiten INTENSIT TSEINSTELLUNG Mit der Intensit tseinstellung k nnen Sie den Farbfluss der aus der D se kommt erh hen oder verringern Drehen Sie den Inte...

Страница 36: ...Farbe in den Originalbeh lter HINWEIS Geben Sie keine verd nnte Farbe zur ck in den Originalbeh lter entsorgen Sie diese ordnungsgem oder bewahren Sie sie separat in einem verschlossenen Beh lter auf...

Страница 37: ...ODUCT ASSEMBLY The device is delivered pre assembled make sure that all parts are within reach so you can use them 1 Place the multi position regulator onto the nozzle and secure by turning the union...

Страница 38: ...ng upward the angled end of the suction tube must be pointed toward the back end of the spray gun see Figure 6 NOTE If you place the suction tube in the correct direction you will not have to refill t...

Страница 39: ...e in water Always clean the device in a safe area IMPORTANT Never clean the air filters or nozzle air inlets with sharp metal objects Do not use silicone based solvents or lubricants CLEANING INSTRUCT...

Страница 40: ...ce is too far away Reduce the distance to the object The intensity is too high Decrease the intensity FR MONTAGE DU PRODUIT Assurez vous que l interrupteur est en position OFF avant de brancher le cor...

Страница 41: ...il 1 Assurez vous que l appareil est d branch et que l interrupteur est en position OFF 2 D vissez le r cipient de l appareil 3 Apr s avoir bien dilu le mat riau remplissez le r cipient jusqu en haut...

Страница 42: ...attention la direction du vent et portez une protection oculaire et respiratoire appropri e ainsi que des v tements appropri s La surface souhait e doit tre propre et sans poussi re afin qu aucun mat...

Страница 43: ...olvants Ne les plongez jamais dans des solvants nettoyez les simplement voir illustration 16 INFORMATIONS TECHNIQUES 220 240 V I 50 60 Hz I 600 W Mod le Q1P WYT24 800 Puissance 600 W Fr quence nominal...

Страница 44: ...25 50 Smalti brillanti smalti colorati con solventi o solubili in acqua 45 50 Smalti Non diluiti Mani di fondo 45 50 Impregnanti per legno senza coloranti oli da diluire Disinfettanti o prodotti di p...

Страница 45: ...per i lavori dettagliati IMPOSTAZIONE DELL INTENSIT L impostazione dell intensit consente di aumentare o ridurre il flusso di vernice che proviene dall ugello Ruotare il regolatore dell intensit in se...

Страница 46: ...alcuna vernice diluita nel contenitore originale smaltirla in modo regolamentare o conservarla separatamente in un contenitore chiuso vedi figura 12 3 Versare una piccola quantit di una soluzione dete...

Страница 47: ...etto L intensit troppo elevata Ridurre l intensit NL PRODUCTMONTAGE Het apparaat wordt voorgemonteerd geleverd zorg ervoor dat alle onderdelen binnen handbereik zijn zodat u ze kunt gebruiken 1 Plaats...

Страница 48: ...apparaat 1 Zorg ervoor dat de stekker uit het stopcontact is en dat de schakelaar op OFF staat 2 Schroef de container los van het apparaat 3 Nadat u het materiaal goed hebt verdund vult u de container...

Страница 49: ...ateriaal in contact komt met het geverfde oppervlak OPMERKING Volg alle milieurichtlijnen die in uw land gelden wanneer u buiten spuit Zorg voor het milieu en verwijder ongebruikte materialen op de ju...

Страница 50: ...800 Vermogen 600W Nominale frequentie 50 Hz Snoerlengte 2 meter Spanning resp reikwijdte van het led licht 1 5 V PROBLEMEN OPLOSSEN Probleem Oorzaak Oplossing Geen of weinig materiaal wordt gespoten...

Страница 51: ...emulzi k 25 50 F nyes lakkok Lakkfest kek old szerrel vagy v zben old d 45 50 Lakkok H g t s n lk l Alapoz k 45 50 Impregn l anyag f ra old szerek n lk li fest kekhez olajokhoz Fert tlen t szerekhez v...

Страница 52: ...it sszab lyoz gombot az ramutat j r s val megegyez ir nyba hogy azt megh zza a fest k nagyobb raml sa rdek ben vagy az ramutat j r s val ellent tes ir nyba hogy cs kkentse a fest k kimeneti nyom s t L...

Страница 53: ...vagy t rolja k l n lez rt tart lyban L sd a 12 br t 3 nts n egy kis mennyis g megfelel tiszt t oldatot a fest ksz r tart lyba 4 Reinigen Sie den Beh lter und entsorgen Sie die Reinigungsl sung ordnun...

Страница 54: ...p edmontovan Ujist te se e jsou v echny d ly po ruce abyste je mohli pou t 1 Nasa te multipolohov regul tor na trysku a zajist te ho t m e p es n j na roubujete p evle nou matici Ve vzduchov hadici j...

Страница 55: ...c pistole viz obr zek 6 UPOZORN N Pokud sac trubku ulo te ve spr vn m sm ru nemus te n dobu tak asto dopl ovat Typ n st iku P stroj m r zn typy n st iku vertik ln horizont ln a p esn Vertik ln a horiz...

Страница 56: ...stroj do vody P stroj v dy ist te v bezpe n oblasti D LE IT Vzduchov filtr nebo ventila n otvory trysky nikdy ne ist te ostr mi kovov mi p edm ty Nepou vejte rozpou t dla nebo maziva s obsahem siliko...

Страница 57: ...troj je p li vzd len Zkra te vzd lenost od objektu Intenzita je p li vysok Sni te intenzitu SK MONT V ROBKU Pr stroj sa dod va zmontovan uistite sa e v etky asti s v dosahu aby ste ich mohli pou va 1...

Страница 58: ...dobu opatrne naskrutkujte sp Vyrovnanie sacej r rky pozri obr zok 5 6 Sacia r rka vo vn tri n doby sa mus umiestni pri ka dom pou it striekacieho zariadenia Pri striekan smerom nadol mus ikm koniec sa...

Страница 59: ...a rozp adlami pre materi ly na b ze oleja Nepou vajte istiace prostriedky riedidl ani maziv obsahuj ce silik n preto e nie s kompatibiln s pr strojom Nepou vajte materi ly obsahuj ce bielidlo alebo c...

Страница 60: ...Zn te r chlos pohybu Pr li ve a prebyto nej farby Pr stroj je pr li aleko Zmen ite vzdialenos objektu Intenzita je pr li vysok Zn te intenzitu RO MONTAREA PRODUSULUI Aparatul este livrat preasamblat...

Страница 61: ...ialul umple i recipientul p n la partea superioar a g tului IMPORTANT nu dep i i niciodat nivelul maxim de umplere de 800 ml 4 Apoi n uruba i cu grij recipientul la loc Alinierea conductei de aspira i...

Страница 62: ...materialele neutilizate n conformitate cu reglement rile LAMPA LED vezi figura 11 Lampa LED asigur executarea lucr rilor cu precizie n locuri greu accesibile sau n col uri neiluminate Lampa LED r m ne...

Страница 63: ...rea pu in material pulverizat Duza este nfundat Cur a i duza Conducta de aspira ie este nfundat M ri i intensitatea Intensitatea este prea mic M ri i intensitatea Tubul de aspira ie este desprins Rein...

Страница 64: ...ques ainsi que les piles et accumulateurs ne doivent pas tre jet s avec les d chets m nagers ordinaires Vous tes l galement tenu de les ramener gratuitement lafindeleurdur edevie audistributeurou unpo...

Отзывы: