background image

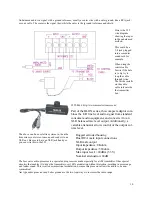
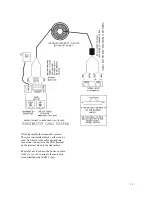
Wire diagram for the transmitter system. 
There are two terminal blocks, either can be 
used. Not shown is the cable shield drain 
connection, connect it to the GND terminal 
on the terminal block in the transmitter. 
 
Be careful not to connect the power or audio 
to the (S+) or (S-) terminals, these are used 
for another function (RS485 sync). 

11 

Содержание HAMILTON AM1000

Страница 1: ...e transmitter 4 2 2 Finding a place for the Transmitter 5 2 3 Using Ground Radials 3 Installing the Control Wire 6 6 4 Studio Connections and settings 8 5 Tuning and Setting Power 12 6 Trying to get good Range 14 7 Better radio reception 16 8 General Specifications 17 9 FCC information 17 RangeMaster Transmitters Inc 213 Caraway lane Cary NC 27519 919 362 9393 http www am1000rangemaster com 10 Con...

Страница 2: ...d be small flat and large flat screwdriver wire cutter and stripper mallet to pound ground rod in A jack hammer can put a ground rod down in a couple of minutes if you can get one hammer tools to install mast mount you may need a hammer drill and masonry bits to attach the mount to masonry large Phillips screwdriv er Wrench set Ratchet set medium adjustable wrench hacksaw level knife torch for sol...

Страница 3: ...d Ground wire Lowes or Home Depot 30 40 Use 12 10 the bigger wire 10 will give better performance but will be harder to work with 500ft roll Insulated is fine Wire mounting hardware Lowes or Home Depot 15 Think about how you are going to mount the ground wire it needs to be tied down mounted to the side of the building or pole so it won t move see instructions 15 891 Eaves mount Radio Shack 16 Or ...

Страница 4: ...ultiple rods keep them at least 6 feet apart don t concentrate on just a small area of dirt For example don t place 10 rods in a 2 foot circle The more yard area you can cover with your system the better A 20 foot diameter circle would keep the rods about 6 feet apart Keeping the system spread out allows the currents to flow more efficiently Working with different installation sites you have to be...

Страница 5: ...u Call an electrician to make this connection Some times there may be a water pipe or other metal pole lead ing into the ground you can use You need to be creative with grounding sometimes I once used a deep well I con nected to the cast iron sleeve that went into the ground and had great range The iron sleeve was metal and went deep into the ground The more metal dirt contact the better Note that...

Страница 6: ...ound rod outward Elevated radials First of all be aware that elevated radials do increase radiation and may not be approved should you be inspected by the FCC Note the direction of increased signal More then one radial can be used Buried radials There should be no problem with the FCC concern ing buried radials metal in the dirt does not radiate For more Information see the Legal section This is t...

Страница 7: ...Using Cat 5 shielded outdoor wire 7 ...

Страница 8: ...4 Studio Connections and settings 8 ...

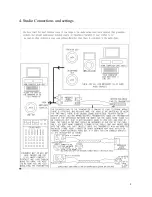
Страница 9: ... of the 222 output level control then check the transmitter audio gain it should be 1 2 to fully clockwise it is preferable not to have it lower then 1 2 way If you are way over driven try turning the transmitter audio gain down a bit you may need to turn it down to almost off if you are getting to much drive from the 222 Adjust 222 output level and Transmitter level for good sound from a test rad...

Страница 10: ...to an XLR balanced mic level output Additionally a variable attenuator allows control of the output vol ume level Rugged extruded housing Dual RCA male input connections XLR male output Input impedance 8Kohm Output impedance 580ohm Max input level 24dBm 3 3V Nominal attenuation 24dB The above can be a useful item stereo in then the item mixes your stereo to mono and sends it to an XLR out Be sure ...

Страница 11: ... blocks either can be used Not shown is the cable shield drain connection connect it to the GND terminal on the terminal block in the transmitter Be careful not to connect the power or audio to the S or S terminals these are used for another function RS485 sync 11 ...

Страница 12: ...obtain a peak reading of the meter When the meter peaks you are tuned Be sure to stay away from the anten na while tuning If you are to close to the antenna your body will affect where it tunes Keep in mind that you need to see a peak The meter should rise and fall as you are turning If you just turn it clockwise or counter clock wise all the way and the meter goes up until the capacitor can t be ...

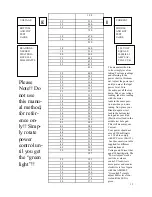
Страница 13: ...anual method in volves simply involves taking 2 voltage readings and referring to the power chart in this man ual Adjust the power pot until you are at the legal power level Turn the audio pot all the way down Take your voltage reading take this reading with the meter leads in the same posi tion as when you were tuning Now place your Black negative test lead in the bottom test hole pad your Red Po...

Страница 14: ...6 Trying to get good Range 14 ...

Страница 15: ...ting manual if you can remove your ground and not see a difference in the tune voltage or range then the ground is likely the problem If when you are tuning the Cap Tune you don t see much movement of the meter then you probably have a poor ground Placement of the Transmitter is important keep it away from metal and other objects One way to look at it is that the antenna is the plus of the battery...

Страница 16: ...d radio as a direction finder Turn the radio until the loudest noise is heard and the front and back of the radio will point to the noise origin Carry a radio around the neighborhood and see if you can find the origin of the noise Ask other neighbors if they have problems with radio noise obviously If a power pole is suspected call the utility company and they will check the area and possibly wash...

Страница 17: ...peration in the band 510 1705 kHz a The total input power to the final radio frequency stage exclusive of filament or heaterpower shall not exceed 100 milliwatts b The total length of the transmission line antenna and ground lead if used shall not exceed 3meters c All emissions below 510 kHz or above 1705 kHz shall be attenuated at least 20 dB below the lev el of the unmodulated carrier Determinat...

Страница 18: ...has been done We have never heard of one of our transmitters being shut down because of improper installation the agent has always given the customer time to fix any issue and has allowed them to continue to operate Please be aware that even if your equipment is properly installed and passes an FCC inspection you might still be the subject of a complaint from a nearby broadcast station or member o...

Страница 19: ...19 11 Certification ...

Страница 20: ... back into J13 Please note you can preferably use a voltmeter To use the Coil Tune program simply move the shunt on the Coil Tune jumper block and then remove J13 if the voltage is higher the LED will be green if lower the LED will be red Then immediately replace J13 shunt At this point you can move the Coil Tune shunt if you wish again and take another reading with J13 If the LED goes blank It is...

Страница 21: ... Turn the power down until you can just barely see the LED light then you should be able to use this LED as an Voltage indicator the LED will get brighter as the voltage goes up This will only work if the LED is dim You may find using a voltmeter quicker but if you don t have a voltmeter handy this program will do the job Once you have tuned turn the transmitter off then back on with a shunt in J1...

Страница 22: ...ain surge protection but this circuitry will only operate if when the equipment has been properly grounded This protection circuitry will not help in the event of a large nearby surge or strike Limitation of Warranty The Warranty stated above is the only warranty applicable to this product All other warranties ex press or implied including all implied warranties of merchantability or fitness for a...

Отзывы: