background image

6

7

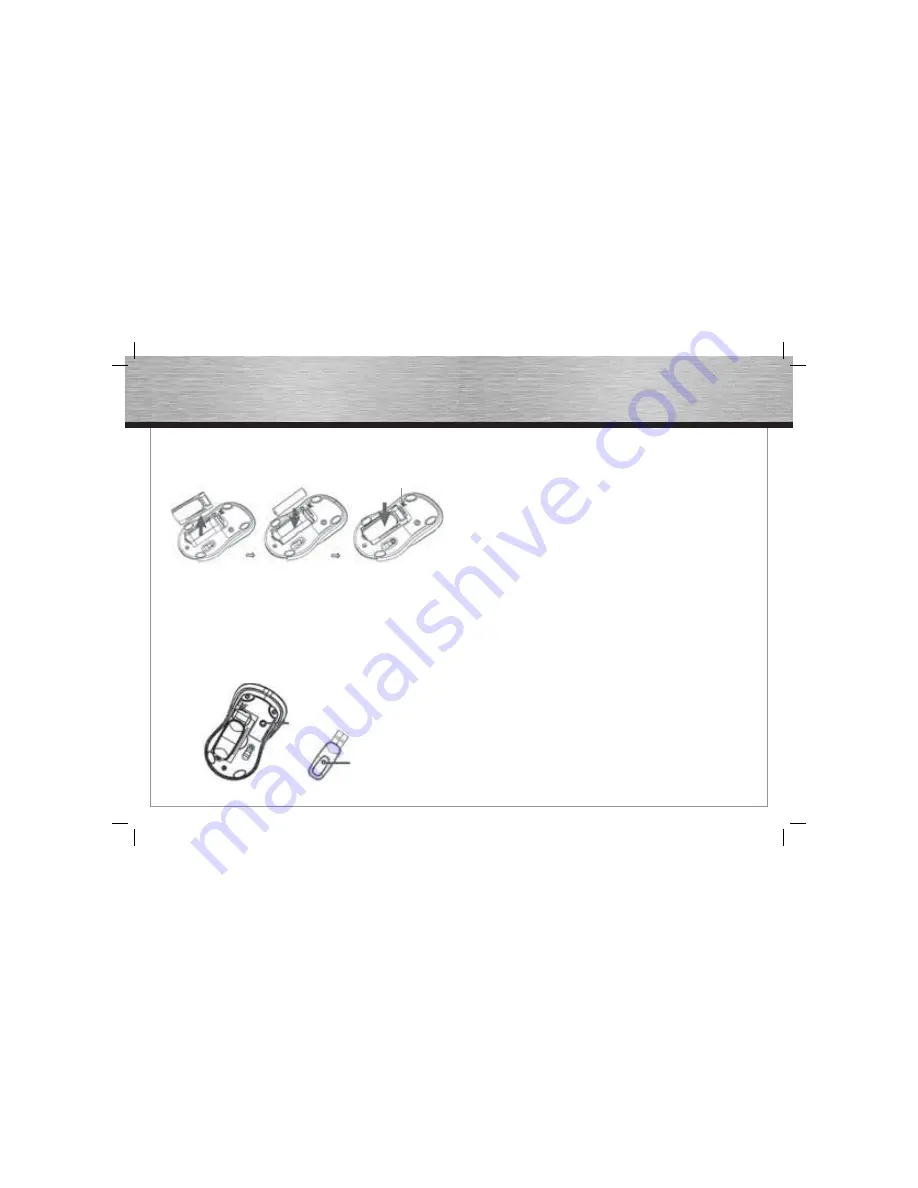
2.2 Inserting batteries

a)  Remove the battery compartment cover and insert the batteries into the 
 

battery compartment, observing correct polarity. The correct polarity is indi

 cated 

there.

b)  Replace the battery compartment cover so that it is securely closed. 
c)  Set the ON-OFF switch on the bottom of the mouse to „ON“.  

2.3  Connecting the USB receiver  

a)  Connect the USB receiver to a free USB port on the PC.
b)  Windows detects the USB receiver and installs it in the operating system.
c)  The mouse normally connects to the receiver automatically and is ready for
   

use immediately. If this does not happen, proceed as described in section 2.4. 

2.4  Connecting the mouse and receiver/Getting started 


a)  Press the Connect button on the receiver; the status LED starts to fl ash.
   

The receiver is now ready to synchronise with the mouse.

b)  Using a pointed object (such as a pen), press the Connect button on the 
   

bottom of the mouse within 10 seconds. Please note that the mouse should be 


no more than a maximum of 30 cm away from the receiver during this 

   connection phase. 
c)  The status LED on the receiver stops fl ashing after the synchronisation 
   

process has been completed successfully. The mouse is now ready for use. 


If the cursor does not move, repeat steps 3a-b. You will also need to do this 


if interference originating from other wireless mice or keyboards occurs 

   during operation.


3.  Battery Indicator Display  

The control light starts to fl ash when the battery voltage is too low. Although 
the mouse will still function for some time, you should change the batteries as 
soon as possible. 

4.  Power Saving Mode  

If the mouse is not used for 8 minutes, it switches to power saving mode. The 
optical sensor is switched off to minimise the power consumption. Move the 
mouse or press any button to activate the mouse.

5. Functionality 

Problems

If the mouse does not function as expected, ensure that you have carefully carried 
out the following steps:
• 

The batteries are new and have been inserted correctly

• 

The receiver is connected to the computer properly

• 

The receiver and devices are within their communication range 


(depending on local conditions, max. 1.5 m)

Fig.3

Connect button

Connect button

On/off switch

00052450bda.indd   Abs1:6-Abs1:7

00052450bda.indd   Abs1:6-Abs1:7

12.12.2007   13:17:25 Uhr

12.12.2007   13:17:25 Uhr

Содержание M650

Страница 1: ...ted brands are trademarks of the corresponding companies Errors and omissions excepted and subject to technical changes Our general terms of delivery and payment are applied Hama GmbH Co KG D 86651 Monheim Germany www hama com 00052450bda indd 2 3 00052450bda indd 2 3 12 12 2007 13 17 21 Uhr 12 12 2007 13 17 21 Uhr ...

Страница 2: ... auf der Unterseite der Maus auf ON 2 3 Anschließen des USB Empfängers a Verbinden Sie den USB Empfänger mit einem freien USB Anschluss am PC b Der USB Empfänger wird von Windows erkannt und in das Betriebssystem eingebunden c Normalerweise verbindet sich die Maus selbständig mit dem Empfänger und ist sofort einsatzbereit Sollte dies nicht der Fall sein gehen Sie vor wie unter Pkt 2 4 beschrieben ...

Страница 3: ...t zwar noch einige Zeit Sie sollten aber so bald wie möglich die Batterien austauschen 4 Energiesparmodus Wenn die Maus für 8 Minuten nicht betätigt wird wechselt sie in den Energiespar modus der optische Sensor wird ausgeschaltet um den Energieverbrauch auf ein Minimum zu reduzieren Zum Aktivieren der Maus genügt es sie zu bewegen oder eine beliebige Taste zu betätigen 5 Funktionsprobleme Sollte ...

Страница 4: ...on phase c The status LED on the receiver stops flashing after the synchronisation process has been completed successfully The mouse is now ready for use If the cursor does not move repeat steps 3a b You will also need to do this if interference originating from other wireless mice or keyboards occurs during operation 3 Battery Indicator Display The control light starts to flash when the battery v...

Страница 5: ... 2 3 Branchement du récepteur USB a Raccordez le récepteur USB à un port USB libre de votre ordinateur b Le récepteur USB est alors reconnu par Windows et intégré dans votre système d exploitation c En règle générale la souris se connecte automatiquement au récepteur est immédiatement opérationnelle Procédez comme décrit au point 2 4 si tel n est pas le cas 2 4 Synchronisation mise en service de l...

Страница 6: ...riez remplacer les piles dès que possible 4 Mode économique En cas de non utilisation pendant plus de 8 minutes la souris se met automatiquement en mode économie d énergie le détecteur optique est mis hors tension afin de réduire au maximum la consommation électrique de la souris Il suffit de la remuer ou d appuyer sur n importe quelle touche afin de la réactiver 5 Problèmes de fonctionnement Dans...

Страница 7: ...m de muis te activeren is het reeds voldoende om haar te bewegen of u drukt een willekeurig toets in 5 Disfunctioneren Indien de muis niet functioneert zoals zij zou moeten controleer dan of de onderstaande stappen correct uitgevoerd zijn de batterijen zijn nieuw en correct geplaatst polarisatie de ontvanger is correct op de computer aangesloten ontvanger en apparatuur bevinden zich binnen het zen...

Страница 8: ...TE riktlinje 99 5 EG finner du på www hama com m Radio ja telepäätelaitteita koskevan direktiivin 99 5 EY mukainen vaatimustenmukaisuusvakuutus löytyy osoitteesta www hama com q Deklaracja zgodności według dyrektywy R TTE 99 5 EG dostępna na stronie internetowej www hama com h A megfelelőségi követelmények megegyeznek az R TTE Irányelvek 99 5 EG ajánlásaival www hama com c Prohlášení o shodě podle...

Отзывы: