background image

4

Attention :

The Hama FlashPen »Piko«  must never be separated from the 
computer or from the notebook as long as there is a data transfer. 
A loss of data could not be excluded.

Please follow the pieces of advice given in this quick reference guide.
Under no circumstances, the fi rm Hama GmbH & Co KG is responsible 
for the loss of data which have been stored on storage media.

Supported operating systems:

Windows 2000/ME/XP/Vista/7 as well as Mac OS 9.x or higher.
Windows 2000/ME/XP/Vista as well as Windows 7 and Mac OS 9.x or 
higher have an integrated driver support for this FlashPen.

For Windows ME/XP and 2000:

No additional driver fi les are required. The Hama FlashPen is 
automatically detected and installed. On My Computer you can see 
now an additional drive “removable disk”.

In order to remove the FlashPen, click with the right mouse button 
the small green arrow symbol in the systray (on the bottom right next 
to the Windows clock) and afterwards => Remove or eject hardware 
or Remove hardware safely. Now click => Deactivate or Exit => OK. 
A message appears now stating that you can remove the hardware 
safely => OK or Exit. Afterwards, you can remove the Hama FlashPen.

For Windows Vista / Windows 7 

Windows Vista and Windows 7 offers a so-called ReadyBoost 
function (see www.microsoft.com for more information). This function 
enables the use of a fl ash memory (e.g. Hama FlashPen »Piko« ) as 
quick intermediate memory.

Connect your Hama FlashPen »Piko«  to a free USB 2.0 connection.
The installation is carried out automatically.
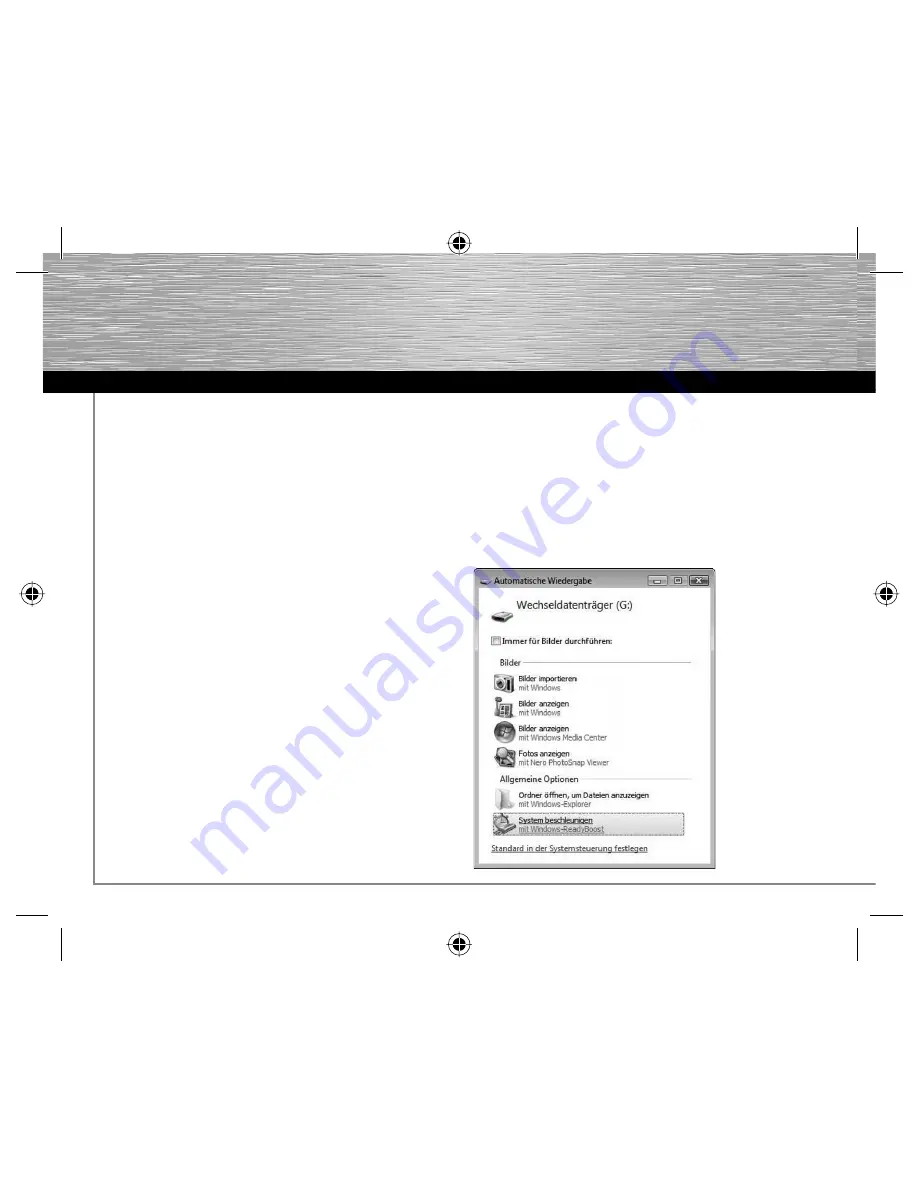
The following dialogue box appears after a successful installation.
Please select the command 

Speed up my system

.

Operating Instruction

g

00094180man_de_en_fr.indd   Abs2:4

00094180man_de_en_fr.indd   Abs2:4

15.03.10   07:43

15.03.10   07:43

Содержание 94180

Страница 1: ...nd subject to technical changes Our general terms of delivery and payment are applied Hama GmbH Co KG D 86651 Monheim Germany www hama com 00090842_00090844_00090927_30_00094113_14_00094179_80 03 10 0...

Страница 2: ...ready for Windows 7 D I G I T A L FlashPen Piko USB 2 0 _ _ _ _ _ _ _ 00094180 00094180man_de_en_fr indd Abs2 1 00094180man_de_en_fr indd Abs2 1 15 03 10 07 43 15 03 10 07 43...

Страница 3: ...Zum Entfernen des FlashPens klicken Sie mit der rechten Maustaste auf das kleine gr ne Pfeilsymbol in der Systray rechts unten neben der Windows Uhr und danach auf Hardware entfernen oder auswerfen b...

Страница 4: ...tiviert wird Wenn Sie die ReadyBoost Funktion nicht nutzen wollen w hlen Sie den Befehl Dieses Ger t nicht verwenden Ihr Hama FlashPen Piko kann nun als Massendatentr ger genutzt werden Hinweis Hama e...

Страница 5: ...disk In order to remove the FlashPen click with the right mouse button the small green arrow symbol in the systray on the bottom right next to the Windows clock and afterwards Remove or eject hardwar...

Страница 6: ...e stick Select the command Do not use this device if you do not want to use the ReadyBoost function Your Hama FlashPen Piko can now be used as mass storage medium Note Hama recommends the following po...

Страница 7: ...r le Flash Pen veuillez cliquer avec le bouton droit de la souris sur le petit symbole fl ch vert dans le coin droit le plus bas du pupitre de commande de Windows puis sur Suppression de mat riel ou j...

Страница 8: ...s lectionner l instruction Ne pas utiliser ce p riph rique vous ne voulez pas utiliser la fonction ReadyBoost Maintenant votre FlashPen Piko de Hama peut tre utilis comme support de donn es de masse R...

Отзывы: