


31
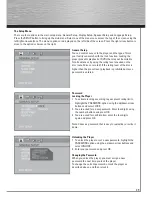
Video
Progressive Function provides high quality pictures with less fl ickering. Turn on Progressive Scan if you used the
Component Video jacks of the player to connect a TV or monitor compatible with a progressive scan signal.
Select ON and press OK to activate Progressive Scan.
Speaker Setup
You can adapt your player to other equipment and access
specifi c functions with the Speaker
Setup menu.
1. Select the Speaker Setup icon in the main menu using the
left/right arrow buttons.
2. Select an option using the up/down arrow buttons. Press
the right arrow to move to the option’s choices.
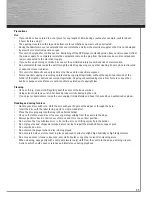
Night Mode
You can use this function to control the different sound levels via dynamic compression. It improves the quality of the
sound track at a low volume, and quiets the loudest sounds. You can choose between Quiet, Moderate or Off.
Note: This function is available only on DVD discs recorded in Dolby Digital.
Distance
Basic settings have been preset for the speakers included with your unit. However, to suit the acoustic conditions in
your listening room and to make the sound more effective, you may need to delay the signal coming from some of the
speakers. Channel delay compensates for center or surround speakers that are closer to the listening position than the
front speakers.
1. Highlight a distance option using the up/down arrow buttons.
• Front (FL/FR DISTANCE)
• Center (CT DISTANCE)
• Rear (SL/SR DISTANCE)
2. Press the right arrow button to move to the default distance.
3. Press the up/down arrow buttons to adjust the distance.
Note: The receiver speaker distance default settings are the following:
Front speakers (FL/FR): 15 ft
Center speaker (CT): 15 ft
Rear speaker (SL/SR): 10 ft
IMPORTANT!
Once Progressive Scan has been activated, an image will only be visible on a progressive scan TV
or monitor. If you choose this option and you do not have a progressive scan TV or monitor, you
may get a picture with incorrect color or no color. If you activate Progressive Scan by mistake,
follow the procedure below to reset the unit:
Press and hold the SUBWOOFER button on the front panel. The video output will be restored to
the standard setting and a picture will once again be visible on a conventional analog TV or monitor.
00055455bda2.indd Abs2:31
00055455bda2.indd Abs2:31
07.08.2007 15:07:25 Uhr
07.08.2007 15:07:25 Uhr