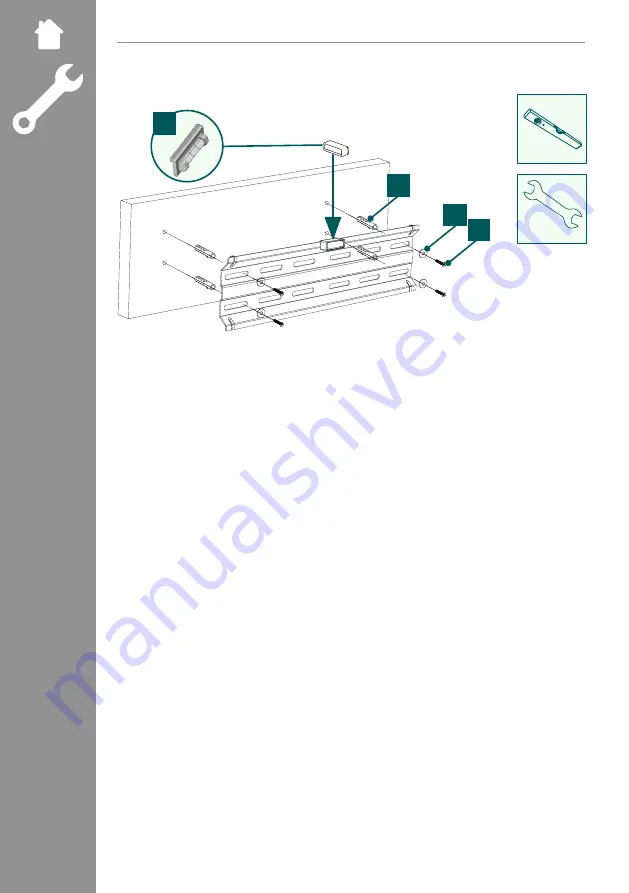
6.1.2 Attaching the wall bracket
A2
A3
A1
F1
10
•
Attach the wall bracket to the wall as shown above using the enclosed mounting material ([A2] plug, [A3] M6
washer, [A1] 6x50 mm screw and the [F1] spirit level).
Страница 1: ...00 220810 TV WALL BRACKET G Operating Instructions...
Страница 2: ...y 6 6 1 Mounting on the wall 7 6 1 1 Preparing the intended mounting surface 7 6 1 2 Attaching the wall bracket 8 6 2 Mounting on the TV set 9 6 2 1 Mounting the VESA plate on the back of the TV set 1...
Страница 3: ...e for future reference If you sell the device pass on the illustrated quick start guide and the safety instructions in printed form to the new owner 1 Explanation of warning symbols and notes Warning...
Страница 4: ...x20 x4 A3 M6 x4 D3 M8x30 x4 B1 M6 x4 D4 M8x50 x4 B2 8x10 x4 E1 M4x12 x4 B3 8x20 x4 E2 M4x20 x4 C1 M6x12 x4 F1 x1 C2 M6x20 x4 M8x50 8x5 M8x45 Note Please check the mounting kit for completeness before...
Страница 5: ...e this product installed by a qualified technician do not attempt to install it yourself Do not mount the product above locations where persons might sit or stand Once you have mounted the product and...
Страница 6: ...for later reference sale of the product moving house relocation of the bracket new TV etc Warning Be aware that the brackets are only suitable for wall mounting Before installation check that the wal...
Страница 7: ...orizontal and vertical alignment of the bracket on the wall Now mark the holes on the wall To attach the wall bracket to the wall you need a drill and a drilling attachment with a diameter of 8mm Make...
Страница 8: ...6 1 2 Attaching the wall bracket A2 A3 A1 F1 10 Attach the wall bracket to the wall as shown above using the enclosed mounting material A2 plug A3 M6 washer A1 6x50 mm screw and the F1 spirit level...
Страница 9: ...we cannot describe all possible mounting options here Please ensure that the bracket lays flat and evenly on the back of the television Use the enclosed spacer to even out any unevenness on the back o...
Страница 10: ...D3 D4 E1 E2 Curved TV back C2 D2 D4 E2 B1 B2 D3 D4 B3 M8x50 M8x45 D4 8x5 Flat TV back C1 D1 D4 E1 B1 You do not need a washer for the D screws Mount the VESA arms the back of your TV set Note the com...
Страница 11: ...et Get support and help from other people for the following assembly step Hang the TV set with the mounted VESA arms on the wall bracket as shown above Turn the screws as shown above on both supportin...
Страница 12: ...the product is loaded symmetrically and that the maximum permitted carrying capacity is not exceeded Check the strength and operational safety of the bracket and the load attached to it at regular in...
Страница 13: ...ad 35 kg Screen diagonal 81 0 165 0 cm US 32 65 Depth 2 8 cm Tilt 12 depending on the device Dimensions of the wall mounting plate 9 6 x 42 0 cm Mount Compliant with VESA standard 100x100 200x200 200x...
Страница 14: ...he product with future standards of further developed hardware Within the specified period Hama GmbH Co KG will remedy a justified warranty claim at its own discretion free of charge either by repair...