


SeTuP
7
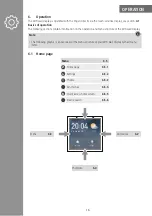
5.
Setup
The following steps are required to commission the WiFi wall display:
•
Mounting the WiFi wall display, see Chapter
.
•
The initial setup of the WiFi wall display, see Chapter
5.2 Initial setup of the WiFi wall display
.
•
The installation of the
Hama Smart Home
app, see Chapter
5.3 Installing the Hama Smart Home
•
The integration of the WiFi wall display into the app, see Chapter
.
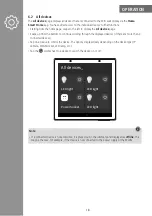
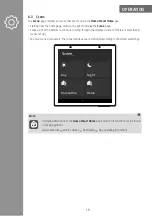
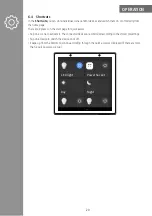
5.1 Installation
The WiFi wall display consists of two parts, the display and the bracket. The WiFi wall display is plugged
into the bracket when delivered.
First carry out the following preparatory steps:
•
Find a suitable mounting location that allows you convenient access to the WiFi wall display.
•
Switch off the relevant fuse (fuse box) for the room in which you wish to install the WiFi wall display.
•
Check that the wires are de-energised using a suitable measuring device (e.g. multimeter).
•
Remove the bracket of the WiFi wall display.
To do this, use a suitable object to carefully lever off the bracket at the groove
1
on the underside.
You will see the slotted holes required for mounting on the back of the bracket.
Input:100 V~240 V AC
50/60 Hz
Hama GmbH & Co KG
86652 Monheim
Germany
1


