background image

3

4. Product characteristics

Our WiFi outdoor camera is used to monitor the area in

which you install it. You can use the Hama Smart Home

(Solution) app to access the images of the monitored

location conveniently at any time.

The following voice commands are available for voice

assistants with a display (Amazon Echo Show, Google

Nest, etc.):

"Alexa/OK Google, show me camera (plus the name of

the camera you have defined)"

5. Installation

You can secure the camera into place using the adhesive

pads or mounting kit supplied.

Warning - installation with adhesive

Be aware that the intended mounting surface must be

free from dust and grease. Use a suitable cleaner from

a specialist retailer for this.

Be aware that the adhesive pads are intended to be

permanent. Carefully pull the adhesive pad off the

mounting surface to remove it.

Various environmental influences, such as moisture in

the air, sunlight, cold, etc., can impair the long-term

stickiness of the adhesive pads.

Possible residue on the mounting surface after removal

of the adhesive pads cannot be ruled out!

Warning - mounting kit

Do not mount the product above locations where

persons might sit or stand.

Before mounting, check that the wall you have chosen

is suitable for the weight to be mounted. Also make

sure that there are no electric, water, gas or other lines

running through the wall at the mounting site.

6. Integrating devices into the Hama Smart Home

(Solution)

Warning

Only operate the product from an approved socket that

is connected to the public power supply. The socket

must be installed close to the product and must be

easily accessible.

Disconnect the product from the power supply using

the On/Off switch – if this is not available, unplug the

power cord from the socket.

If using a multi-socket power strip, make sure that the

total power consumption of all connected devices does

not exceed the power strip's maximum throughput

rating.

If you will not be using the product for a prolonged

period, disconnect it from mains power.

Connect the camera to a properly installed socket.

The LED on the camera starts to flash quickly. If it does

not, press and hold the Reset button (4) on the camera

for around 5 seconds.

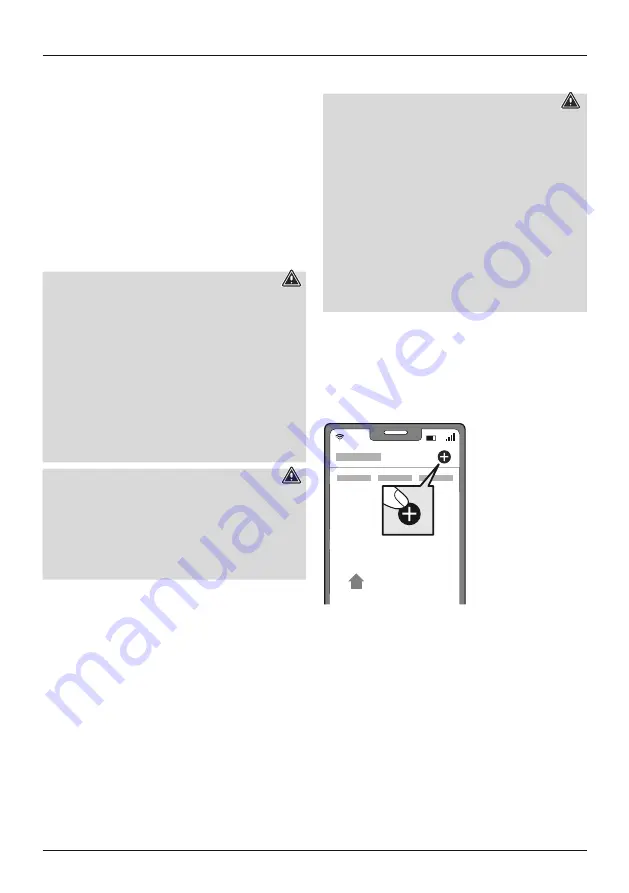
Open the app and sign in.

Press the

+

in the top right-hand corner to add a new

device.

My Home

Содержание 00176576

Страница 1: ...WiFi Outdoor Camera WiFi Outdoor Kamera D GB Operating Instructions Bedienungsanleitung 00176576 00176577...

Страница 2: ...A B 4 2 3 1 5...

Страница 3: ...hich electronic products are not permitted Do not drop the product and do not expose it to any major shocks Do not modify the product in any way Doing so voids the warranty Keep the packaging material...

Страница 4: ...ads cannot be ruled out Warning mounting kit Do not mount the product above locations where persons might sit or stand Before mounting check that the wall you have chosen is suitable for the weight to...

Страница 5: ...ickly and the app confirms that your camera is connected You can now assign it a different name if you wish Added successfully Done Click Finish to end the process You can now operate and configure th...

Страница 6: ...arties are able to speak and hear each other 3 Record a video recording of the current activities A cloud connection or the presence of a memory card is required here 4 Play back video recordings from...

Страница 7: ...pp allow various combination options and usage options for these products depending on the SmartHome products in your home Programming is always via the app see Section 7 of the App Guide and will be...

Страница 8: ...opean Directives 2012 19 EU and 2006 66 EU into the national legal systems the following applies Electrical and electronic devices as well as batteries must not be disposed of with household waste Con...

Страница 9: ...ekter Sonneneinstrahlung Benutzen Sie das Produkt nicht in Bereichen in denen elektronische Produkte nicht erlaubt sind Lassen Sie das Produkt nicht fallen und setzen Sie es keinen heftigen Ersch tter...

Страница 10: ...ntieren Sie das Produkt nicht an Orten unter denen sich Personen aufhalten k nnten Pr fen Sie vor Montage die Eignung der vorgesehenen Wand f r das anzubringende Gewicht und vergewissern Sie sich dass...

Страница 11: ...n und die App best tigt dass Ihre Kamera verbunden wurde Nun k nnen Sie ihr noch einen eigenen Namen geben Erfolgreich hinzugef gt Erledigt Mit einem Klick auf Erledigt schlie en Sie den Vorgang ab Je...

Страница 12: ...ren 3 Zeichnen Sie hier eine Videoaufnahme des aktuellen Geschehens auf Eine Cloud Anbindung oder das Vorhandensein einer Speicherkarte werden hier vorausgesetzt 4 Geben Sie vorhandene Videoaufnahmen...

Страница 13: ...en sich je nach vorhandenen SmartHome Produkten in Ihrem Zuhause viele Kombinations und Nutzungsm glichkeiten dieser Produkte Die Programmierung erfolgt immer ber die App siehe Kapitel 7 des App Guide...

Страница 14: ...dem Zeitpunkt der Umsetzung der europ ischen Richtlinien 2012 19 EU und 2006 66 EG in nationales Recht gilt folgendes Elektrische und elektronische Ger te sowie Batterien d rfen nicht mit dem Hausm ll...

Страница 15: ...sted brands are trademarks of the corresponding companies Errors and omissions excepted and subject to technical changes Our general terms of delivery and payment are applied Service Support www hama...

Отзывы: