background image

4

Click

Download driver

to download the latest driver from the Hama website. This allows you to check whether

drivers have now been developed for previously unsupported systems.

Click

Back

to return to language selection.

When you select

Install

, the InstallShield Wizard is loaded.

This can take a few seconds. Please wait until the InstallShield

Wizard starts.

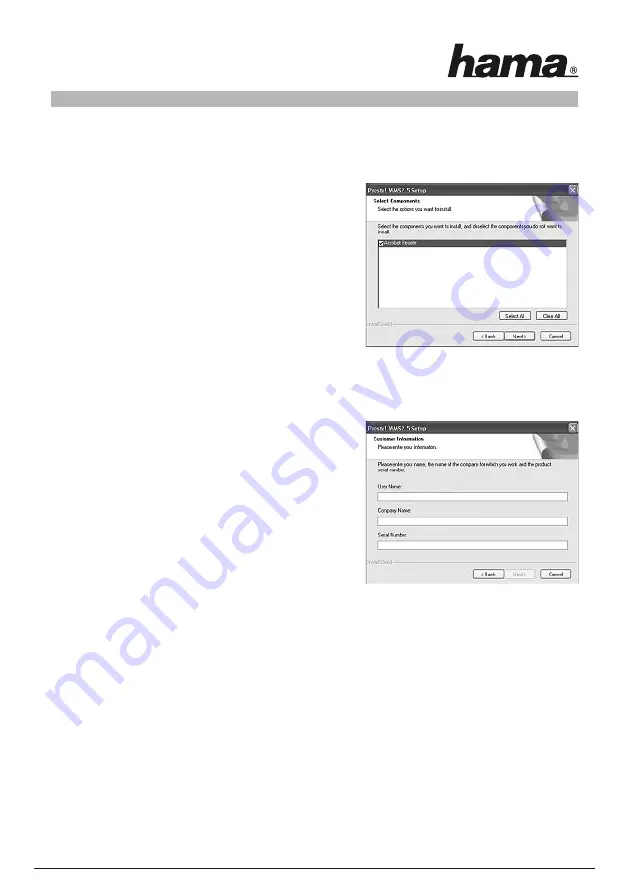
In this window you can decide if the Acrobat Reader is to be

installed as well. Remove the small hook if you do not want to

install the Acrobat Reader now. The Acrobat Reader can also be

installed afterwards

The next window shows you that the Presto! WMS software is being installed on your computer. Confirm

the dialogue with

Yes

. Read the licence terms and click

Yes

if you accept them. If you click

No

, the setup is

stopped.

In the following window you are asked to enter your

registration data for the software. Please enter your data in

the fields provided for this. Three serial numbers are

available. You will find them in the package, on the card of the

firm Newsoft.

Click

Next

if you accept the directory suggested for the

installation or select another directory first. The same procedure

is applicable when you determine the program file.

The required files are installed afterwards.

The message that the software has not passed the Windows® logo test may appear while the driver is being

installed:

This only means that the test has not been performed. The stability and function of the driver was tested

thoroughly before delivery. The qualification of the drivers by Hama means that new versions can be used far

earlier and do not have to wait for the Windows® logo test. Click

Continue Anyway

to confirm the message.

Click

Finish

and confirm the next dialogue with

OK

in order to restart the computer. After the reboot you can

install the transmitter.

3. Installation of the transmitter

In this case, the transmitter is the computer which sends the data to the adapter. Start the Presto! WMS

software by clicking the appropriate button on the desktop.

A list with network devices is being displayed. Select the

wireless

network adapter with which you want to

establish a connection to the wireless beamer adapter. Click

OK

.

Note:

If no wireless network adapter is shown in the list you have to install this one first before

you can continue with the installation.

Содержание 00062792

Страница 1: ...www hama com Hama GmbH Co KG Postfach 80 86651 Monheim Germany Tel 49 0 9091 502 0 Fax 49 0 9091 502 274 hama hama de www hama com 00062792 09 06...

Страница 2: ...Wireless Beamer Adapter 00062792...

Страница 3: ...irkung Das Ger t darf w hrend des Betriebes nicht ge ffnet oder bewegt wer den Verwenden Sie zum Betrieb des Adapters nur das mitgelieferte Netzteil Die Verwendung eines fremden Netzteils kann zur Bes...

Страница 4: ...artet wird doppelkli cken Sie im Arbeitsplatz auf das entsprechende Symbol des CD Laufwerks Nach dem Start zeigt sich folgendes Fenster W hlen Sie die gew nschte Sprache Diese Installationsroutine ist...

Страница 5: ...r falls Sie das vorgeschlagene Verzeichnis f r die Installation akzeptieren oder w hlen Sie zuerst ein anderes Verzeichnis aus Gleiches Verfahren gilt f r das Festlegen des Programmordners Im An schlu...

Страница 6: ...che auf Ihrem Monitor sehen In diesem Abschnitt werden nun alle grundlegenden Einstellungs und Steuerfunktionen erkl rt Wiedergabe Starten der Bild bertragung Achtung Bitte trennen Sie nicht die Kabe...

Страница 7: ...P 128 bit ASCII erfordert 13 Zeichen WEP 64 bit HEX erfordert 10 Zeichen WEP 128 bit HEX erfordert 26 Zeichen Die gleichen Einstellungen m ssen Sie noch f r den Wireless Beamer Adapter selber vornehme...

Страница 8: ...nkt WLAN aus Auf dieser Seite k nnen Sie die WLAN Einstel lungen wie z B SSID Verschl sselung oder Kanal ndern Um die Verschl sselung einzustellen w hlen Sie unter Authentication Mode Shared Key und k...

Страница 9: ...r um die Kon guration abzuschlie en 7 Support und Kontaktinformationen Bei defekten Produkten Bitte wenden Sie sich bei Produktreklamationen an Ihren H ndler oder an die Hama Produktberatung Internet...

Страница 10: ...pressure and impact The device may not be opened or moved during operation Only use the enclosed power supply unit for the operation of the adapter Using another power supply unit may lead to damage o...

Страница 11: ...automatically If the menu does not start automatically double click the corresponding CD ROM drive icon in My Computer The following window opens after the program starts Select the required language...

Страница 12: ...directory suggested for the installation or select another directory rst The same procedure is applicable when you determine the program le The required les are installed afterwards The message that t...

Страница 13: ...n your monitor as shown here All basic setting and control functions are explained in this section Reproduction Start of image transmission Attention Please do not separate the cable connections durin...

Страница 14: ...ASCII requires 5 characters WEP 64 bit HEX requires 10 characters WEP 128 bit ASCII requires 13 characters WEP 128 bit HEX requires 26 characters The same settings are necessary for the wireless beame...

Страница 15: ...on the left On this side you can modify the WLAN settings such as SSID Encryption or Channel Select Shared Key under Authentication Mode to adjust the encoding and click Apply In the following screen...

Страница 16: ...he new values Close the browser window in order to nish the con guration 7 Support and contact information If products are defective Please contact your dealer or Hama Product Consulting if you have a...

Страница 17: ...tre ni ouvert ni transport pendant son fonctionnement Utilisez uniquement le bloc secteur fourni pour le fonctionnement de l adaptateur L utilisation d un autre bloc secteur peut entra ner des dommage...

Страница 18: ...as o le menu ne s ouvre pas automatiquement double cliquez sur l ic ne de votre lecteur dans votre poste de travail La fen tre suivante appara t apr s le d marrage du disque S lectionnez la langue d s...

Страница 19: ...ptez le r pertoire propos pour l installation ou s lectionnez d abord un autre r pertoire Veuillez proc der de la m me fa on pour d terminer le dossier de programmes Les chiers n cessaires seront inst...

Страница 20: ...r comme montr ci dessous Dans cette section on vous expliquera toutes les fonctions de r glage et de commande essentielles Reproduction D marrage de la transmission d images Attention Veuillez ne pas...

Страница 21: ...s entr es avec OK WEP 64 bits ASCII exige 5 caract res WEP 64 bits HEX exige 10 caract res WEP 128 bits ASCII exige 13 caract res WEP 128 bits HEX exige 26 caract res Les m mes r glages sont n cessair...

Страница 22: ...er les r gales WLAN par ex le SSID le chiffrement ou le canal S lectionnez Shared Key sous Authentication Mode pour ajuster le chiffrement et cliquez sur Appliquer Apply Entrez les donn es qui sont n...

Страница 23: ...butineur pour terminer la con guration 7 Support technique et contact En cas d appareil d fectueux En cas de r clamation concernant le produit veuillez vous adresser votre revendeur ou au d partement...

Страница 24: ...cja zgodno ci wed ug dyrektywy q R TTE 99 5 EG dost pna na stronie internetowej www hama com Praca w zakresie 5 GHz dozwolona tylko w zamkni tych pomieszczeniach A megfelel s gi k vetelm nyek megegyez...

Отзывы: