

SJ8Q_1P
(630) 574-8484
Halsey Taylor
2000000695 (Rev. A - 07/22)
Page 9
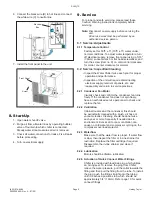
6.
Connect the black wire (B) to hot line and connect
the white wire (C) to neutral line.
B
C
7. Install the front panel to the unit.
8. Start-Up
.
1.
Open water shut-off valve.
2.
Purge air from all water lines by operating bubbler
valve of fountain to which chiller is connected.
Steady water stream assures all air is removed.
3.
Check all water connections for leaks. Fix all leaks
before proceeding.
4. Turn on electrical supply.
9. Service
For proper and safe servicing, please read these
Caution, Warning instructions completely before
servicing.
Note:
Disconnect power supply before servicing the
unit.
All service work must be performed by an
authorized service person
.
9.1 Service: Adjustments
9.1.1 Temperature Control
Factory set for 50ºF ± 5º (10ºC ± 5º) water under
normal conditions. To adjust water temperature, turn
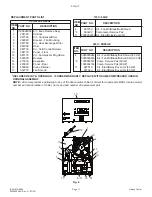
off electrical supply, remove front panel using a 5/16"
(7.9mm) socket wrench or flat head screwdriver, and
turn the screw (item no. 9) on cold control clockwise
for colder, counter clockwise for warmer.
9.2 Service: Inspection/Cleaning
•
Inspect the Water Chiller twice each year for proper
operation and performance.
•
Inspection of the unit will require disconnecting
electrical supply, removal of panels, etc. and
reassembly and return to service practices.
9.2.1 Condenser Fan Motor
Visually check and confirm the condenser fan turns
freely. If the condenser fan does not spin freely,
have an authorized service personnel to check and
replace the fan.
9.2.2 Ventilation
Cabinet louvers and the condenser fins should
be periodically cleaned with a brush, air hose or
vacuum cleaner. Cleaning should be done twice
each year or more frequently if needed due to
environment. Excess dirt or poor ventilation can
cause no cold water and compressor cycling on the
compressor overload protector.
9.2.3 Waterflow
Make sure that the water flow is proper. If water flow
is slow, then inspect the filter or in-line strainer for
restriction. Replace the filter cartridge if required.
Disassemble the in-line strainer and clean if
required.
9.2.4 Lubrication
Motors should be lifetime lubricated.
9.2.5 Actuation of Quick Connect Water Fittings
Chiller is provided with lead-free plug which utilizes
an O-ring seal. To remove the plug from Chiller,
relieve the water pressure, pull the collar towards the
fitting and then pull the fitting from the tube. To install
the plug, push the fitting straight onto the tubing
until it reaches a positive stop, which should be
approximately 3/4” (19mm). Refer page 10 for quick
connect fittings.
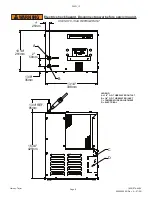
Screw
Front Panel
Electrical
Box