background image

11

IMPORTANT SAFETY INFORMATION

If you smell gas:

• Shut off gas to the 

appliance.

• 

Extinguish any open flame.

• Open lid.

• If odor continues, keep 

away from the appliance 

and immediately call your 

fire department.

Failure to follow the  

Dangers, Warnings and 

Cautions contained in this 

Owner’s Manual may result 

in serious bodily injury or 

death.

DANGER

• Never operate this 

appliance unattended.

• Never operate this 

appliance within 10' 

(3.0 m) of any structure, 

combustible material or 

other gas cylinder.

• Never operate this 

appliance within 25'  

(7.5 m) of any flammable 

liquid.

• 

If a fire should occur, keep 

away from the appliance 

and immediately call your 

fire department. Do not 

attempt to extinguish an 

oil or a grease fire with 

water.

Failure to follow these 

instructions could result 

in fire, explosion or 

burn hazard which could 

cause property damage, 

personal injury or death.

DANGER

Do not leave the appliance unattended. Keep children 

and pets away from the appliance at all times.

WARNING

This product can expose you to chemicals, 

including carbon monoxide, which are known to 

the State of California to cause cancer and birth 

defects or other reproductive harm. For more 

information go to 

www.P65Warnings.ca.gov

WARNING

CALIFORNIA PROPOSITION 65

When using a match to light the appliance, 

make sure to use the included matchlight stick 

or a long 11” match.

WARNING

FOR OUTDOOR USE ONLY

 and 

shall not be used in a building, garage, or any 

other enclosed area.

WARNING

Spiders and insects can nest inside the burner 

of the appliance and disrupt gas flow. Inspect 

the burner at least once a year.

WARNING

This appliance is not intended for commercial use.

WARNING

Check all gas supply fittings for leaks before each use. 

Do not use the appliance until all connections have 

been checked and do not leak.

WARNING

• "Read and follow all 

warnings and instructions 

before assembling and 

using the appliance."

• "Follow all warnings and 

instructions when using 

the appliance."

• "Keep this manual for 

future reference."

• "Keep the fuel supply hose 

away from any heated 

surface(s)."

WARNING

In the event of rain, snow, hail, sleet, or other 

forms of precipitation while cooking with oil 

or grease, cover the cooking vessel immediately and 

turn off the appliance burners and gas supply. Do 

not attempt to move the appliance or cooking vessel.

WARNING

Keep any electrical supply cord and the fuel

supply hose away from any heated surfaces.

WARNING

Place dust cap on cylinder valve outlet whenever the 

cylinder is not in use. Only install the type of dust 

cap on the cylinder valve outlet that is provided 

with the cylinder valve. Other types of caps or plugs 

may result in leakage of propane.

WARNING

Содержание Elite2B HZ-1003-XNA

Страница 1: ...1 ESSENTIALS GUIDE HZ 1003 XNA...

Страница 2: ...OUR ELITE2B 10 OWNER S MANUAL 18 LIGHTING INSTRUCTIONS 24 CARING FOR YOUR ELITE2B 14 PRODUCT RECORD 11 CSA ENGLISH 15 CONNECTING 20 LBS TANK GREASE CUP LEVELING 20 TROUBLESHOOTING 29 23 SEASONING YOUR...

Страница 3: ...E PROBLEMAS 55 GARANT A LIMITADA DE CINCO 5 A OS 59 56 LISTA DE PIEZAS ELITE2B 62 MANUEL DU PROPRI TAIRE 70 INSTRUCTIONS D ALLUMAGE 76 ENTRETIEN DE VOTRE ELITE2B 66 FICHE PRODUIT 63 CSA FRANCAIS 67 CO...

Страница 4: ...off When it comes to innovation and an Elite outdoor cooking experience we ve got you covered We strive to Rise Above in both who we are and what we create Our mission is to be a catalyst for reconnec...

Страница 5: ...5...

Страница 6: ...KING SURFACE Season the Elite2B s 480 in2 total cooking surface within 20 25 minutes SEASON YOUR GRIDDLE IN UNDER 30 MINUTES 4 ZONE BURNER SYSTEM FEATURES OF YOUR WIND PROOF DESIGN QUICK WARM UP TIME...

Страница 7: ...uded handles to remove the griddle top GRIDDLE PLATE LIFT OFF PROPANE FUELED WIDE RANGE TEMPERATURE 300 F to 700 F BUILT IN UTENSIL CLEAN OFF Clean utensils as you cook REAR GREASE MANAGEMENT Extra la...

Страница 8: ...8 8 8 ZONES 1 2 8 WITH 4 COOKING ZONES...

Страница 9: ...te2B Outdoor Griddle takes control to the next level by splitting each of its 2 burners into 2 zones Ignite any of the 2 front zones without igniting the back zones for custom cooler zones ready to ke...

Страница 10: ...on prescription drugs may impair the consumer s ability to properly assemble or safely operate the appliance When cooking with oil or grease have a type BC or ABC fire extinguisher readily available I...

Страница 11: ...PROPOSITION 65 When using a match to light the appliance make sure to use the included matchlight stick or a long 11 match WARNING FOR OUTDOOR USE ONLYand shall not be used in a building garage or an...

Страница 12: ...CARE Clean your HALO Elite2B Outdoor Griddle after each cook Turn off the gas supply if you notice grease dripping onto the valve or regulator Determine the cause correct it then clean and check valv...

Страница 13: ...ood Alwaysensurethatyouuse separatechopping boards utensilsforraw andcookedfoods andalwayswashyourhandsafterhandling rawfood 3 COOK FOOD THOROUGHLY Food poisoning is caused by harmful bacteria such as...

Страница 14: ...PORTANT Fillouttheproductinformationrecordbelow orto registeryourproduct visitourwebsiteatwww halo pg com Model Number Serial Number Purchase Date NOTICE Model Number and Serial Number located on the...

Страница 15: ...OSE ADJUSTABLE REGULATOR 20 LBS TANK WARNING The LP tank used with this Flat Top Griddle must meet the following requirements Use the appliance only with LP propane gas and the regulator valve assembl...

Страница 16: ...9 5 water column setting Depending on what temperature setting you have the control knob set at will determine how much lower your temperature will be when using the lower pressure setting Please see...

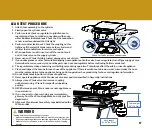
Страница 17: ...nce onto the valve hose or regulator turn off gas supply at once Determine the cause correct clean and inspect valve hose and regulator before continuing Perform a leak test 8 The regulator may make a...

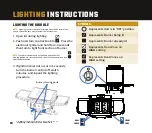
Страница 18: ...n 3 If ignition does not occur in 5 seconds turn the burner control off wait 5 minutes and repeat the lighting procedure SYMBOLS Represents Burner being lit Represents Burner already lit Represents Fr...

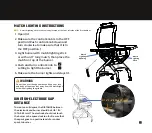
Страница 19: ...burner lights and stays lit Do not lean over the open barbecue Keep your face and body at least one foot away from the matchlight hole when lighting the griddle WARNING To create a solid spark the DIS...

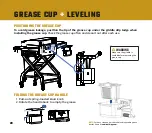
Страница 20: ...he grease cup often and clean it out after each use 1 Pull out spring loaded knurl knob 2 Rotate the handle back to empty the grease FOLDING THE GREASE CUP HANDLE WARNING Make sure the griddle is cool...

Страница 21: ...21 UTENSIL CLEAN OFF FEATURE Clean your spatula during cooking or clean up with the stationary squeegee bar conveniently located above the grease drain opening on your Elite2B Outdoor Griddle...

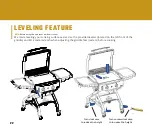
Страница 22: ...he provided leveler located on the left front of the griddle and M12 caster wrench when adjusting the griddle feet casters before cooking Turn clockwise to reduce the height Turn counterclockwise to i...

Страница 23: ...ION DO NOT USE SOAP ON THE GRIDDLE COOKING SURFACE This will destroy the griddle s seasoning Make sure to apply an even coating across the entire griddle surface and inner walls until it reaches its s...

Страница 24: ...O Elite2B Outdoor Griddle indoors the gas cylinder must be disconnected and left outside The gas cylinder should always be stored outside and in a dry well ventilated area and out of reach of children...

Страница 25: ...25 HOW TO CLEAN THE BURNERS Turn gas OFF at the control knobs and at LP cylinder not pictured 1 2 Remove the swing away warming rack and griddle plate Carefully detach and remove the burner...

Страница 26: ...e brush through burner venturi several times Donotusewirebrushes 4 Brush the entire outer burner surface to remove grime and rust 5 Clean any blocked ports with a stiff wire such as an open paper clip...

Страница 27: ...TING YOUR GRIDDLE HOW TO CONVERT YOUR GRIDDLE FROM PORTABLE TO TABLETOP 1 Remove Hose and Regulator assembly from the cylinder 2 Loosen all 4 x 1 4 20 x 15mm Knobs w Threaded Shaft from sides and back...

Страница 28: ...bles can be taken off by removing 4 x M6 x 7H shoulder screws 5 Place the Fire Chamber Assembly on the park bench or table with the help of a friend 4 Lift up the Fire Chamber Assembly from the cart w...

Страница 29: ...s hose Change electrode assembly and ignitor wire or change igniter module Replace with a new LP cylinder Faulty regulator Obstructions in burner Obstructions in gas orifice or gas hose Empty LP cylin...

Страница 30: ...30 ELITE2B PARTS LIST...

Страница 31: ...HZ 1004 37 HZ 1004 38 HZ 1003 06 HZ 1001 17 HZ 1004 32 HZ 1004 36 HZ 1004 35 HZ 1007 21 HZ 1007 22 HZ 1003 08 HZ 1001 21 HZ 1001 22 1 1 2 2 1 2 2 2 1 1 1 2 2 1 1 1 1 1 4 4 2 2 2 2 1 1 1 1 1 1 1 1 Cap...

Страница 32: ...32 ASSEMBLED DIMENSIONS...

Страница 33: ...lidate your warranty You may be requested to send in a copy of your receipt to confirm any warranty requests The original consumer purchaser will be responsible for all shipping charges for parts repl...

Страница 34: ...nd delivery of your product 8 Repairs to parts or systems resulting from unauthorized modifications made to the product 9 The removal and or reinstallation of your product Disclaimer of Implied Warran...

Страница 35: ...lifornia only if refinishing or replacement of the product is not commercially practicable the California retailer selling this product will refund the purchase price paid for the product less the amo...

Страница 36: ...ejarconseguridadelaparato Cuando cocine con aceite o grasa tenga a mano un extintor de tipo BC o ABC En caso de incendio de aceite o grasa no intente extinguirlo con agua Llame inmediatamente a los bo...

Страница 37: ...cender el aparato aseg rese de utilizar la varilla de f sforos incluida o un f sforo largo de 11 ADVERTENCIA PARA USO EXTERIOR NICAMENTE y no debe utilizarse en un edificio garaje o cualquier otra rea...

Страница 38: ...de paredes edificios veh culos u otras estructuras mientras est en uso USO Y CUIDADO Limpie su Plancha de Exteriores HALO Elite2B despu s de cada cocci n Cierre el suministro de gas si observa que la...

Страница 39: ...ya que esto hace que las bacterias da inas contaminen los alimentos cocinados Aseg rese siempre de utilizar tablas de cortar utensilios separados para los alimentos crudos y cocinados y l vese siempr...

Страница 40: ...erie Fecha de Compra AVISO El N mero de modelo y el N mero de Serie se encuentran en la parte posterior del panel frontal IMPORTANTE Llenarlainformaci nderegistrodelproductoa continuaci n opararegistr...

Страница 41: ...on los c digos locales o en su defecto con el C digo Nacional de Gas Combustible NFPA 54 ANSI Z223 1 La manipulaci n y el almacenamiento de los cilindros de gas LP deben cumplir con el C digo de Gas L...

Страница 42: ...5 Dependiendo del ajuste de temperatura que tenga el mando de control determinar cu nto m s bajas ser su temperatura cuando utilice el ajuste de presi n m s bajo Por favor vea las instrucciones sobre...

Страница 43: ...no afectar a la seguridad ni al uso del aparato 9 Limpie e inspeccione la manguera antes de cada uso del aparato Si hay evidencia de abrasi n desgaste cortes o fugas la manguera debe ser reemplazada a...

Страница 44: ...uego gire la perilla de control para encender la secci n trasera 3 Si no se produce el encendido en 5 segundos apague el control del quemador espere 5 minutos y repita el procedimiento de encendido S...

Страница 45: ...ra encender el quemador 5 Aseg rese de que el quemador se enciende y permanece encendido No se incline sobre la barbacoa abierta Mantenga la cara y el cuerpo a una distancia m nima de 30 cm del orific...

Страница 46: ...frecuencia y l mpielo despu s de cada uso 1 Perilla de resorte extra ble 2 Gire la manivela hacia atr s para vaciar la grasa PLEGANDO EL ASA DEL DEP SITO DE GRASA ADVERTENCIA Aseg rese de que la plan...

Страница 47: ...EZA DE UTENSILIOS Limpie su esp tula durante la cocci n o la limpieza con la barra estacionaria de la escobilla de goma convenientemente ubicada sobre la abertura de drenaje de grasa en su Plancha de...

Страница 48: ...situado en la parte frontal izquierda de la plancha y la llave de ruedas M12 cuando ajuste las patas ruedas de la plancha antes de cocinar Gire en el sentido de las agujas del reloj para reducir la a...

Страница 49: ...a o se queman los restos de comida Si la plancha no se ha limpiado con regularidad puede producirse un incendio por grasa que puede causar lesiones graves o da os materiales La idea simple de un trata...

Страница 50: ...el interior la bombona de gas debe desconectarse y dejarse fuera La bombona de gas debe guardarse siempre en el exterior y en un lugar seco y bien ventilado fuera del alcance de los ni os PRIMERA VEZ...

Страница 51: ...IMPIAR LOS QUEMADORES Apague el gas en las perillas de control y en el cilindro LP no se muestra Retire la rejilla de calentamiento abatible y la placa de la plancha Separe y retire con cuidado el que...

Страница 52: ...l venturi del quemador varias veces Noutilicecepillosdealambre 4 Cepille toda la superficie exterior del quemador para eliminar la suciedad y el xido 5 Limpie cualquier puerto bloqueado con un alambre...

Страница 53: ...CONVERTIR SU PLANCHA C MO CONVERTIR SU PLANCHA DE COCINA DE PORT TIL A DE MES N 1 Retire el conjunto de Manguera y Regulador del cilindro 2 Afloje las cuatro perillas de 1 4 20 x 15 mm con eje roscad...

Страница 54: ...pueden quitar quitando 4 tornillos de tope M6 x 7H 5 Levante el Conjunto de la C mara de Combusti n del carro con la ayuda de un amigo 4 Coloque el conjunto de la c mara de combusti n en el banco o la...

Страница 55: ...ie el conjunto de electrodos y el cable de encendido o cambie el m dulo de encendido Sustituya por un nuevo cilindro LP Regulador defectuoso Obstrucciones en el quemador Obstrucciones en la boquilla d...

Страница 56: ...56 LISTA DE PIEZAS ELITE2B...

Страница 57: ...HZ 1004 32 HZ 1004 36 HZ 1004 35 HZ 1007 21 HZ 1007 22 HZ 1003 08 HZ 1001 21 HZ 1001 22 1 1 2 2 1 2 2 2 1 1 1 2 2 1 1 1 1 1 4 4 2 2 2 2 1 1 1 1 1 1 1 1 Tapa Pata Pata Izquierda Larga Pierna Izquierda...

Страница 58: ...58 DIMENSIONES ENSAMBLADO...

Страница 59: ...ante de compra para validar su garant a Es posible que se le pida que env e una copia de su recibo para confirmar cualquier solicitud de garant a El consumidor comprador original ser responsable de to...

Страница 60: ...y entrega de su producto 8 Reparaciones a piezas o sistemas resultantes de modificaciones no autorizadas realizadas en el producto 9 La recogida y o reinstalaci n de su producto Renuncia a las Garant...

Страница 61: ...ompras hechas s lo en el estado de California si el reacondicionamiento o la sustituci n del producto no son comercialmente viables el minorista de California que vende este producto reembolsar el pre...

Страница 62: ...de m dicaments sur ordonnance ou en vente libre peut alt rer la capacit du consommateur assembler correctement ou utiliser l appareil en toute s curit Lorsque vous cuisinez avec de l huile ou de la g...

Страница 63: ...ITION 65 DE LA CALIFORNIE POUR UTILISATION EXTERIEURE UNIQUEMENT et ne doit pas tre utilis dans un b timent un garage ou tout autre endroit ferm AVERTISSEMENT Les araign es et les insectes peuvent se...

Страница 64: ...tructures pendant son utilisation UTILISATION ET ENTRETIEN Nettoyez votre gril d ext rieur HALO Elite2B apr s chaque cuisson Coupez l alimentation en gaz si vous remarquez que de la graisse coule sur...

Страница 65: ...contact avec des aliments crus car cela entra ne la contamination des aliments cuits par des bact ries nocives Veillez toujours utiliser des planches d couper ustensiles s par s pour les aliments crus...

Страница 66: ...ate d achat AVIS Le Num ro de Mod le et leNum ro de S rie se trouvent l arri re du panneau avant IMPORTANT Remplissezlesinformationsrelatives l enregistrementduproduitci dessous pourenregistrervotre p...

Страница 67: ...ence au National Fuel Gas Code NFPA 54 ANSI Z223 1 La manipulation et le stockage des bouteilles de GPL doivent tre conformes au Code des gaz de GPL NFPA ANSI 58 Ne modifiez pas cet appareil Toute mod...

Страница 68: ...lage de la temp rature sur lequel vous avez r gl le bouton de commande la temp rature sera plus ou moins basse lorsque vous utiliserez le r glage de la pression la plus basse Veuillez consulter les in...

Страница 69: ...on de l appareil PROC DURE DE TEST D TANCH IT Risque de tr buchement sur le tuyau et la bouteille d alimentation Veillez bienfixerla bouteilleaveclefilder tentiondur servoir Nefaitespasfonctionnerl ap...

Страница 70: ...gnez la commande du br leur attendez 5 minutes et r p tez la proc dure d allumage ALLUMAGE DU GRIL INSTRUCTIONS D ALLUMAGE REMARQUE Pour confirmer que le br leur est allum regardez travers le br leurp...

Страница 71: ...e br leur s allume et reste allum Ne vous penchez pas au dessus du barbecue ouvert Gardez votre visage et votre corps une distance d au moins un pied du trou de l allumette lorsque vous allumez la pla...

Страница 72: ...godet graisse et nettoyez le apr s chaque utilisation 1 Bouton molet coulissant ressort 2 Tournez la poign e vers l arri re pour vider la graisse PLIER LA POIGN E DU BAC GRAISSE AVERTISSEMENT Assurez...

Страница 73: ...DE NETTOYAGE DES USTENSILES Nettoyez votre spatule pendant la cuisson ou le nettoyage l aide de la barre de raclette fixe situ e au dessus de l orifice d vacuation des graisses de votre Gril d ext ri...

Страница 74: ...gauche de la plancha et la cl roulette M12 pour r gler les pieds roulettes du gril avant la cuisson Tournez dans le sens des aiguilles d une montre pour r duire la hauteur Tournez dans le sens invers...

Страница 75: ...chauffage ou la combustion des r sidus alimentaires Si le gril n a pas t r guli rement nettoy un feu de graisse peut se produire et provoquer des blessures graves ou des dommages mat riels L id e sim...

Страница 76: ...la bouteille de gaz doit tre d branch e et laiss e l ext rieur La bouteille de gaz doit toujours tre stock e l ext rieur et dans un endroit sec bien ventil et hors de port e des enfants LA PREMI RE F...

Страница 77: ...S BR LEURS Coupez le gaz au niveau des boutons de commande et de la bouteille de GPL non illustr e Retirez la grille de maintien au chaud pivotante et la plaque de cuisson D tachez et retirez le br le...

Страница 78: ...pillon troit dans le venturi du br leur N utilisezpasdebrossem tallique 4 Brossez toute la surface ext rieure du br leur pour enlever la crasse et la rouille 5 Nettoyez les orifices obstru s l aide d...

Страница 79: ...79 TRANSFORMATION DE VOTRE GRIL COMMENT CONVERTIR VOTRE GRIL PORTABLE EN GRIL DE TABLE 1 Retirez l ensemble tuyau et d tendeur de la bouteille 2 Desserrer le 4 1 4 20 x 15mm boutons avec arbre filet...

Страница 80: ...s peuvent tre retir es en retirant 4 vis paulement M6 x 7H 5 Soulevez l ensemble de la chambre de combustion du chariot avec l aide d un ami 4 Placez l ensemble de la chambre de combustion sur le banc...

Страница 81: ...de et le fil d allumage ou remplacez le module d allumage Remplacez par un nouveau cylindre LP R gulateur d fectueux Obstructions dans le br leur Obstruction de l orifice ou du tuyau de gaz Bouteille...

Страница 82: ...82 LISTE DES PI CES ELITE2B...

Страница 83: ...1003 06 HZ 1001 17 HZ 1004 32 HZ 1004 36 HZ 1004 35 HZ 1007 21 HZ 1007 22 HZ 1003 08 HZ 1001 21 HZ 1001 22 1 1 2 2 1 2 2 2 1 1 1 2 2 1 1 1 1 1 4 4 2 2 2 2 1 1 1 1 1 1 1 1 Pied capuchon Pied ext rieur...

Страница 84: ...84 DIMENSIONS DE MONTAGE...

Страница 85: ...pie de votre re u pour confirmer toute demande de garantie Le consommateur acheteur d origine sera responsable de tous les frais d exp dition des pi ces remplac es dans le cadre de cette garantie limi...

Страница 86: ...utilis es en dehors des tats Unis ou du Canada 7 Enl vement et livraison de votre produit 8 Les r parations de pi ces ou de syst mes r sultant de modifications non autoris es apport es au produit 9 Le...

Страница 87: ...en tat ou le remplacement du produit n est pas commercialement r alisable le d taillant californien qui vend ce produit remboursera le prix d achat pay pour le produit moins le montant directement att...

Страница 88: ...trademarks of Halo Products Group LLC www halo pg com Halo Products Group LLC 850 West Park Rd Elizabethtown KY 42701 Toll free 1 833 572 1688 STAY CONNECTED WITH US HALO Products Group Halo Products...

Отзывы: